Felting is considered one of the oldest technologies for creating textiles from unspun wool fibers. In recent years, this needlework technique has become very popular and has taken on an artistic form. This technique is now often used to make clothing, exclusive accessories, toys and original paintings.
This type of needlework is the process of creating a variety of products from unspun wool by interlocking and weaving its fibers using various methods using special hardened steel needles.
 This process is also called felting (or felting). This exciting activity helps develop creativity.
Reference! Not all wool is suitable for felting, but only natural fibers. The best choice in this case would be mohair and alpaca wool.
Felting allows you to create original designs on fabric, beautiful toys and various decorative elements (photo). Let's look at how to felt a wool picture with your own hands with step-by-step instructions.
 Necessary materials
For this type of needlework you will need the following materials:
- natural wool;
- felting needles with several notches at the bottom (for the dry method);
- tweezers (for laying out small parts when making paintings);
- flannel or non-woven fabric (for the base when making paintings);
- liquid soap or warm soap solution (for the wet method);
- eyes, noses and stuffing material (used in making toys).
 If you do not yet have experience in purchasing suitable material for felting, it is advisable to purchase ready-made kits for creating paintings in craft stores. Such kits may include different volumes of material, needles of different sizes and a special solution for wet felting. Each set comes with detailed instructions, which will be especially convenient for beginners.
The undeniable advantage of such sets is that after creating one product, needles and solution will remain, which can be used repeatedly later.
Types of felting
There are two methods of felting - dry and wet. When dry felting The material is compacted using special needles with notches. Such notches catch the fibers and push them into the lower layers, resulting in felting. Repeatedly sticking a needle into the same place allows you to give the product the desired shape. This method of felting is most often used to create jewelry, toys and various figurines.
 Wet method Felting involves the use of warm soapy water and straightened strands of wool. The layout of the material is soaked in a soap solution, after which it is rubbed and ironed in different directions, gradually increasing the degree of pressure. This method is in most cases used for the manufacture of flat objects: panels, paintings and decorations for fabric and clothing.
Advice! When making a pattern for a product, it should be taken into account that during wet felting the wool will shrink by about 30-40%.
 Dry felting wool to create paintings
Paintings from a similar material are created by alternately laying strands of wool in layers on a base fixed with a frame in glass. Making a painting this way using a simple master class is a great way to master dry felting. By applying material of different shades in thin strands on top of each other, a smooth transition of colors from one to another is achieved.
The production of such a picture must begin with the creation of a background, which is recommended to be laid out from top to bottom in accordance with the chosen scheme.
 The strands should be translucent, light and not particularly large. First, you should lay out the edges of the background with tweezers, and then the middle.
Important! After each stage of work, the product should be held under glass to secure it.
After this, you can begin to lay out the main motive of the painting. Schemes for beginners, as a rule, contain large motifs with a minimum number of shades. The first step is to lay out the contours of the main figure and fill them with material of the required shades.
 Then, using additional colors, you need to “draw” the contours of the remaining figures with thin, slightly twisted strands. During the process, you need to constantly check the diagram. There is no need to rush. Continuing to “paint” the picture with thin colored strands, you need to lay them out along the lines outlined in this way, if necessary, straightening with tweezers or adjusting with scissors if the strands are too long.
Moving little by little to the foreground of the picture, you need to lay out small fragments of it, twisting and rolling the material. If the main figure turns out to be too voluminous, the wool can be slightly squished.
 When the work is completed, the picture must be covered with a transparent stencil and the ends of the strands sticking out at the edges must be cut off. After this, the product can be inserted into the frame.
Wet felting
When making a picture from wool using wet felting, you will need a frame, fabric for the base, wool, tweezers, soap solution and gauze, on which the wool will be laid out in accordance with the chosen pattern.

Stages of work:
 Technique:
- You need to put gauze on a flat surface, and on it the base and the selected image.
- Then you need to lay out the base with wool, then the background, and then the selected pattern. The wool should be laid out in strips and in the shape of a cross, trying to prevent the formation of bald spots and holes. The layers should be laid out at right angles to each other (they should have the same thickness).
- After the blank for the future painting has been completely laid out, the wool must be sprinkled with water, covered with a thin cloth (nylon is best suited for this purpose) and generously lubricated with soapy water. Excess should be blotted with a napkin.
- After this, the actual process of felting begins. When using the wet method, the required volume and desired texture are imparted to the wool through friction.
Advice! Using different types of wool for felting, you can get interesting decorative effects.
 Working with artistic felt provides a lot of opportunities for making beautiful paintings on your own. The simplicity of the methods used makes felting accessible to everyone. Having successfully mastered the wool felting technique, you can create real masterpieces and collect your own art collection.
Laying out paintings with wool is a process of layer-by-layer formation of an image from a fibrous material, in which the design is gradually formed from multi-colored strands of wool, layer by layer.
Drawing with wool follows the same principles as painting with paints. The volume of depicted objects is expressed in color, taking into account light and shade. Wool acts as a carrier of color; it is a dyed material that can be given the desired shape and laid out on a plane in the form of a pattern.
Video about the basics of painting with wool without falling over:
The formation of the picture occurs from the background to the foreground, i.e. first the background, then the foreground objects. In this case, the fibers are not fastened to each other in any way (in fact, under the weight of the glass, the wool settles, becomes compacted, and the layers hold each other quite tightly, but still this is not felting). The finished painting is a multi-layered loose cake made of wool fibers, enclosed in a rigid frame on both sides - glass and backdrop (see photo below). In other words, dry, unspun wool is laid out on a fabric base under glass. The backdrop is usually fiberboard (hardboard). To draw pictures with wool, it is very convenient to use clip-frames for photographs (glass + hardboard + clip-clamps).
You can use a regular photo frame purchased at any store, and for convenience between sessions, fasten the picture with paper clips. In this case, the painting will quickly rest, become flat, and work will be comfortable in the next session.

Tools and materials needed for wool painting:
- wool of different colors (selected for a specific subject), as well as fibers of silk, viscose, acrylic, etc.;
- scissors (the sharpest);
- tweezers (regular - for eyebrows);
- clip frame or regular photo frame, preferably the backdrop is rigid;
- non-woven fabric, felt, velvet paper or any fabric with a small pile as a backing (the backing is designed to hold the wool fibers on itself, this is the basis of the picture). Read more in the article: “Which substrate to use for painting with wool.”
If you are using non-woven fabric (it is transparent) and you plan to make the background of the painting very light, it is better to glue white paper onto the dark hardboard. The finished painting is framed.
Wool is mainly used for laying out paintings, but other fibrous materials can also be used: viscose, acrylic, silk, etc. It should be remembered that wool is easier to work with compared to other fibers. This is due to its physical properties. However, with the help of, for example, silk fibers, you can increase the decorativeness of the picture - elements with the addition of silk will reflect and refract light, which will create a lively play of light and shadow.
Wool in stores is most often sold in the form of ribbon, but you can also find carded wool.
Comb tape or tops- combed wool (see photo on the left below), in which all the fibers are pulled in one direction and laid in a ribbon.
Carded wool (carding, « wool wool") is a carding product (photo below on the right), in which, unlike combed sliver, all the fibers are curved and directed in different directions. It can be presented in a fleece or in the form of a carding strip.


For the first acquaintance with the technique of laying out pictures from wool, carding is not necessary. Wool wool can be easily obtained by pinching a combed strip.
This article is for beginners in painting with wool, for all those who are interested in this technique, want to try laying out paintings from wool, or are already creating warm paintings, and at the same time need advice.
I write as it is - what comes to mind, what I consider necessary to convey to you.
- It is recommended to complete the work not in one session, but in several. Let it take several days for 1-2 hours, rather than 1 day, during which you will be very tired from unaccustomed use. Fatigue leads to sloppy work. This is often observed in the first paintings “made on the run,” when you want to complete the work here and now. After all, the eye is “blurred” from fatigue, and the proportions are taken incorrectly... As a result, the picture turns out to be sloppy, the drawing is often disproportionate (for example, a large lopsided vase and a bouquet that goes beyond the boundaries of the picture, the flowers are all unnaturally large - in relation to the container in which they stand, etc.) I understand that the creative process itself is so interesting, so exciting that you no longer pay attention to anything. But sometimes you need to take a break - to rest and evaluate your work with a sober, clear eye.
- Glass needs to be applied to the painting very often. This way you can promptly detect flaws in your work and quickly correct them. After all, the end result is a picture under glass, therefore, when working with wool, you need to focus on the image that you see under the glass.Glass serves as a kind of indicator. By attaching it to the layers that have already been laid out, you will see how well these layers of wool lie (you can see, for example, that the layer is not dense enough and does not cover the working surface well) or you can see how small details look under glass (usually with glass and without him everything looks different). The wool is voluminous, when you press it with glass, the details of the picture “flatten” and thereby increase in size. It often happens that you put a thin stem, but when you apply the glass, you realize that it turned out to be too big for this flower and you have to make it smaller. And most importantly, glass “removes” the visible imaginary volume of the depicted objects (the volume of the fur itself), which is so well captured by the camera and the human eye too. And the true volume that you yourself express becomes visible color(as in drawing with paints).
- Each object in the picture has shadows, or highlights, or light and dark spots/sides of the object, at least they must be there, otherwise the object will not look three-dimensional. When laying out a picture, try to shade parts of the objects with the appropriate color of wool for the occasion, create highlights on the vases (it’s glass!), and always try to enliven the picture by using the play of light and shadow. Read literature and watch videos on drawing and painting.
- Paintings made from wool are quite easy to correct. You can rewind the process as you work with wool and layer it; you just need to remove part of the layer or remove those details that you didn’t get. You will lose a little time, but gain invaluable experience. Don’t be afraid to dare - you always have a chance to change everything. Just don’t overdo it with “alterations”, otherwise the picture will lose its freshness and lightness and become “tormented”.
- If the painting has been put aside to be completed tomorrow, or simply gone somewhere, you need to cover it with glass (under the weight of the glass it will rest and settle, which will make further work with the painting more comfortable).
- For your first works, choose the simplest and most understandable plots for you, and gradually complicate them; or find a master in your city who can convey to you the nuances of the technique of laying out paintings from wool. Now there is a great opportunity to learn how to draw with wool online - using ready-made lessons - video master classes. And even consult on Skype and social networks... Progress does not stand still). Choose a good master, learn, experiment, create a lot of work, sooner or later quantity always turns into quality.
Do you want to learn how to draw with wool using my lessons? Find out more about my wool painting course on this page
Sincerely,
Alexandra
Copying and distribution of photographs and text is possible only with the indication of the author and an active link to the original article.
Do you like to draw? Then it’s time to try a new direction for creativity - dry felting from wool. Having mastered this technique, you will be able to make real masterpieces and create your own art collection. Wool painting according to a simple master class for beginners - a good way to learn.
Step-by-step master class: painting from wool
Before you begin, prepare the following materials:
- Frame with glass and clips
- Wool of different colors
- Base fabric - non-woven or flannel
- Tweezers
First you need to disassemble the frame, that is, separate the glass from it and attach the selected backing fabric to a wooden base. This fabric is needed to ensure that the wool holds well.

Now you need to take the undyed wool and spread it in an even layer on top of the frame.

At this stage, the formation of the base layer occurs, so carefully pull out the threads with tweezers to get even strands. You can also do this with your hands, holding a piece of wool in one and pulling out the strands with the other.

Photo of the pulling technique
The pinching technique should be used to form the background of a wool painting for beginners. This technique is quite simple: bend a piece of wool and pull out the hairs from it and lay them out on the work surface.

Photo of pinching technique
For the background of the painting, use blue and light blue wool, combining plucking techniques.

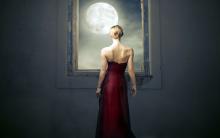
Now you need to make a light haze on a blue background, for this use gray or beige wool. Lay out thin strands. We will have a winter picture, so we used the pulling method to obtain strands of white wool for the snowdrifts and place them on the base.

White wool is suitable for decorating the moon and light haze around it. Unlike snowdrifts, the strands for the moon should be smaller. You can add a little yellow around the moon. To do this, use wool of a suitable color, but trim the hairs after pulling them to make the effect more realistic.

With white wool you can draw trees that are visible in the distance. Gently adjust the threads with tweezers to bring the picture closer to the natural image. If you find it difficult to create on the go, then first make sketches on paper and even mark the shades so that they can be easily selected from the available wool.

Brown threads will be useful to you to make a hut that is barely visible because of the snowdrifts. If you want to plant a tree made of wool, then mix several shades of threads, trim them a little, and then lay out the branches.

The top of the spruce can be covered with snow using white wool. You can think through the plot deeply, then the glare from the moon will fall on the path, and in addition to the spruce tree in your picture, trees will grow from wool.

Wool painting is another fascinating and very creative form of fine art. It is becoming increasingly popular, and now master classes on handmade paintings are appearing on the Internet, creative schools are opening, and handicraft clubs are introducing this type of creativity into their program. Let's keep up with fashion trends and try to get involved in creating paintings using colored wool.
Wool painting "Winter evening"
This MK is designed for beginners, for everyone who wants to get acquainted with the technique of felting pictures, so anyone who has a sufficient amount of perseverance and patience can cope with the work.
To create this picture we will need:
- combed wool tape, colors: white, blue, dark blue, light blue, turquoise, dark brown, brown, yellow, orange, red;
- non-woven fabric 18*24 cm for backing;
- scissors;
- tweezers;
- picture frame;
- glass.
We fix each stage, leaving the work with glass. However, this only applies to “dry” techniques: wet felting does not require such fastening.
1. Pulling strands of wool from the tape, we cover the surface of the substrate with them. We lay them in different directions, the ends of the threads should extend 1-2 cm beyond the non-woven fabric. After attaching the glass, we cut off the excess.

2. By pinching the wool, we form cotton wool for work. We create the background in layers, laying from dark to light shades. We control the quality of laying the material, also applying glass.

3. We create snowdrifts using white strands laid parallel to the horizon. This technique can often be seen when looking at landscapes made of wool.

4. Pull out strands from the dark blue ribbon and twist them a little. This way we draw silhouettes of trees.

5. Add trees made of white wool.

6. We collect fluffy wool mass and, giving the desired shape, thus making the crown of a tree.


7. Use a thin ring of wool to mark the outline of the moon. We fill it with wool fluff, cut as finely as possible. Wool paintings for beginners often use this technique.
8. From dark brown and brown wool, we cut and lay wool for the house. Note that the part on the right is darker than the left.

9. We “make” the roof for the house from dense white strands, carefully using scissors. Here you need to take into account the direction of the fibers.

10. We cover the lower part of the house with snowdrifts, invariably made of white wool.

11. We continue felting. We cut out the windows, add the finest strands of turquoise and blue to the snow. A little of it should end up on the roof.

12. Add light pouring from the windows using yellow, orange and red strands. They should slightly overlap the house, which is why the windows will need to be clarified: cut the fluff again and place it with tweezers.

13. Use translucent white strands to mute the bright colors. We see the result in the photo. Let's add picturesqueness with the help of turquoise fibers placed on the trees and along the horizon.

The picture is ready! All that remains is to cover it with clean glass.

1. Try to touch the glass to the painting as often as possible. The final result of the work will be located under glass, so it will serve as an indicator of the correctness of the layers, their density, and the size of the parts.
2. Warm paintings are easy to fix. The work is done in layers, so the wrong layer can simply be carefully removed. However, you shouldn’t get too carried away with this - the picture will lose its freshness.
3. If you are putting off work to finish later, cover it with glass. The work will become much more comfortable when the painting rests under pressure.
Ideas for creativity
The paintings of the famous craftswoman Nina Mazyreva attract people with the skill with which they are made.


Flowers are also very popular among fans of this type of creativity:


It is impossible not to note the landscapes: autumn, winter, summer and spring in all their manifestations are reflected on the canvases.


Video selection


 Who founded the group Umaturman")

Formation of universal educational actions in speech therapy classes at educational institutions in the context of the introduction of federal state educational standards
A collection of games and exercises for the development of coherent speech in children of middle preschool age “We play together - we develop speech Techniques for developing coherent speech
Provisions of the job description of the chief engineer of the project What does a hydraulic engineer do?
Chief Project Engineer (GPI) Responsibilities of the chief engineer in the GOST design organization
Conventional graphic symbols