I found a couple of old fans in my hardware and decided to take them apart to see how they work. In addition, it has never been possible to completely disassemble such fans before. All the time I limited myself to the usual peeling off the sticker, removing the plug and adding a couple of drops of oil to the bearing. Both of these fans are from two different power supplies, one 120 mm, the second 80 mm. But they also attach exactly the same ones to the case of the system unit, to pump cold air into it or to pump out hot air. So, using these examples, you can carry out preventive maintenance on your fans.


I thought about making a review of both fans, since the small fan is about 15 years old, but later it turned out that their design is almost the same. The only noticeable differences are in the size and shape of the housing, impeller and motor board. Therefore, I will describe the disassembly process on a large fan (120mm).
First, peel off the sticker under which the rubber stopper is hidden.


Use a screwdriver or something sharp to pry and remove the plug.

Under the plug you can see the metal axis of the impeller, on which there is a split, white, plastic lock washer. If it is hard to see due to old grease, then wipe it with a cotton swab.

We insert a narrow screwdriver into the cut of the locking ring and turn it 90 degrees so that the ring moves apart. Then pry up the ring with a screwdriver and remove it from the impeller axis. During this process, the puck can easily shoot and roll away somewhere, usually into the most inaccessible place, under a table, sofa, baseboard, etc.


After removing the retaining ring, remove the rubber ring from the axle.


Now, without much effort, you can separate the impeller from the frame, while it will be lightly held by magnets that are built into the impeller body.


Remove another rubber ring from the base of the impeller axis.


At this point we can say the disassembly is complete. We clean everything from dust and old grease.


Actually, the frame itself with the engine.


We also thoroughly clean the brass engine liner from dirt and old grease. If you wish, you can remove the board with the motor windings, although this is not necessary for cleaning and lubrication. In my case, it was easily removed from both fans, but I found traces of glue under the board. So you may not be able to remove it so easily.


We assemble everything in reverse order. Rubber rings on the bottom and top.


It is convenient to press the retaining ring with tweezers from both sides at once.

If your fan is very worn (noises, knocks, rattles during operation), then it is better to immediately replace such a fan with a new one. Otherwise, lubricate the impeller axle with thick lubricant (grease, etc.) before installing it on the engine. This fan is relatively new to me, so I assembled it, and only then lubricated it with motor oil because it is liquid and will always fill all the cracks.

We apply oil with a needle to the rings and the impeller axis; a syringe is indispensable in this regard. In this case, the impeller can be rotated periodically by hand, then it will be easier for the oil to penetrate inside. You shouldn’t pour a lot of oil (3-5 drops are enough) since everything extra will always find a hole and will subsequently collect dust and become overgrown with moss or fly off the blades throughout the entire system unit. Here, of course, everything depends on the size of the fan; a large one needs more lubrication, while a small one needs less.

We plug the cork. If this sticker area is accidentally filled with oil, you need to wipe it with solvent or white spirit, since this sticker will no longer stick to oil. The sticker itself can be replaced with tape if the old one has become unusable.


In principle, everything is about prevention. We connect, check, then, depending on the test results, install it in the computer case or power supply. Or we throw it away and go to the store for a new fan, if during disassembly we completely destroyed our old fan. Fan designs can be different, both on plain bearings, as in my case, and on rolling bearings (ball bearing), but I think the general principle of disassembly is similar.
Afterword
I recently came across this Gembird fan with a diameter of 120mm. It attracted my attention with the inscription BALL on the protective sticker, which roughly translates as ball, ball, ball. After disassembly, it turned out that this fan was assembled on a ball bearing. But disassembling it is practically no different from disassembling a cheap fan, which I discussed a little higher in this topic.


Even the bearing itself in this fan can be easily disassembled with a pin. You just need to carefully remove the retaining ring using a needle, then you can remove the side protective wall of the bearing (boot). After which you can safely carry out preventive maintenance of the separator and the bearing as a whole, clean, wash, change the lubricant. In this case, the bearing is almost perfect, there is a lot of lubricant and it is light. If your bearing is dry and dirty, and there is also wear (the races are hanging out as if the balls have become smaller), then it is better to replace such a bearing with a new one. Although it is easier and maybe cheaper to buy a new fan.


from 120 rub.
RUB
Each of us may encounter such a problem as the absence of a familiar buzzing sound when turning on the PC. At the same time, the system will boot well (at least without failures), everything seems to be fine, but there is no such sound as we are used to.
If such troubles have not passed you by, then your computer fan is not working and you definitely need to do something about it!
Operating the device without a cooler is prohibited, since without cooling you may face serious troubles.
Most electronics are sensitive to overheating, and if your PC's rear fan isn't working, subsequent repairs can be more expensive. What to do in such a situation? We'll talk about this today.
Why doesn't the cooler work? There are not many reasons why a fan on a computer may not work. This PC element is one of the simplest, but at the same time the most important in the entire system, because it is responsible for cooling sensitive electronic parts.

Here are a few of the most common problems, which are most often the answer to the question: why does the cooler not work?
So, we have found out the main reasons why a fan may fail. Next, we’ll talk about how such malfunctions are eliminated.
The computer fan does not work: how to deal with the problem?
If your fan has failed, you should never use your computer. But what to do? In general, self-repair is not recommended, since a device that is still working can be broken, which can lead to a variety of consequences.

Experts from Expert will help you solve any problems with the cooler, regardless of your PC model.
- Option one: no replacement. The fan may be in good working order, but it may also develop lubricant, which can significantly deteriorate the quality of its operation, even to the point of failure. In such cases, the fan is dismantled, completely disassembled, new lubricant is applied, the connection is re-installed and the operation is tested.
- Option two: replacing the part. Repairing fans is usually impossible. Yes, and inappropriate. The cost of components is cheap, but there can be a lot of work. As part of this work, we completely dismantle the old cooler, install a new one (you can buy it yourself, or the technician will bring it with you), connect and check the functionality of the replaced part.
The computer cooling system must be carefully monitored, otherwise you may end up with serious problems. Overheating can cause the computer to freeze, glitch, and not only the video card, motherboard chips, but also the central processor can fail.
Yes, some processors have temperature sensors and turn off the computer's power if it overheats. But, as practice shows, this does not always work 100%. A new processor costs at least $100, and a good video card is no less expensive either.
All modern computers are equipped with forced air cooling, i.e. in most cases, fans (coolers). Although there are still rare models of modern heavy-duty computers that are equipped with water cooling.
So, let's look at how to restore the fan's functionality?
First, you need to determine which fan is making noise, because there may be several of them in the system unit. There is one simple way to do this - take and slow down the fans one by one, lightly pressing on it with your hand or a napkin. If the noise disappears, it means it.
It is known that when a fan operates, gradual wear of its bearings occurs, dust accumulates on the impeller, hair, lint, etc. become entangled. After some time, it begins to make unpleasant, extraneous sounds, its rotation speed decreases, or it may even stop completely. Fans with plain bearings fail faster. Fans with rolling bearings are more durable, but also more expensive.
To avoid problems, you need to periodically, at least once every six months, do preventative cleaning and inspection of your computer. This is especially necessary if there are animals in the room (cats, dogs, etc.). Their hair and fluff clog the fans and often stop, causing the computer to overheat.
To restore the fan’s operation, it must first be cleaned, vacuumed, and removed dust, lint and other debris. Sometimes even such a basic procedure helps and it starts to work. But, since you have already reached it, it will be very advisable to lubricate it (the bearings).
If the fan still does not rotate when the computer is turned on, then you need to check the electrical part: wires, windings. When a debris fan jams, increased current flows through it, sometimes causing the coils to burn out. If the cooler coil does not ring, then you will have to buy a new fan.
On sale, in computer stores or departments, there is usually a large selection of fans, and I want to say that the durability of the fan also depends on the manufacturer. It happens that the cheapest fans have poor quality plastic and the impeller simply crumbles over time... Therefore, check which fans are of more or less high quality.
And one more important point - connectors. Before going to the store, not only the size of the fan is important, but you also need to pay attention to the connector, what type it is, and choose the same one. And also see if there is a spare connector in the power supply of your PC - flat, 4 pins. As a last resort, if there is no fan in the store with a native connector - with 4 pins. Or, you can resolder the connector from the old fan. And by the way, if you throw away the old fan, bite off the connector, it will come in handy.
If the fan bearings have not yet worn out much (it has not worked that long), and so that it does not make noise, it must be cleaned and lubricated, i.e. do prevention.
You need to remove the impeller: on the back side of the fan, remove the round sticker with the name of the manufacturer, and under it you will see a small recess and the end of the impeller axis. Using a thin screwdriver or an awl and tweezers, remove the fixing washer, in the form of a horseshoe, and remove the impeller from the axle. Now you need to remove the frozen old grease from the fan axle and bearings, and more thoroughly, if necessary, clean the impeller from dust and dirt.
The impeller blades can be washed under running warm water and soap, and then dried, or wiped with alcohol or vodka. Stator - thoroughly wipe with a cloth, preferably dry, because gasoline or alcohol can dissolve and damage the winding insulation. Wash the impeller axle and bearings with gasoline or alcohol.
Now you need to put everything back together in reverse order and lubricate it thoroughly. Lubricate the axle with a thin layer of liquid machine oil (car engine oil), or oil for sewing machines (or silicone grease, if anyone has it...) and insert the impeller into the fan housing, the bearings also need to be lubricated with oil, but not too much so that the lubrication does not spread. After complete assembly and lubrication of the fan, it is necessary to close access to the bearings, making sure that no dust gets in! If the glue on the original sticker has already dried up and does not hold well, cover it with 2 layers of tape; if there is no tape, remove the sticker from shampoo or something else, usually there is good glue on them - cut it out and stick it on.
That's it, the fan is ready for operation for at least another six months, and at most up to 2 years. Now put it back into the computer and check it. As for fans with rolling bearings, their restoration is not much different from what was described above. The only difference is that you need to use a thick lubricant for bearings, for example CIATIM, Litol - 24, or replace them with new ones.
By the way, if the fan is in a convenient place that allows you to remove the sticker, then for lubrication you don’t have to remove it, but simply remove the sticker, turn the system unit case so that the fan is horizontal and drop 1 drop of machine oil onto the axis in the center. This is quite enough. Then rotate the impeller a little so that the lubricant penetrates deeper.
It happens that the processor cooler is very dirty and needs to be removed to clean it. This is not difficult to do, there is a special latch. If you had to do this, then the cooler must be repacked with thermal paste (white, or preferably containing silver, silver in color). You need to put the cooler back carefully, without unnecessary effort, so as not to break anything.
And a few lines about lubricants. In sliding bearings, only liquid lubricant is used as a lubricant: silicone oil or motor vehicle oil. The viscosity of the oil is selected depending on the wear of the plain bearings. If the wear is slight and the fan just beeps (the lubricant has dried out), then we use 10-15W oil, medium viscosity, or silicone. If the fan makes a loud noise, these are signs of high production and we use 20-25W oil with a high viscosity level.
I also want to say that the cause of increased computer noise can be not only fans, but also poorly secured parts, blocks or modules: hard drive, motherboard, system unit cover, etc. In such cases, you just need to tighten the fastening screws and the problem is solved.
And in conclusion, I want to say - make it a habit - in the spring, before the onset of heat, to do preventive maintenance of the entire computer, and it is better to do this a couple of times a year. Then, you won’t have to restore anything, but simply change the fans as they wear out... About once every 5 years...
Power supply fans periodically fail or start running slower than before, affecting the overall performance of the PC. Repairing a fan costs money, and going to specialists takes time. There is a way out of this situation. You can repair the fan yourself without using a screwdriver.
Materials
To repair a PC fan you will need:
- a tube of oil for sewing machines;
- stationery knife.
Step 1. Understand the essence of the breakdown
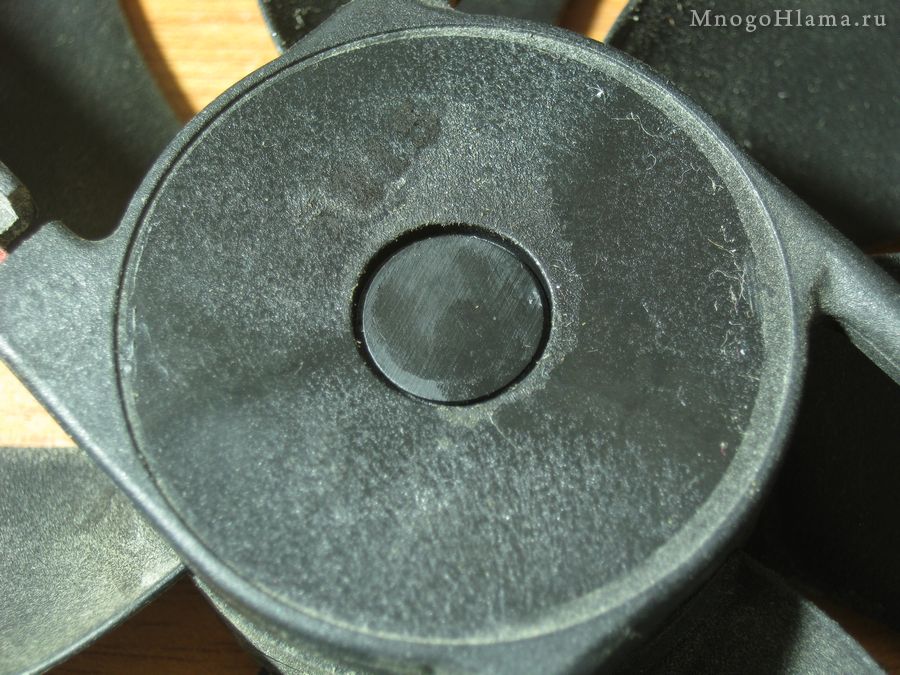
In the photo of the fan you can see a standard fan bearing bushing. When rotating, its shaft slides thanks to a very thin layer of lubricant. It, in turn, is held in place by a rubber bushing, which is located under the sticker. A number of fans do not have such a bushing at all, and the sticker is simply glued on top of a layer of grease. Problems with fan operation begin when the lubricant layer dries out partially or completely.

The traditional repair method involves disassembling the power supply and removing the fan itself. After this, the sticker and bushing are removed, a new layer of lubricant is applied, and then everything is put in place in reverse order.
The difficulty lies in the fact that all the insides of the power supply are connected to each other by wires and the work, despite the simplicity of the description, will be time-consuming.

Step 2. Check if the life hack will work
There is an easier way to apply fan lubricant, but it will not work for all power supplies.
Look at the back panel of yours and if you have four holes in the very center of the fan mounting area, as shown in the photo, then you will succeed. If not, you will have to go the hard way.

Step 3: Apply Lubricant
To apply the lubricant, you will need to take a tube and sewing machine oil. No need to use motor oil. Its layer will be too thick for the power supply fan.

To apply the oil you will need a tube with a needle or a thin pastry syringe. You will have to cut the tip of the tube at a large angle so that it resembles the tip of a regular needle.

Insert the needle into the center hole of the fan mounting area, piercing the sticker and rubber grommet. If the latter is missing, then quickly pull the needle back, as the oil will quickly spread over the surface. If there is, then squeeze out some oil and also remove the needle. Immediately after this, turn on the power so that the fan evenly distributes the lubricant over the surface and starts working again as before.
Every owner of a modern computer sooner or later faces the problem of poor performance of the PC cooling system. By cooling system I mean the processor cooler and fans in the system unit of a computer or laptop.
What are the symptoms of poor PC cooling system performance?
- Insufficient CPU cooling - the computer overheats, which in many cases leads to the PC turning off under load.
- The cooler and fans constantly rotate at maximum speed, most often this happens on laptops, and if the laptop is also worn, then the whole process is accompanied by a decent hum.
- The cooler and fan knock, rub, or catch on the blades when the computer starts. Most often, friction goes away after light tapping or a change in tilt (for example, when the system unit is slightly tilted).
Reasons for poor cooling of a computer and laptop
- Severely worn cooler or fan;
- The processor radiator and cooler are clogged with dust and other debris;
- Dried oil in the cooler and fans;
- The oil was absorbed into the dust that was not cleaned in time, therefore, as in the previous point, the cooler and fan operate dry.
At the first signs of a malfunction in the cooling system, an immediate inspection of the PC is required, since a constantly maintained high temperature has a detrimental effect not only on the processor itself, but also on the surrounding components of the computer such as the video card, RAM, and primarily the motherboard.
We have sorted out the manifestations and causes, and we will begin the repairs...
Computer fan and cooler repair
The first and main reason for incorrect operation of the cooler and fan, such as friction of the blades, rustling and slight hum, is dry grease or its absorption into dust that has not been cleaned in time. Without lubrication, fan parts quickly wear out and malfunction, but if the cause is eliminated in a timely manner and at the beginning of its manifestation, then the operation of the cooler can be extended for a long time. Of course, if the method does not help in case of severe wear of parts, then the cooler or fan will have to be replaced.

WITH bottom side fan, in the center there is hole which provides shaft access. This hole is usually closed rubber or plastic plug, and the top is sealed sticker. Sometimes there is no plug, and the hole is sealed only with a sticker, and even less often it happens that there is no hole itself, this sometimes occurs on coolers for processors and video cards.
The sticker must be removed and the plug removed (if there is one) by picking it up with a sharp object (knife, awl). If you come across a cooler that simply does not have this hole, then you will have to drill it with a screwdriver. The hole diameter should be no more than 6 mm. It is highly not recommended to poke a hole with a sharp object (instead of a drill), since the inner edges of the new hole will curl inward and can lock the shaft, and besides, this will increase the likelihood of “sawdust” getting inside the cooler.
After gaining access to the cooler shaft, you need to apply a few drops of machine oil there. This can be done with a syringe or any thin object (match, needle, awl). Reinstall the plug and apply the sticker.
If you have a cooler with a RUBBER plug, or without a plug at all (only a sticker), then you can not remove them, but lubricate the cooler shaft with a syringe, piercing the sticker and rubber plug with a needle and injecting oil.
In some fan and cooler models, you will have to remove a small retaining ring on the fan shaft, and then drop in oil or add a little grease.
In some cases, you can use other thicker automotive and machine lubricants instead of oil, the main thing is that the lubricant is for high-temperature use. A minimum amount of lubricant should be used - this is still not a car starter.
After such a “repair”, the cooler will still work from one month to a couple of years - it all depends on its quality, the quality of the oil, and the degree of contamination.
Cleaning your computer from dust
Firstly, dusting a PC will sharply raise the temperature of all parts (video card, processor, hard drive, power supply), the likelihood of them overheating and subsequent combustion increases.
Secondly, mechanical dust, as strange as it may sound, is very dangerous for the human body, especially for children.
Third, a cleaned computer in 95% of cases makes much less noise than a dusty one.
Fourth, the ingress of dust into computer parts greatly increases the rate of their wear.
Fifthly, excessive dust in the power supply can lead to magnetization of dust, subsequent overheating of parts of the power supply, consequently their melting, short circuit of the board, burnout of parts of the motherboard, UPS, surge protector and much more.
At sixth, magnetized dust contributes to the release of voltage onto the computer case, which can cause electric shock if it comes into contact with the system unit. I think this is enough to make a decision!
Cleaning the case and critical parts of your computer
Let's get started, I guess! Disconnect all the wires from the system unit, take it out from under the table (from the table) or where it is hidden, put the front part towards you (the part where the disk drive opens) and... go get a screwdriver. Have you already taken it? Great, the first thing you need to do is remove the left side cover (the left one when you are facing the front of the system unit). It is usually secured with two bolts on the back of the system unit. Most likely, after unscrewing the bolts, you will need some force - to move the cover back, move it down, or something else. They simply make protrusions on the covers that fit into the grooves of the system unit, and the cover must be pulled out of these grooves. You shouldn’t just drag it towards yourself, listening to the crunch of the fasteners.
After you have removed the lid, something like this “wonderful” picture will open before your eyes. Except for differences in parts and amount of dust.

Pay special attention to small black, gray, blue and other cylinders, barrels, squares, rectangles and connectors with protruding iron pins - under no circumstances should all of this be bent, broken, moved, shaken, etc. If you do this, then cleaning your PC will result in you replacing the motherboard or something else expensive.
In addition to accuracy, the correct selection of tools for cleaning PC from dust. For example, use a vacuum cleaner; it should have a short flexible handle (for access to all corners of the system unit) with two nozzles - a narrow hard one (plastic) and a narrow soft one (brush). It doesn't hurt to have a couple of different unnecessary toothbrushes - one hard, one soft. Stock up on dry wipes, cotton pads, and in some cases you will need something like nail polish remover (when removing heavily dried pieces of thermal paste). You may be surprised, but with the help of these simple tools you can easily clean your PC of dust almost perfectly.


How and where to properly store oysters
The biscuit settles after baking
How to make marmalade with your own hands: apple classics
What a sign: a bird flew into the window (a tit flew in)
Apricot jam in syrup for the winter