
In this drawing lesson, I prepared the material so that the key principles of drawing a human head were visible. To learn how to draw a portrait, you need to understand the shape of the head, and this is possible through simplification and generalization of unnecessary details. For this purpose, I used a schematic representation of a head called “chipping,” an academic drawing of a skull, a step-by-step drawing of a human head, and additional schematic drawings to help understand the features of the anatomical structure.
1. Three-dimensional form. Simplification and generalization.
At the initial stage of learning to draw, people most often see the contours of an object instead of its volume. This is exactly how beginners draw a portrait: they draw the contours of the eyes, nose... But a person’s head, eyes, nose, lips - they all have volume, they are not just contours. In addition, they have a rather complex shape. Therefore, at the beginning of training, you need to be able to generalize the secondary and realize the volume of each form.
First, let's try to draw a person's face with a protruding nose and forehead, presented in the form of rectangular geometric shapes.

2. The skull is the basis of the head shape.
There is one important lesson to learn next. All the main curves and contours of the face are formed from the bulges and bends of the skull. After all, it is the skull that is the basis on which the shape of the head in a portrait is built. Try to trace this relationship by comparing the shape of the skull with the pattern of the head. This is a very important point in learning.
Since the skull has a complex shape, it will not be easy to immediately understand this relationship. Therefore, first we will draw a skull in general.
The skull consists of two main sections: the brain and the face.

In addition, the shape of the skull can be roughly represented as a cube. The skull has a frontal side, two lateral sides, an occipital side and the so-called cranial vault or roof.

After the conventional, generalized drawings, I give as an example an academic academic drawing of a skull. With many details, you can see the frontal, occipital, lateral sides and arch. You can also see how the details are grouped into two main sections - the brain and the face.

It should also be noted that the widest part of the skull is located closer to the back of the head. It can be clearly seen in the figure below.

For those learning to draw a portrait, the following anatomical names for the various parts of the skull may be useful:

- brow ridges;
- frontal bone;
- parietal bone;
- occipital bone;
- temporal bone;
- zygomatic process;
- cheekbone;
- maxillary bone;
- mandibular bone;
- nasal bone;
- eye socket or eye socket.
3. “Orubovka” is the key to understanding the shape of the human head.
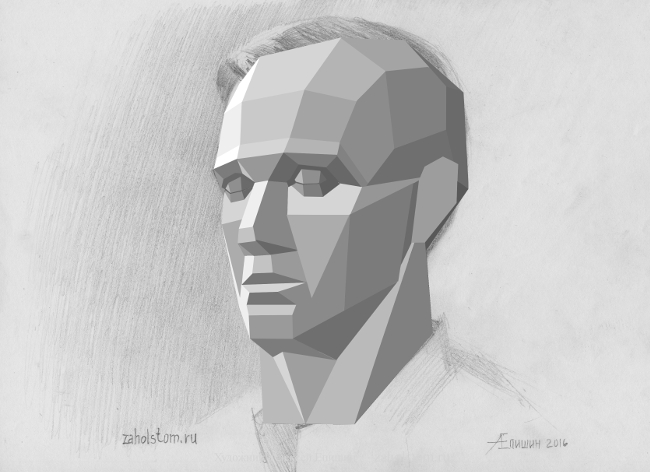
In addition to the skull, the shape of the head and face is influenced by muscles, cartilage, fat deposits, etc. In order not to get confused in the details, trimming will help you understand the anatomical structure. A cut is a conventional image of a person’s head, consisting of edges. With the help of such planes the volume of the entire head is formed. Thanks to these edges, the main curves of the skull and the main muscle groups of the face are clearly visible. In any portrait, for any person, the shape of the head is built on the basis of these trimming edges. Of course, each person has his own facial features, his own proportions, but the key points in the construction of the head correspond to the cutting. Therefore, when drawing a portrait, the artist always keeps these key facets in mind.
Try to trace the main planes of the cut in the drawing of the skull and in the tonal drawing of the head made in pencil.


4. Formation of volume through light and shade on the front, side and top sides of the head.
To make the head drawing three-dimensional, it needs to be worked out with shading. Hatching creates the desired tone. By changing the tone (lighter-darker) we see volume and shape. According to the law of chiaroscuro, light is distributed on the surface of the form in the following sequence: highlight, light, penumbra, shadow, reflex, falling shadow. If you draw a ball or similar simple geometric shapes, then everything is much simpler. But how to show chiaroscuro in a tonal drawing of a human head? In the portrait, chiaroscuro is also done with shading, as in the drawing of the ball. But with the difference that the artist must trace the light and shadow on each individual fragment of the face in particular and on the entire head as a whole. That is, you need to show light, penumbra, shadow - on the nose, on the forehead, on the eye sockets, on the lips, chin, etc. But besides this, light and shadow need to be shown on the entire head as a whole, that is, on its main large faces or sides. For example, one side of the head may be darker than the other. This is an important point when creating the volume of the head in a portrait.
For a better understanding of this topic, I give as an example visual diagrams and drawings of a plaster stump, a human skull and head. In them you can clearly see the front, side and top edges of the head. The diagrams and pencil drawings are designed in such a way that they can be used to gradually trace the main edges of the head, which will help novice artists see the chiaroscuro on the surface of the head as a whole.


5. Brain and facial sections of the head.
Above I have already given a schematic drawing in which the brain and facial parts of the skull were visible. But how to practically see these areas in drawing a portrait? A number of drawings and diagrams below can help with this. Here you can trace the boundary between the front and brain parts of the head in the usual pencil drawing, plaster casting and training drawing of the skull.

6. Step-by-step tonal pencil drawing.
After studying the basic anatomical features of the structure of the head, you can begin step-by-step pencil drawing. Here you need to learn this sequence. First we draw in general terms. Then we complicate the drawing by adding details.
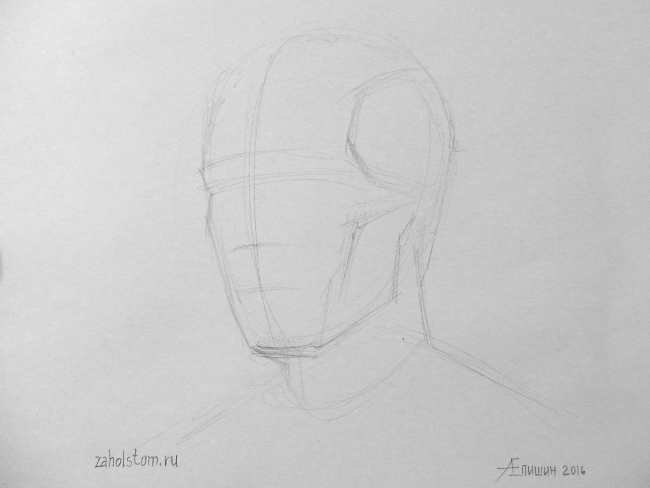
A) Since the shape of the head resembles the shape of an egg, we first draw the corresponding figure with a line.

b) After this, we construct a drawing of the head. Draw an axis of symmetry that will run through the middle of the head. This is very important because the axis will allow you to compare the left and right sides, which will help to avoid errors and irregularities. Next, we outline the levels at which the eyebrows, eyes, nose, lips are located. We outline them using light lines. I wrote about how to determine these levels in the lesson

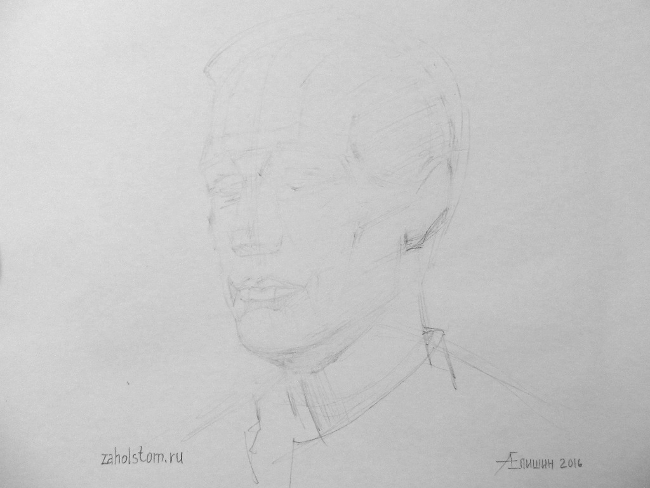
V) At the next stage, you can outline the eye sockets, eyes, nose, lips, as well as the cheekbone, frontal lobes, main muscle groups and folds on the face.
G) Let's clarify the details.

d) I use an eraser to lighten the blackness of the auxiliary lines, which will be erased in the end, however, they are needed at the beginning of constructing the head.
e) Let's start with tonal drawing. Enter shading. We designate shadows and light. We “sculpt” the shape of the head using tone. I did not record the intermediate stages of shading, so I am publishing the final stage of the drawing right away.

7. Different manner and technique of drawing.
At the end of this lesson I would like to add that the manner and technique of drawing can be different. The drawing can be linear or tonal. You can draw with a line, or you can draw with a spot. You can work in a free sketch style, allowing for inaccuracies. Or you can make an accurate academic drawing. You can draw in detail, or you can draw in general terms.
But with all the variety of approaches, literacy should be visible in the drawing. The principles of constructing a head are preserved, whether on paper or in the mind of the artist. A professional artist with experience may not draw auxiliary construction lines. He may work in a different sequence. However, whatever the technique of execution, his drawing will show an understanding of the basics of plastic anatomy. Therefore, if you want to learn how to draw a portrait, you need to understand the essence, and not just copy a nature or picture step by step. When a novice artist gains such an understanding and begins to see nature by analyzing, and not just copying, then he will be much more successful in learning. I hope the drawings and diagrams from this lesson will help beginners with this.
Guys, we put our soul into the site. Thank you for that
that you are discovering this beauty. Thanks for the inspiration and the goosebumps.
Join us on Facebook And In contact with
The skill of some artists surpasses all boundaries. They draw with anything: oil, acrylic paints, charcoal, ballpoint pens or a simple pencil, but their work is indistinguishable from photographs. The considerable perseverance and talent of the authors make these works more than just photocopies. They contain life, the artist’s vision, emotions and the illusion of the world in which we live.
website collected 15 artists, looking at whose works we literally cannot believe our eyes.
Diego Fazio
Diego works like an inkjet printer, starting to draw from the edge of the sheet. Draws with a simple pencil and charcoal. It takes the artist 200 hours of work to create one portrait.
Gregory Tilker
Gregory Tilker paints his “rainy” canvases with a brush, using watercolors and oil paints. Viewing Gregory's paintings is like traveling by car on a cold, stormy day.
Ruth Tyson
British artist Ruth Tyson, like many of her colleagues, does not have an artistic education, but has an original manner of performing her works. She draws with graphite and watercolor pencils, but sometimes also paints.
Roberto Bernardi
It's hard to believe that Roberto Bernardi's "sweet" still lifes were not filmed. Each still life conveys reflections on the glossy surface of the table, folds and highlights with amazing accuracy.
Robin Eley
The London-based artist creates large-scale, realistic oil paintings. In the paintings of this collection, the artist gracefully “hides” the nakedness of human bodies with transparent film.
Gottfried Helnwein
In his works, Helnwein uses mainly watercolors. He works as a painter, draftsman, photographer, sculptor and artist, revealing all aspects of his talent.
Vincent Fatauzo
Renowned Australian artist Vincent Fatauzo's work has been exhibited around the world. The portrait of Heath Ledger was painted a few weeks before the actor's death.
Camalchi Laureano
Kamalki Laureano is a talented Dominican artist. He uses the technique of painting with acrylic paints on canvas. For him, work is not just an imitation of photography, but an imitation of life.
Paul Cadden
Thomas Arvid
Thomas has no formal education. Having developed mastery using his own training system, the artist came to his own theme - the theme of wine. This is how “Thomas Arvid’s Wine Cellar” arose - a series of works depicting bottles, corks, corkscrews and glasses with sparkling drinks.
Very often, beginning artists neglect the study of the human skeleton and musculature, mistakenly believing that “it will work out just fine.” But ignorance of human anatomy leads to the fact that the drawn person turns out to be unconvincing, and his facial expressions and movements look unnatural.
Therefore, today we will look at the basic principles that you should follow if you want to draw a good and high-quality portrait.
1. Facial proportions
The skull and jaw are a slightly flattened sphere, so when looking at a human face from the front we see something like an egg turned upside down with its narrow side down. Two perpendicular lines running down the middle divide this egg into four parts. Let's look at the details:
- Mark the midpoints of the right and left halves of the horizontal line. The eyes will be located exactly at these points.
- Divide the bottom half of the vertical line into five parts. The bottom of the nose will be located on the second mark from the top, and the line where the lips meet will be located one point below.
- Divide the top half of the vertical line into four parts. The hairline will be located at the second or third mark, this feature varies. The ears are located between the upper eyelid and the tip of the nose, but this rule is only true when the face is not down or up.
Helpful hint: The width of the face is usually the width of five eyes or a little less. The distance between the eyes is equal to the width of one eye. Very rarely in people this distance differs very much from the standard, but this feature will be quite easy to notice. The distance between the lower lip and chin is also equal to the length of one eye.
Another way to measure is to use the distance between the tip of your thumb and index finger. The figure below shows which distances can be measured in this way: ear height, distance from hairline to eyebrows, from eyebrow to nose, from nose to chin and from pupil to pupil.

Profile
In profile we can still see the shape of the egg, but its sharp side points towards the corner. Lines now divide the head into the face and skull.
On the skull:
- The ear is located just behind the vertical line. In size and location, it is still located between the upper eyelid and the tip of the nose.
- The depth of the skull varies within the limits indicated in the picture below in point 4 with dotted lines.
- Everything is located as indicated above.
- The root of the nose coincides with the horizontal line or is slightly higher
- The most convex part is the first point above the horizontal line that marks the line of the eyebrows.

2. Features
Eyes and eyebrows
The eye is simply two arches joined into an almond shape. There is no specific rule in drawing eyes, because the shape of the eyes can be different, and there are a lot of such shapes, but we can notice the following trends:
- The outer corner of the eye can be higher than the inner corner, but not vice versa.
- If the eye shape is almond, then the rounded part of the eye will be closer to the inner corner, and the elongated part will be closer to the outer corner.

Eye details
- The iris is partially hidden under the outer eyelid. It only touches the lower eyelid if the person is looking down, or if the eye is built so that the lower eyelid is higher than usual.
- Eyelashes grow from the inside out, not the other way around, and this is very important when drawing so that they look natural. The eyelashes on the lower eyelid are shorter.
- When trying to draw all the little details (tear ducts, lower eyelid, etc.), remember that detailed drawing does not always mean that the result will be beautiful.
In profile, the eye takes the shape of an arrowhead (with convex or concave sides), with a slight hint of the upper and possibly lower eyelid. In real life, you won't see the iris from the side, you will only see the white of the eye. But an eye without an iris looks strange, so draw at least a hint of it.
As for the eyebrows, the easiest way to draw them is to follow the arch of the upper eyelid. Often the widest part of the eyebrow is closer to the inner part, and the “tail” tending towards the outer part of the eye gradually becomes thinner.
If you look in profile, the shape of the eyebrows changes dramatically and becomes more like a comma. The eyebrow begins where the tips of the eyelashes are located.
The human nose is approximately wedge-shaped, it is quite easy to imagine and draw it in volumetric form before drawing in the details.
The dorsum and wings of the nose are flat surfaces that are only outlined at the end, but it is still very important to take these surfaces into account when sketching in order to correctly calculate the proportions. The lower flat part of our wedge in the form of a truncated triangle connects to the wings and the tip of the nose. The wings fold inwards towards the septum to form the nostrils - note that the ventral view shows how the septum begins before the wings and connects to the face. It projects lower than the wings when we look at the nose in profile, which means that in the 3/4 view the far nostril is hidden by the septum.

Just as with the eyes, detailing does not always give good results. Therefore, it is more important to work out the proportions than to pore over details that can ultimately disfigure the drawing. When drawing from the front, the nose looks better if you draw only the lower part. If you are drawing a 3/4 view, then most likely you will be better off drawing the line of the bridge of the nose. You'll have to look at and study a lot of noses to figure out how and when to portray it.

Lips
- The line where the lips meet should be drawn first, as it is the longest and darkest line of the three that form the mouth. It's not just a wavy line, but a whole series of thin curves. In the picture below you can see an exaggerated example that will explain to you the movement of the mouth line. Note that there are different lip shapes and that the base line can reflect the lower or upper lip. Lips can be softened in many ways. The line in the middle can be very straight to reflect a sharp look, or very blurry to weaken the lips. It all depends on the shape of the lips, how plump they are. If you want to achieve symmetry, start from the center and draw one half of the lip, and then the other.
- The two upper tips of the upper lip are the most obvious parts of the mouth, but they can also be either pronounced or almost in one line.
- The lower lip has a soft arch, but can also vary from almost straight to very rounded.
- The upper lip is usually thinner than the lower lip and sticks out less from the overall topography of the face than the lower lip. Try to highlight the upper lip with strokes.
- The sides of the lips are shaped like an arrowhead, and the fact that the upper lip protrudes slightly forward in this place can be seen very clearly.
- The midline of the mouth at the ends deviates downward from the lips. Even if the person smiles, it curves down before going up again. Never draw this line straight up if you are drawing a face in profile.

The most important part of the ear is the long C-shaped outer line. The inside of the ear is like an inverted U. There is also a similar curve just above the earlobe, connected to a small C-shaped arch. In general, the shape of the ear also varies.

When we see the face from the front, the ears are visible in profile:
- The rim, which was previously U-shaped, is now a separate part - as happens when we look at the plate from the side and see its bottom.
- The earlobe will look more like a drop and will stand out.
- How thin the ear line needs to be drawn depends on how close the ears are to the head.
If you look at the head from behind, the ear looks as if separated from the head: the rim is attached to the head by a funnel. Don't be afraid to draw the funnel too big, as it really isn't small.
3. Angle
Being shaped like a ball with a few minor changes, the head is easier to draw than expected. But despite this, you need to study how it looks from different angles. Of course, the appearance of the nose changes first, but the eyebrows, cheekbones, central part of the mouth and chin also change.
When we drew the face in front and profile, we practically simplified it to a two-dimensional plane. For other viewing angles, we need to think in three-dimensional space.
Look down
- All parts are rounded upward and the ears also move upward.
- Since the nose protrudes forward, it protrudes from the general line of the face and its tip is closer to the mouth.
- The eyebrow curve becomes smoother. In order for it to take a reverse bend, you need to turn your face in some particularly unusual way.
- The upper eyelid becomes more visible and covers most of the eyeball.
- The upper lip almost disappears, and the lower one sticks out more.
- Notice that since the mouth follows a general curve, it appears as if a smile has appeared on the person's face.

Look up
- All parts are rounded down and the ears are also moved down.
- The upper lip becomes fully visible and the mouth appears fuller.
- The brow line becomes more rounded, but the lower eyelid curves downward, giving the effect of an edgy look.
- The lower part of the nose is clearly visible, and the nostrils are also clearly visible.

Turn sideways
When a person is seen almost from the back, all that is visible is the protruding line of the eyebrows and cheekbones. The neck line protrudes and tends towards the ear. Eyelashes are the next thing that is visible when a person turns his face.
Then part of the eyebrow appears, and the ridge of the lower eyelid and the tip of the nose protruding from behind the cheek become visible.
When the face is already turned almost in profile, the eyeball and lips become visible (but the middle line of the mouth is still small), and the neck line merges with the chin line into one line. You can still see part of the cheek where the nostril hides.

10 contemporary artists that will make you sick
Now we will tell you about such strange creative projects that you will want to lie in a corner, covered with a blanket, hugging the “Black Square” and complaining to it about the decline of morality, and that’s all.
Paired brushes
"New Hope"
Let's start with the rather modest and even sweet American artist Kira Ain Varseji. Her technique is simple: she mixes paints, applies them to her bare chest, and presses them to the canvas. You can buy her abstract works for 200-300 dollars. Kira is a positive woman: she loves fishing, her husband, and computer games. Sometimes he lets his turtle crawl on the paint, and also displays individual parts with toys and vegetables. Breast size, if you're wondering, is 38DD. It's a lot.

Memory card

“Birds Giving Praise”
Sergio Portillo (USA) paints with ordinary brushes. The secret is in the paint. There is ash in the paint. Human. No, everything is fine. Relatives of the deceased and cremated themselves order such paintings from the artist. It’s convenient: you don’t have to spend money on art in the house, and you don’t have to spend money on space in the columbarium. By the way, Sergio is not original; several other artists provide this service.

Art and sacrifice

“Portrait with a Gun”
Chris Trueman painted only one picture suitable for our list, but what a picture! He made a portrait of his little brother out of 200 thousand dead ants. And it wasn't that easy, because the artist loves ants and doesn't like killing them. But the genocide of insects paid off - the painting was bought for 35 thousand dollars.

Painter

"Jimi Hendrix"
An elderly Australian, Tim Patch, works under the pseudonym Pricasso. This can be translated into Russian as Khrenasso. Well, you already understand what he draws with. And it turns out pretty well, by the way, for such a blunt weapon! By the way, the artist allows you to observe his creative process, so he is gladly invited to all sorts of festivals where children are prohibited from entering.

Language will take you to the museum

"Christ"
For Hindu Ani Kay, art doesn't come easy. Because of his creative method, he constantly suffers from stomach pain, headaches, and dizziness. And all because he draws with his tongue. He says that now it’s still tolerable, but after the first pictures he thought that he would go to the next world. In total, he painted 20 watercolors, including a two-meter copy of Da Vinci’s “The Last Supper,” which is not particularly high quality. A member would definitely be better, on the other hand, a religious theme...

Eye gauge

An artist, of course, needs an accurate eye, but we didn’t know that it was so literally needed. Chinese Xiang Chen, a master of calligraphy, holds a brush with his eyelid and drags it across a sheet of paper. In general, the result is difficult to evaluate, but the work is impressive. By the way, he can also hold a stick with the same eye and play the piano with it.

Inspiration from within

"Nexus Vomitus"
Artist Millie Brown uncontrollably vomits on canvas, literally. To do this, she drinks colored milk and then vomits it onto a white sheet or onto her dress. The paintings turn out abstract, but they cost a lot. For example, the painting Nexus Vomitus was made while three opera singers were singing and successfully sold for $2,400.

Red and yellow

Brazilian Vinicius Quesada paints with blood. And not just any pig, but a human one. His series of paintings “Urine and Blood Blues” is famous, written exactly as in the title. These are realistic psychedelic images of geishas, monkeys and zombies. Why geisha? Why urine? Why everything?

20. Painting lesson. Oil portrait painting.
At painting and drawing lessons in school New Art Intention Beginners to draw are taught to “look” for the silhouette of the figure and head in relation to the background, because only an accurately and expressively found silhouette gives the portrait greater artistic expressiveness.
To learn how to draw a portrait of a person (with a pencil or paints) - try to understand the unique facial expression and through this expression, unique only to this person, convey his inner, mental state.
On the previous painting lesson you have gained sufficient experience in depicting heads and learned to work in color. The purpose of this lesson is to learn how to create a portrait with maximum artistic expressiveness.
Drawing sketches. The practice of drawing from life in comparison.
In drawing lessons, we especially draw the attention of beginning artists to the color of the human body. This color is different from the color of all other objects in the visible world. Blood vessels give the body color only its inherent pinkish color, which is why people have a flesh-colored, pinkish complexion. But the artist’s eye, experienced in perceiving the finest shades of color, will easily notice that no two faces are absolutely identical in color, identical in shape, proportions and texture.
Therefore, when practicing drawing a portrait from life, try to correctly identify the flesh color. In each individual case, the artist must directly see the inherent color in nature and be able to accurately convey it. To make it easier to notice this color difference and competently learn how to draw the nuances of color rendering, we recommend doing the first exercise of this painting lesson by drawing three different portraits of the heads of different people on the same canvas. You may ask the question: “Why is it necessary to paint different portraits on one canvas? Wouldn’t it be better to do this on three separate canvases?” Drawing such a sketch is recommended so that you can more clearly feel the difference in color and character of portrait faces when comparing them.
Let's practically check this. You wrote (or drew with a pencil or pastel) in one or two sessions the head of a girl on the left edge of your canvas. Her black hair clearly outlines the shape of her smooth, light, slightly yellowish forehead, her scarlet, luscious lips softly mold the shape of her mouth. The pinkness of youthful cheeks echoes the scarlet lips. The light yellowish-pink face gives a nice greenish-purple undertone in the shadows.
For your next portrait session, you invite a middle-aged man whose head is devoid of hair. In this case, the anatomical structure of the skull is clearly revealed. Deep eye sockets help convey the volume and character of that person's head. Before you draw it, you immediately note to yourself that its image requires completely different colors than a sketch of a girl’s head.
You can easily conclude that this man apparently rarely goes outdoors, since the color of his face is pale yellowish-green, reminiscent of the color of parchment. The shadow areas of the head are also greenish, but they are absolutely not similar to the greenishness in the girl’s sketch - they are brown-green and need to be addressed, perhaps with umber and volkonskoite. You immediately see that this head does not have those pleasant pink tones with which you painted the girl’s cheeks and lips, and when preparing colorful mixtures to convey the character of the color, you are convinced that they must be made from completely different paints.
Third sketch. Drawing a portrait of the head of an old man with a thick beard and gray hair. Starting to write it, you compare this head with two previously written sketches and make sure that it is completely different in color and texture from the two previous heads.
Thus, such a painting lesson, such drawing from different natures in comparison, will convince you that all human faces are different in the nature of shapes and proportions, and in the texture of the body, and in color structure. This belief will not allow you to paint all heads with the same “flesh” color, but will force you to carefully analyze and study the colors of a person’s body every time, based on location and lighting conditions. This method of drawing will allow you to train your eye to perceive the subtlest color vibrations and will help you understand how to learn to draw correctly at the initial stage of learning, and in further independent creative work.
Let's draw a portrait.
The setting of the nature should clearly reveal the main pictorial features of the face and head as a whole, illuminated by light from the front, when small groups of shadow are formed. A head illuminated by direct light requires a darker background, although not necessarily black, but selected in color so that the background is not only in tonal, but also in color contrast with nature.
This painting lesson for beginners is carried out in several lessons, as it is quite complex for students. And a beginning artist is sometimes forced to draw again many times.
Anyone who wants to learn how to draw and acquire the right skills in painting, to arm themselves with mastery, needs to develop a system of work in drawing a portrait of the face and head. We recommend that you roughly break the lesson of painting over a portrait of a head into three stages, which are interconnected and organically transform into one another, developing and complementing each other.
The first stage of a portrait painting lesson is a preparatory drawing of the head for painting and performing color underpainting (Fig. 1);
the second stage of the painting lesson - studying the details of the portrait, characterizing their shapes and color features (Fig. 2);
the third stage of the painting lesson is generalization and synthesis of what has been learned, bringing the portrait to pictorial unity and artistic expressiveness (Fig. 3).
These stages of a portrait drawing lesson will enable the artist to more consciously conduct his work from the beginning to the end of the drawing and will help him get rid of many unnecessary and sometimes harmful endless alterations. This usually leads to the portrait becoming overloaded with paint, which cannot be applied haphazardly, otherwise it will begin to fade and turn black.
When the setting of the life is done, the artist begins the first stage of this painting lesson. At the same time, you must always remember that, without drawing the model, you should not start painting with paints. This point seems clear, and many may argue that it should not have been mentioned. But the practice of teaching painting in our school shows that students do not always adhere to this rule. Beginning painters sometimes don’t want to spend time on preparatory drawings. Sometimes this leads to a sad result - at first the portrait turns out to be fresh in color, and individual places are resolved in an interesting and picturesque manner, but then many significant errors are suddenly discovered in the form.
At subsequent sessions (dry), you begin to correct, carry out the work in parts, and it imperceptibly loses the charm and freshness that it had at the beginning, turns into a sketch that is tortured in painting and broken in form. It becomes boring to work, the model seems uninteresting, doubts arise in your abilities - you want to give up the portrait and not take up your brushes anymore.
To move on the right path without such experiences, first make a thoroughly constructed and detailed drawing. Draw for painting using charcoal or a soft pencil. It is not necessary to do modeling at full tone strength. You can make a drawing that is quite light in tone, but preferably with a description of the main tonal gradations of the portrait. Then the design can be fixed with varnish or moistened with water from a spray bottle if the canvas primer is adhesive or emulsion, or the charcoal can be lightly brushed off, leaving the design in a very light light tone.
Then, before starting to paint, the artist must mentally analyze the model depending on the tasks and decide what mixtures he should take for the portrait sketch, what colorful combinations he discovered in the model, and see warm and cold tones in nature.
After the novice portrait painter has “get used to” the nature and mentally understood its color scheme, as if seeing it painted, he begins to underpaint.
Underpainting (Fig. 1) is a light application of color to the entire canvas. Underpainting is sometimes done without white, like with watercolor, and sometimes a small amount of white is added.
Underpainting for head painting is done in the same way as for still life and other exercises. You already got an idea of this from previous lessons.
With a light underpainting it is easier for the artist to subsequently determine the correct tone and color, whereas with a blank canvas this is more difficult to do. When the underpainting is done and the shape of the head is sculpted, you can move on to solving the main masses in full force of nature. It is better to start writing in full force from the piece that is most clear to the author. Suppose the artist felt the strength of tone and color of the forehead along with the hair and began to pick up the color point-blank based on the underpainting. Starting to paint the forehead with full force, he takes both the hair and the background, bringing it all into harmony. Then, with the same force, he will take the remaining parts of the head, all the time comparing color relationships with each other. Thus, after the underpainting, the author proceeds to sculpting the head as if in parts, solving these parts point-blank, comparing them with each other.

But it is not always possible for an artist, when painting in parts, to perceive the entire production as a whole; his eye strives to linger on the area of nature that is depicted, and does not want to see the surrounding areas. This is the eternal struggle for a holistic vision of nature. A beginner in drawing must muster the necessary efforts of will to constant attention and develop a working principle that would allow him, when he paints a cheek, to compare not only the illuminated part of the cheek with the shadow part, but to compare the cheek with the forehead, and with the neck, and with the background , and with hair. So, always when drawing any detail, compare as much and often as possible, because the whole process of painting consists of comparison.
It is necessary to compare not only in terms of shape, proportions and character, but also in terms of color relationships.
To solve the problem of painting a head, experience is needed; you need to feel how the shape of the head is built by color relationships. Therefore, when working on the shape of parts with each brush stroke, identify a certain part of the form and be sure to distinguish one stroke from the others by color.
After working on the form for several sessions, you will see that you are quite close to nature. The head in the portrait began to look like a model. The eyes look and express the nature of the model's gaze. The nose begins to be defined, the volume of the head is built correctly, even, perhaps, the unshavenness of the person’s cheeks is conveyed, that is, all the details are depicted lovingly and carefully. But, alas, you immediately discover that at a distance of 5 - 6 meters your portrait has become somehow sluggish and expressionless. The colors are not sonorous enough, the work has lost its colorful charm. Immediately you discover that, despite the details being written out, the head is not very voluminous and three-dimensional, in addition, the face is somehow slanted, the eyes are not clearly constructed, one cheekbone has moved down in relation to the other, the lips have also moved somewhere to the side. Frustrated, you timidly begin to correct errors with a small brush, chasing after correcting details, but this does not make the portrait any better.
It becomes unpleasant for you to work on it. You feel tired.
All this happened because during a fairly long painting lesson, in the process of working on details, you stopped looking holistically; the pursuit of conveying details distracted you from a holistic perception.
The last stage of the painting lesson. The purpose of this stage is to bring the head, fragmented by details, back to generalization, to again strengthen the design of the portrait of the head, to bring to synthesis the analysis of forms that was done earlier. In order to achieve generalization and a complete pictorial solution, the artist has to endure great internal tension.

At this moment, you need to strain all your will in order to sometimes abandon many of the found details for the sake of a complete and most artistic solution. Many great portrait painters of the past had to endure such painful moments.
From the memoirs of V. A. Serov, we know how the great artist, who knew how to work on a portrait for sixty or more sessions, having thoroughly studied the model and achieved considerable finds, then mercilessly scraped off everything written with a palette knife and, having gathered his will and strength, freely 2 — 3 sessions to finish work on the portrait. In these last sessions, he transferred the portrait to a new, higher quality, making it a complete, generalized, highly artistic work.
In our lessons we draw the attention of beginning artists to the character and state of nature.
If a portrait image of a person includes hands, then it is necessary to pay great attention to them, because hands sometimes tell you even more about a person than their face. Gestures and hand movements should be vital, characteristic of this person in the state in which he is at the moment.
In the process of drawing a portrait, pay maximum attention to the eyes of the person being portrayed, try to penetrate deeper into the person’s soul through the expression of the eyes. It is not without reason that they say that the eyes are the mirror of the soul. Therefore, in order to learn how to convey a person’s spiritual world in portraiture, pay close attention to the character of the eyes, their expression, and do not hesitate to paint the eyes with the full force of your brush. This does not mean that you need to draw the eyes meticulously, in detail with all the veins and highlights in the pupil. But write carefully and accurately, so that the eyes look, and through this gaze the person’s state of mind is conveyed.


Calorie content of steamed chicken cutlet Chopped chicken breast cutlet calorie content
Why do you dream about a small grave?
Why do you dream about a big ship?
What does Water in a dream mean in the Ancient Persian dream book of Taflisi?
Why do you dream of lace in a dream - interpretation by day of the week