DIY finger theater
Master class on making finger puppets from felt
Author: Ekaterina Nikolaevna Demidova, teacher, MBDOU “Combined Kindergarten No. 62 “Silver Hoof”, Kurgan
Theater is thoughts free flight,
Theater – here fantasy blooms generously...
Vladimir Miodushevsky
The master class is designed for educators and specialists preschool institutions, teachers additional education, parents and creative individuals.
The finger theater is intended for theatrical activities in kindergarten and at home; it can be used directly during educational activities like a surprise moment. It can become a wonderful tradition for your family.
The choice of material – felt – is determined by the following criteria:
easy to process, edges do not crumble;
wide range of colors, different thickness and density;
natural, safe for health!!!
Target: making a finger theater for development creativity children through theatrical activities.
Tasks:
introduce the technology of making felt finger puppets;
develop children's acting and directing abilities;
develop fine motor skills;
promote the enrichment and activation of vocabulary, develop monologue and dialogical speech;
to develop interest in arts and crafts;
develop skills in organizing practical activities.
Materials and tools:
simple felt, with a self-adhesive base;
lace;
beads, rhinestones, small buttons, small eyes for dolls;
reinforced threads;
tailor's pins;
needle;
tailor's chalk;
pattern paper;
“second” glue;
scissors;
sewing machine.

Chanterelle Patterns:

Manufacturing technology of the finger puppet “Fox”.
Before we get started, let’s remember the basic safety rules when working with scissors and needles.
store needles and pins in a specific place (pincushion). Do not put needles or pins in your mouth or stick them into your clothing.
Do not use rusty needles and pins.
Do not leave the scissor blades open while working.
Don't cut as you go.
Making a pattern for a finger puppet will not take you much time. First you need to decide on the size. The base of the toy should be about the height of your index finger. Draw the body and other details. Don’t forget to make allowances for the parts that are inserted into the base.
We select materials for our chanterelle. We transfer the details onto paper and cut them out.
Base – 2 parts;
Head – 1 piece;
Muzzle – 1 piece;
Ears – 2 parts;
Tail – 1 piece;
Ponytail tip – 1 piece;
Paws – 2 parts.

Transfer the pattern to felt. We pin larger parts to the material with pins, and outline small ones with tailor's chalk.

We distribute the parts in places.

We adjust the right foot to the base. We make fastenings.

Adjusting the second foot. We make fastenings.

We adjust the muzzle to the head. Align the edges with scissors.

We sew the ears to the head with a triple tack.

We design the ponytail - we fit the tip of the ponytail onto the part. Align the edges with scissors.

We connect the parts of the body along the contour. Don't forget to insert a tail on the side. We make fastenings. Align the edges along the contour.

Using glue we attach the head to the body. We work with glue carefully, as traces may appear on the surface of the material. We make the eyes and nose from large black beads. They can be glued or sewn with threads in color.

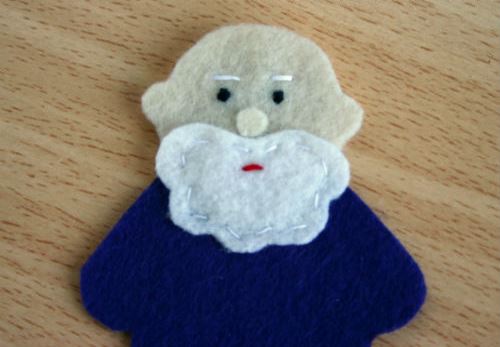
Manufacturing technology of the finger puppet “Mashenka”.
A distinctive feature of the execution will be the processing of the head.
Let's draw the pattern. We select materials.
Base (dress) – 2 parts;
Sleeves – 2 parts;
Hands – 2 parts;
Bast shoes - 2 parts;
Head – 1 piece;
Headscarf (front part) – 1 piece;
Headscarf (back view) – 1 piece;
Braid – 1 piece;
Spout – 1 piece;
Bangs – 1 piece.

Patterns of the doll “Mashenka”

We cut out the blanks. We place the parts in their places.

We adjust the sleeves on the dress, put handles along the bottom of the sleeves (without adjusting them).

We adjust the lace along the bottom of the dress. We make fastenings.

We adjust the bast shoes. We make fastenings. Sew the dress along the contour. Align the edges along the contour.

We adjust the bangs and nose to the head. To prevent the spout from sliding under the sewing machine foot, it must first be glued.

Glue the head to the base. Glue a scarf of self-adhesive felt on top. We fasten the braid between the two parts of the scarf. Align the edges.

We secure the edges of the scarf with machine stitching. We make fastenings.

Glue on the eyes - beads. Brown the cheeks with a red pencil.

Mashenka's eyes can be decorated using special accessories for needlework - peepholes.

This is what we got!

My first works.

Design options for the finger puppet “Frog”.

Design options for the finger puppet “Cockerel”.

Design options for finger puppets - people.

I sewed two sets: for home and for kindergarten.
DIY finger theater
Master class with step-by-step photographs on making a felt house for a finger theater.
Author: Ekaterina Nikolaevna Demidova, teacher, MBDOU “Combined Kindergarten No. 62 “Silver Hoof”, Kurgan.
Somewhere in a fairy forest,
Where there are no paths and roads,
Where they drink dew from flowers
And the bee and the moth,
There, under the old pine tree -
Teremochek is small...
S. Bogdan
The master class is designed for teachers and specialists of preschool institutions, additional education teachers, parents and creative individuals.
How often do we ask ourselves the question - how to raise a child to be polite, purposeful, sensitive, and raise him to be a creatively active person? To solve this problem, theatrical activities together with the baby can come to our aid.
One of the most favorite activities among preschool children is finger theater. It not only promotes the development of fine motor skills (which has a beneficial effect on the development of speech), prepares the hand for writing, but also develops creative abilities, relieves emotional stress. Finger theater is the basis for developing your child’s abilities and talents.
Finger puppets can be made from paper, knitted or sewn. Today we will look at the technology of making a house from felt - a material that is easy to process and does not require additional operations for processing sections. It is available in a wide variety of craft stores. color scheme(with the help of colored pencils it can be easily shaded), with different thicknesses and densities, at an affordable price. Most main characteristic felt is natural and safe for health.
Target: making a finger theater to develop children's creative abilities through theatrical activities.
Tasks:
introduce the technology of making felt decorations;
to develop interest in arts and crafts;
develop skills in organizing practical activities;
develop children's acting and directing abilities;
promote the enrichment and activation of vocabulary, develop monologue and dialogic speech;
develop fine motor skills.

Materials and tools:
felt;
paper for patterns;
reinforced threads;
scissors;
tailor's pins;
tailor's chalk;
beads;
colored pencils (brown and black);
sewing machine.
Safety precautions when working with scissors and pins:
1. Store needles and pins in a specific place (pincushion).
2. do not put needles or pins in your mouth or stick them into your clothes.
3. Do not use rusty needles and pins in your work.
4. Do not leave the scissor blades open while working.
5. Don't cut as you go.
Technology for making a felt house for a finger theater.
We will build two huts
Animals will come to visit us.
Everyone got down to business together
And the work began to boil.
The hare builds from splint paper,
And the fox is made of ice
Not a hut, but beauty.
Merinova Elena
The first stage of work is making a template for a double-sided house (log and ice).
Templates:


We transfer the details onto paper and cut them out. Transfer the pattern to felt. We pin larger parts to the material with pins, and outline small ones with tailor's chalk.
For the base of the ice house, we take blue felt, since it was on a self-adhesive base, for strength it is necessary to put the part on a backing.

In order for the contours of the house to coincide in further processing, you need to place the finished base of the ice house on brown felt face down, outline it with chalk and cut it out.

The base of the house is ready.

We distribute all the details in their places.


log cabin
Set the roof and window parts aside and leave the round logs. Draw straight lines between the logs with chalk.

Set the details aside. Sew the chalk lines with a double stitch. Use threads darker than the material.

Remove the remaining chalk using a piece of felt (just rub it with the material and the mark will disappear). Use a black colored pencil to shade the logs along the line, and a brown pencil just above the line.

Stitch round logs with a spiral stitch and tack.

Shade the line with a brown pencil.

Stitch the top roof and fasten it.

Stitch the middle roof and make fastenings.

Stitch the lower roof and fasten it.

Set up windows, make fastenings.

Cut holes in windows.

Ice house
Sew a roof and a snowdrift from below onto the base, and make fastenings.

Set up all windows, make fastenings.

Cut holes in windows.

Connect the bases of the house along the contour with a machine stitch, make fastenings, trim the unevenness with scissors.

Decorate the ice house with blue beads.

Our house turned out to be quite stable, since we used a blue felt backing.


There is a teremok-teremok in the field,
He is not short, not high, not tall.

Bunny built a hut
bast, warm.

And Chanterelle next to Bunny
from ice - cold.
Svetlana Ledkova
The Finger Theater is very interesting and also very useful activity for the development of children. Today we will make such a finger theater from felt for the fairy tale “Teremok”. Let's make fairy tale heroes (mouse, bunny, frog, fox, wolf, bear) and a little house.
All toys are about 8cm long, only the mouse is slightly smaller. The finger theater is suitable for both adults and children's little fingers.
What we need to work on the Teremok finger theater:
- thin felt;
- glue moment;
- needle;
- scissors.

Master class “Teremok - DIY finger theater”:
The pattern for each animal can be traced by attaching White list A4 paper to the monitor.
1) Frog-wah. Let's prepare the following details: 2 bases, a piece for the eyes made of white felt and two more black ovals for the eyes.

2) Small parts can be glued to felt. Apply moment glue to the white part and glue it to the front part. Then glue the black eyes on top. We embroider the mouth with red thread using a “back needle” stitch.

3) Now we fold the two parts of the body and sew them together using a loop stitch.

4) We do not sew the bottom of the toy so that you can put it on your finger.

5) Little mouse. We fold the gray felt in half and cut out 2 parts of the body, we will also make a muzzle and a tail. The nose will be black, and the tummy will be beige.

6) Sew the muzzle onto the front part of the body. Glue the nose.

7) Using black thread we embroider small eyes and antennae.

8) Sew on the tummy. Glue the tail onto another part.

9) Sew the 2 parts of the body together, also leaving a hole at the bottom of the toy. Photo 10

10) Jumping bunny. For the bunny, cut out 2 parts for the body and a round tail from white felt, and 2 parts for the ears, a muzzle and a tummy from pink felt.

11) Glue a tail to the back of the body. On the front part we embroider the eyes and nose using black floss threads. We put on a pink muzzle and sew it on, making black antennae. We will also embroider a mouth. We glue the parts to the ears with glue, and sew on the tummy.

12) We put the two parts together and sew them together, not forgetting to leave a hole at the bottom.

13) Foxy sister. From orange felt we cut out 2 parts for the body, a muzzle and a tail. From white felt we will make the eyes, the tip of the tail and the chest. And the nose is made of black felt.

14) First, sew on the muzzle and chest using threads to match the felt.

15) Before the eyes, we make a stitch with floss threads, imitating the pupil. And we glue the white tip onto the tail. We apply glue only in the center of the part, since we will then sew the tail with threads.

16) Now glue on the eyes and black nose. Sew the tail along the contour using threads in the color of felt.

17) As in previous toys, we put the two parts together and sew them with a buttonhole stitch.

18) Wolf. For the wolf, we cut out 2 parts for the body, a muzzle and a tail, from gray felt, 2 eyes, a shirtfront and the tip of the tail from white felt, and only the nose from black felt.

19) Sew on the shirtfront, and glue on the white part of the tail, like a fox’s.

20) Now we sew the muzzle onto the front part. We sew on the eyes by making pupil stitches. We glue the nose. Sew the tail on the back.

21) Then, by analogy, we sew together 2 body parts.

22) Bear. We will need the following parts: 2 bases, an oval for the muzzle, a belly and 2 ovals for the eyes.

23) Using floss threads, we embroider the nose and mouth on the muzzle, and sew on the eyes, making pupils.

24) Sew the tummy and muzzle to the base.

25) And, again, we sew two parts of the body together.

26) The characters for the fairy tale “Teremok” are ready.


27) Now we’ll make a tower. To do this, cut out 2 large rectangles from green felt for the base of the house and 2 small rectangles for the pipe. From purple felt we will make 2 triangles for the roof, and also cut out 5 rectangles different colors for pocket balconies.
Content
All mothers know how much children love home theater, even if the characters are as small as in the finger version of the game. It’s not difficult to make such a theater, although more heroes, the more time it takes to make it. But the child will definitely appreciate the mother’s efforts and will be happy to watch original fairy tale, and then play with unusual toys.
IN free access you can find many options and workshops on making finger toys. By simple circuits and understandable step by step instructions Even a mother who has little knowledge of needlework can sew such characters. And for a child, the process of making toys will be a real adventure and will help develop fine motor skills. Little ones will be able to do little to help, but they will happily begin to put the first characters on their own fingers, showing interest and joy in such a game.
Finger Theater "Ryaba Hen"
To create the heroes of the fairy tale “The Pockmarked Hen,” you need to make 5 heroes from felt, including the golden egg that the mouse pushed off the table.
At first glance, it seems that it is difficult to make such a number of finger toys, there are many small parts, and it will take a very long time. In fact, felt is a simple and easy-to-process material, it is not difficult to work with, and even novice needlewomen can cope with this task.
So, before you start making finger theater characters from felt, you need to prepare all the materials and tools for the work. First of all, these are sheets of multi-colored felt. You need to buy thin sheets that will not create excess volume for the toys, but will not tear after the first use. You can choose the color variety of felt to suit your own taste, choosing any dress for your grandmother, and a shirt for your grandfather. But, of course, the mouse should be gray, and the egg should be yellow.
In addition to felt, you need to prepare the following materials:
- threads of different colors;
- scissors, needle;
- black marker for drawing people's faces and mouse faces;
- glue "Moment".
To glue some felt parts, you can use another glue, but from experience, “Moment” holds the best.

There are only five heroes of the fairy tale: an egg, a chicken, a mouse, and grandfather and grandmother. They need to be done sequentially.
golden egg
All finger theater toys consist of two parts - a face and a back, so that they can be put on the fingers. The egg can be made one color on both sides, or you can use felt of different colors.
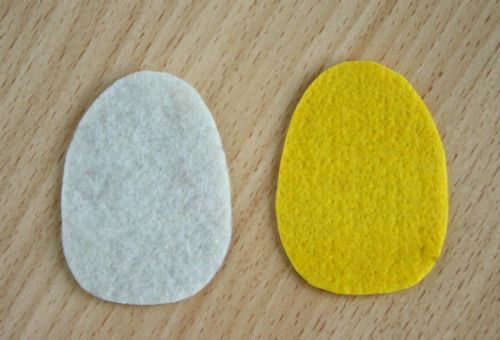
The parts are sewn together using a loop seam - small, neat stitches that will prevent damage to the felt and give the toys a finished look.

In the place where the toy will be put on the finger, the edges of the felt need to be processed on both parts separately. The size of the hole does not need to be made too large, since felt is a soft and pliable material and will stretch over time.

The egg for the fairy tale is ready!
Little gray mouse
With a mouse there will be a little more work than with a simple oval, but it is also not particularly difficult. The sizes and shapes of the parts can be made arbitrary; you don’t even need a clear pattern for this. But it is important that the mouse has ears with pink centers and a tail.

Having cut out and prepared all the parts, you can begin assembling the mouse. Glue the outer and inner parts of the ears together with glue, and draw a muzzle with a marker.
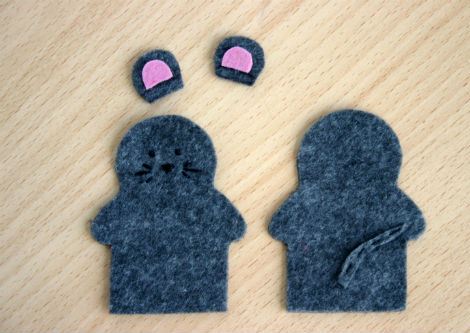
The next step is to sew all the pieces together. Even black threads will look harmonious in a buttonhole stitch, which needs to be used to process all the edges of the toy. It is important not to forget - leave a hole at the bottom for the finger, and process the parts separately.
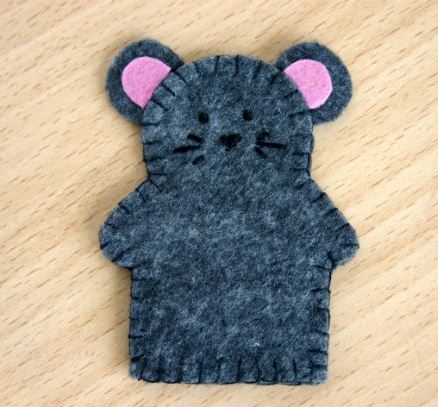
The mouse for the fairy tale is also ready!

Chicken Ryaba
The color of the felt from which the chicken for the fairy tale will be sewn can be almost any, from light beige or yellow to dark brown or red. After all, chickens come in different colors. In addition to the body of the toy, the chicken will also need wings, a beak and a red crest.

After all the parts are cut out, you need to glue and finish drawing the chicken’s head. This is easy to do.

In the process of processing the edges of the fabric, wings and a comb on the head are sewn to the product.

The cheerful and funny chicken is also ready to lay an egg!
Grandfather in a blue shirt
The figures of the grandfather and grandmother are made a little more complex than the previous heroes of the future fairy tale. To make them you need more parts, so you will have to try and make an effort. This is especially true for the subtleties and elements of the face. But first you need to prepare the following details: two halves of the body, two heads, a beard and a nose.

First of all, you need to make grandpa’s face. The eyes can be embroidered with black thread, although it is much faster and easier to draw them with a marker. The nose is glued on with glue. Above the eyes you need to make two small stitches of eyebrows, and in the center of the beard - a red stripe of the mouth. The work is small, but not difficult. And at the same time you can give grandfather any facial expression.

The next step is to sew the head to the body. This only requires a few stitches along the neckline.
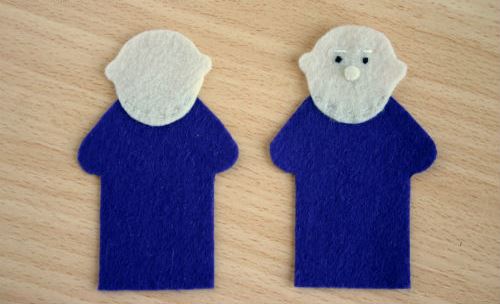
Only after this will you need to sew on the beard. It can also be glued, but the white threads in the old man’s gray beard look natural and appropriate.
When the main assembly is ready, you can start processing all the edges of the toy. Grandpa is ready.

Grandmother in a scarf
The last and perhaps most complex character in the fairy tale is the grandmother. The only difficulty is that there are more details for this hero than for all the others. However, once you get the hang of it and train your hand on previous toys, sewing a grandmother won’t be particularly difficult either.
In addition to the body and head, you need to cut out a scarf, an apron and facial elements from felt.

Grandma's face is shaped similarly to grandpa's previous toy. You can draw the eyes with a marker, embroider the lips with red thread, and glue the nose. The oval of the face against the background of the scarf is sewn with white threads. The apron is also sewn on the front side and on the back - a strip from it.

When all three parts are ready, you can sew the head to the body using threads that match the color of the felt.

Only after this can you begin to process the edges and sew the two halves into one toy.

Thus, all the characters of the future fairy tale are ready.

It is important that all toys look beautiful and neat, both from the front and from the back. If you do everything slowly, sewing the parts together with small stitches, this will not be difficult to complete.

If the process of making toys was easy and interesting, you can expand the number of characters in your home finger theater. Grandmother and grandfather can be used for the fairy tales “Kolobok” and “Turnip”, completing the missing characters. And over time, the child will begin to help create new heroes and invent stories about their adventures. It’s not difficult to make a finger theater from felt, but all family members will have a lot of joy and happiness from the process and result of joint work.
Post Views: 292
Municipal budget preschool educational institution kindergarten“Care and Health” No. 206 Master class
DIY felt finger theater
Completed by the teacher
Kerbel S.M.
Kemerovo 2015
target
o develop speech, thinking, imaginationo develop fine motor skills
finger movements
o enrich lexicon children
What is felt?
Lately non-woven has become very relevantmaterial FELT. You can sew toys from it,
educational books, pillows, flowers, dolls for
finger theater, shoes, children's mobiles, covers
For mobile phones, e-books,
iPhones and laptops, keychains, jewelry,
decorate rooms and everything you need
your imagination is enough.
Felt (felt) - material obtained by felting
fluff, fine pile, mainly hares,
rabbits, goats, fur waste, fine and semi-coarse
wool sometimes mixed with chemical fiber.
(TSB)
What are they made from?
Felt is made from natural and artificial fibers. He canbe purely woolen, with the addition of synthetic fibers and
completely synthetic. Felt is a fibrous material that
produced using heat, moisture, friction and
other processes for bonding fibers of fur, hair or wool into
non-woven, tightly matted fabric. This explains the uniqueness
felt as a material, its difference from most fabrics is that it
made like paper, so it can be handled like paper,
also cut, glue, etc.
Felt goes well with paper and fabrics, as well as
unspun wool. This provides an excellent opportunity for
making beautiful covers for notebooks and books, frames for
photographs, sewing handbags and wallets, various
containers, napkins for a phone or table lamp,
coasters for hot dishes, stuffed toys, a pocket for scissors and
pincushions of various shapes, key holders, bright sofa cushions and
even house slippers
DIY felt finger theater
Dear teachers! I want to share with you an idea taken fromInternet, but made with your own hands!
Author of the idea and templates Elena of the “Country of Masters” website
This is an idea for creating a finger theater from felt with your own hands.
There are three game options:
Put it on your fingers
Apply to flannelgraph,
Show from behind the screen
For this I needed:
two sets of colored felt (plain felt and colored self-adhesive
felt),
scissors,
glue,
waterproof thin felt-tip pen,
sketches of heroes,
decor “eyes” oval, round To begin with, I transferred the sketches onto paper
(grandfather, grandmother, granddaughter, cat, dog, mouse,
turnip, bun, hare, fox, Ryaba chicken,
bear, golden egg, etc.) and then, step by step, the drawing was transferred to felt.
Algorithm for making a wolf
Algorithm for making a wolf
10. Making three-dimensional figures
The figures turn out to be voluminous, since one piecesticks on another. After all the details
docked and glued, you can start decorating and
draw the contours using a waterproof thin
felt-tip pens (folds of clothing, eyes, elements of clothing and
etc.)
11.
Felt finger theater puppets will help not onlyentertain the child, but also spend time usefully. Such
finger “theater games” develop speech,
imagination, finger coordination. This is real
finger gymnastics.
Children learn to use their hands and fingers,
coordinate their actions, get pleasant
tactile sensations from contact with soft
felt.
After all, the development of fine motor skills, subtle movements
fingers stimulates speech centers. Play like this
theater made of felt is possible with children from two years old, and you can use puppets
you can do it in literally 2-3 hours.
Good luck!


I dreamed of a light - what could this mean?
Dreams from Sunday to Monday - what awaits in reality in the near future?
What does the ex-husband dream about: a resumption of relationships or upcoming trials
What does the name Olesya mean? Olesya is an adult name
Why did they “open the tomb of Jesus Christ”?