In December, along with frosts and snowstorms, the most fun and favorite holiday comes to us - New Year. According to eastern calendar, 2017 a year will pass under the symbol of the red rooster - a strict, serious, but fair bird. Do you want good luck, health, happiness to settle in your home? Appease the rooster - draw the fiery owner of the coming year and place the picture under the tree next to Santa Claus.
How to draw a rooster - first option
The drawing is done with a pencil; under your supervision, even a preschooler can handle this work. Take a sheet of paper, a pencil, an eraser, a postcard with a cockerel (for clarity).
- In the center of the sheet, draw a circle (the head), with a small circle (the eye) in it. From the left side great circle draw two closed triangles - a nose. On top of the head, create a scallop with three adjacent semi-ovals. Place a drop of the bird's beard under the beak.
- Draw two parallel lines down from the head - one start from the bottom of the beard, the second from the back of the rooster's head, this is how you designate the neck. Connect the ends of the lines with a smooth wavy line. Outline the body of the bird with a crescent, the back of which is covered with fluffy tail feathers, similar to narrow leaves of fireweed.

- Mark the wing on the body by drawing a segment symmetrical to the line of the abdomen. Blend it with a pencil, simulating protruding feathers. From the body down, lower two perpendiculars - future paws, draw four fingers with claws. The drawing is ready; if desired, you can color it with colored pencils and write a congratulation on the holiday.


How to draw a rooster - second option
A more complicated version, in which the bird turns out to be more believable, as if it were alive.
You will need: a sheet of paper, a simple pencil, paints.
- Draw a small circle for the rooster's head. Mark the eye in it, draw a beak, an arched neck, focusing on our drawing. Sketch the body, drawing straight rays from the neck. Smooth out the corners with semi-oval outlines, define the line of the wing.


- Draw a crest on the head and hang an earring under the beak. Mark the rooster's feathers on the neck and back with vertical shading. Draw the paws in furry pants, with three crossed toes and one rear spur. Using crooked teeth, highlight the tail feathers and lightly shade the feathering of the head.


- You can leave the drawing like this, shading the rooster’s body with soft shading, or paint the bird with bright watercolors.


How to draw a rooster - third option
The basis of such a pattern will be circles, ovals, semi-ovals.
- Draw a horizontal line in the middle of the sheet, draw a semi-oval down from it - the body. Below, describe two small semicircles that are on top of each other - future paws. Raise the pencil up, lean to the right and draw the head in a circle, from which draw two rays to a horizontal line - you get the bird’s neck.
- On the body, draw a wing in the form of an ellipse. Add a triangle nose, a pendulous beard, and a round eye.
- Make another circle in the upper left part of the large semi-oval - a beautiful fluffy tail will come out of it. Then outline the crest, legs in shaggy shorts, feathers on the side wing. Trace the outline of the rooster with a black marker and color the bird at your discretion with felt-tip pens or paints.

As you understand, portraying a rooster is not difficult. The main thing is to follow our advice and draw with your soul, then the wise bird will become your talisman and will protect you all year.
We draw a rooster step by step with pencil and paints, for children and adults.
Do you want to learn how to draw, but don’t have time to attend specialized classes? It's never too late to start! In this article we have collected many lessons for self-study drawing. The topic of this lesson: drawing a rooster using different techniques.
Of course, you can put a piece of paper on the screen and redraw this luxurious bird, but this is a quick and, one might say, useless task. After all, drawing lessons not only teach you to draw beautifully, but also develop both hemispheres of the brain, calm you down and make you happy.
For the drawing, take two simple pencils. T-hard and TM - hard-soft.
We take a hard pencil in our hands. Draw the contours of the rooster. The clarity of the lines is not important here, it is important to draw them barely noticeable. But the proportions should be maintained as accurately as possible. For convenience, divide the sheet into equal sections.
The next step is the contours of small parts - the head, “earrings”, paws.


Take a closer look at the picture and do as in it general outline rooster hard pencil. Then we take a hard-soft pencil in our hands.


The next step is to draw the details of the rooster. Start with what seems easiest (or what you want to draw first). We can recommend drawing the legs, tail, wing first, and then the head. Try to make it as “live” and pleasant as possible. It depends on the location and size of the eyes and the angle of the beak. At the end draw the comb and “earrings”.


The outline of the rooster is completely completed. If you plan to draw a rooster with pencils, felt-tip pens, or paints, then at this stage you should move on to them. But we will show in this lesson how to completely color the rooster with a pencil.


Using curved lines we highlight the tail and breast as in the picture. Draw the eye inside. Look at your rooster, at the picture. See if you've missed anything. Add as desired. For example, spurs on the paws or other detail.


Now we make bolder strokes in different directions (look at the picture) and different forms and sizes. If necessary, blend the pencil with your finger or an eraser to create shadows.
The cockerel is ready! How do you like our lesson? Did you like it? So, let’s continue to study the following techniques!
Both children and adults like to draw by cells. After all, it is much simpler and also convenient to do in notebooks, notepads and notebooks. Please note that drawing by squares gives a lot of inspiration to children that they can draw great! But it depends on inspiration whether a child will take drawing seriously.


For a child, it is best to number the cells on the sample and on the creativity sheet in advance. After this, select the highest/lowest point as desired and draw from it.

For variety, the cells in the picture can be filled with various characters, thereby creating a unique picture.


This drawing is of a more complex level, but we are sure that both beginners and more experienced artists will enjoy it. Using a hard pencil, outline the outline where the rooster will be located.


We outline the contours and details of the rooster with a pencil (an example can be taken in the first lesson). Check the correct proportions and correct the drawing if necessary.


We finish drawing the rooster schematically. Don't get attached to small details, because now all that matters is big picture and proportionality.


Now we erase the excess (many lines), if they were drawn thinly and without pressure, then the lines will be erased easily, but if you pressed hard on a sheet of paper, then it is better to put another sheet and trace.


The result is such an excellent detailed outline of the rooster. Please note that watercolor is one of the most complex colors for application, so watercolor pencils may be useful for beginners.
Have you chosen watercolor? Let's start with the background. Apply with a brush or foam sponge, darkening towards the middle and lightening towards the edges. Try not to touch the rooster, as it can be difficult for beginners to lighten the right areas.


Now we gradually decorate the rooster. We recommend starting with one section and gradually moving to the right or left.


Detailing the feathers on the wing. Carefully draw each feather, combine several colors in one stroke. Don't be afraid to experiment.


The next step is to draw the neck. The feathers on it are smaller and denser. Highlight as needed with a clean brush and water.


Draw the ridge. It should turn out bright and red.


We detail each feather on the tail with a separate color. The colors will overlap one another a little, don’t worry, watercolor drawings are good, the colors merge with each other at transitions, forming a unique watercolor style.


The comb has dried and you can darken the ends (as in the picture), thereby giving it volume. Draw the eyes. Paint a highlight with white paint.


Let's return to the tail. The top of the tail has already dried and you can draw the middle and bottom.
At the very end, we draw the legs and add the necessary highlights and shadows to give the rooster volume and liveliness.

The rooster is ready, all you have to do is buy a frame!
How to draw a rooster's head with pencil and paints?
In that step by step wizard In class, we propose to draw in detail both the head of the rooster and the rest of its body. We will not, as in previous lessons, dwell on the description of what pencils and paints to draw, but we will give maximum amount step-by-step illustrations for drawing a rooster in different styles.
Drawing a cheerful rooster Drawings of a rooster for children with a pencil for sketching 

In conclusion, let us add that drawing is, first and foremost, creativity. It cannot be instilled by force, but it is possible to discourage the desire to draw and sow self-doubt in an instant. Give your child pencils and paints only when he has good mood, and there is a desire to create!
Video: Simple drawings #376 Drawing a Rooster / 2017
I suggest drawing a real rooster. Like this one.
And he is easy to draw. We take ovals as a basis. There are three of them - head, body, tail.

Let's give our cockerel a shape.

We draw the tail and head in detail.

This is how you get a cockerel.

Typically, the step-by-step drawing of all animals begins with drawing two ovals. Step by step drawing rooster is indicated in the following diagram:

The scheme is very simple. After drawing the rooster, you can paint it in bright colors.
There is also an option drawing a rooster. We start drawing with a circle, this will be our body, draw a beak and an eye, a comb and a head. Now, draw the feathers and wing, all steps need to be repeated carefully according to the photo in the picture

All you have to do is draw a fluffy tail and you’re done, color it beautifully bright colors like a handsome rooster

And you can draw such a rooster using a child’s hand, complete the rooster’s legs and beak, comb


This is what the beautiful rooster looks like, the hero of many of our favorite fairy tales from childhood.

Drawing a rooster is quite easy. Try to complete your drawing following the given diagram, like this:

Or like this:

Could be so:

And like this:

I can say for sure that the classically colored cockerel that is painted in all folk tales occurs now, but you can still see cockerels different breeds with completely different feather colors.


I will give an example of the simplest scheme for drawing a cockerel, but you can decide for yourself how to color it in a more interesting way.


Rooster- this is a male chicken; he differs from his female by a large comb, as well as a lush multi-colored tail. The rooster is also a symbol of France, and in Russian folklore this bird is the owner of a heroic character that comes to the aid of the weak.
Also in Slavic mythology When building a house, a black rooster was sacrificed.
Now let's look at an example drawing cartoon cockerel, for this we will use step-by-step scheme drawing, which greatly simplifies the whole process:


We color the finished drawing; you can pair the rooster with a hen and chicks, or simply draw it on a green meadow under a clear blue sky:

In order to draw a Rooster using pencils step by step, then for this you need. Pencils, white paper, skillful hands, and, most importantly, a photo or video - a diagram.
First we draw the head and body of the rooster. Then you need to start drawing the wings and beak, tail and legs. look at how it is drawn in the picture, and you will be able to draw a rooster very easily.


The rooster is a very attractive poultry due to its bright red comb and colorful tail.
You can draw any animal in different styles. I offer two options, how to draw a rooster with a pencil step by step.
The first option looks more like a real bird and is drawn as follows:

The second option is quite simple - for the lazy or for the youngest artists.

To draw a rooster with a pencil step by step, you will need a simple pencil, an eraser and watercolor paints or colored pencils.
The first step is to draw the outline of the head. Next, add a comb on top, consisting of 5 pointed parts, and below, draw something that vaguely resembles a triangle, which will serve as the contour of the lower border of the plumage of the head. Then we draw a beak on the head, and under it a beard, consisting of two parts.
Moves on to drawing the body and wings. Using several lines we draw the outline of the tail (the lines go down). Then we draw the paws and move on to decorating with paints or colored pencils.

In order to draw a rooster, we will need several geometric shapes: circle, oval, semicircle, triangle, line.
Draw a rooster so that your friends gasp in admiration? Easily! Find drawings of a cockerel for every taste, get inspired and decorate your room with the image of a bird. Do not doubt, the vocal warbler will not remain in debt - he will certainly bring good luck next year.
Simple pencil drawing of a rooster
The Rooster is a born leader who requires special attention and respect for his person. Therefore, when placing a winged one in your album, try hard - the owner next year doesn't like sluts.
1. Draw a circle at the top of the sheet. This is the head of a rooster.
2. Draw the neck. Pay attention to the proportions.
3. To make the rooster look truly handsome, decorate his head with a comb.
4. The bird's beak consists of two sharp parts. Since the cockerel is turned to the side, draw two small triangles on the right side of the head.

5. It's time to draw the torso.

6. Decorate the tail with a bunch of feathers.

7. Draw the cockerel's eyes and legs.

8. Now draw the wing. Draw a clear line, add strokes.

The drawing is ready!
How to draw a rooster with colored pencils?
What appears to be clicking, crowing and cackling to the human ear is actually chicken speech. Scientists have identified more than 30 meanings in chicken language, ranging from the simple “it’s time for me to lay an egg” or “come here, there are a lot of worms!” before calling a partner during the mating season.
Let's draw another one a bright representative chicken family with colored pencils, because he just asks: “Draw me!”
1. Mark the main parts of the rooster’s body with ovals.

2. Draw the eyes, comb, beak and earrings underneath.

3. Now you can outline the paws.

4. Add feathering to the tail, detail the legs.

5. And now - the most important thing. Color the cockerel with colored pencils.
First, clearly draw the eye, paint over the crest and beak.

6. The neck and paws will be yellow.


8. Draw the feathers clearly.

9. Use a black pencil to add contrast to the drawing.

Congratulations! The proud, handsome rooster is ready.
How to draw a rooster step by step
IN wildlife There are many dangers awaiting female chickens. The most terrible of them are predators. That is why representatives of the fairer sex, who hatch eggs and raise offspring, have plumage that reliably hides them in the forest. The same cannot be said about roosters! This is who can boast of luxurious feathers: red, bright red, blue with green tints... It would be a sin not to depict such a handsome man in your album. Shall we begin?
1. Draw two ovals on a piece of paper: a large one (torso) and a small one (head). Connect with a slightly curved line (cockerel neck). Using light pencil movements, outline the paws.

2. Next up is the beak. Draw it like a small triangle. Then draw a bent arc - the future tail of the rooster. Outline the comb and earrings, add lines on the neck. Mark the paws with cross lines.

3. Inside the large oval, draw a line defining the boundaries of the rooster’s wing. Don’t forget to outline the “pants” on the paws and outline the tip of the tail.

4. Detail the tail and wing by drawing the plumage. Draw the teeth of the comb.

5. Draw the paws with sharp claws well. You can finish the drawing with colored pencils on plain paper or transfer it to tinted paper and paint over it. oil pastels.
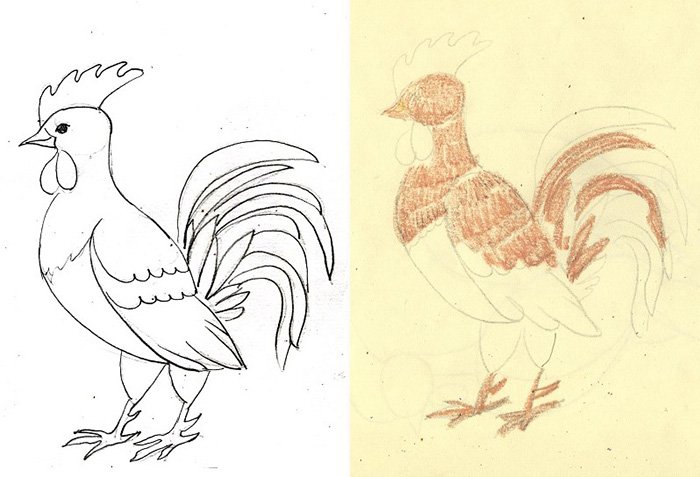
6. Use light brown to paint the head, legs, part of the wing and some tail feathers. The comb and earrings will be red. Use purple to paint the lower part of the body and wings, as well as the tail. Outline the outline of the head and comb with cherry color, and the wing, body and tail with black.

How to draw a rooster with oil pastels
Interestingly, roosters have a sufficient level of intelligence and are able to remember those who treat them poorly or well. Therefore, do not be lazy when portraying the next handsome man, otherwise in 2017 he will still remember this for you.
I suggest drawing a rooster with oil pastels. The main thing here is to color the bird correctly. Watch the photo master class and repeat after the author.
1. First draw the rooster (partially use the top diagrams). The crest, eyes and beak were seen in red.


2. Let's move on to coloring the feathers. Start with light colors, gradually adding darker shades and shadows. You should get a bright drawing.


3. For this little masterpiece you will need pencils of all colors of the rainbow. Draw the background with thick strokes.


The drawing is ready. A bright cockerel will decorate any interior and will certainly bring happiness to its talented owner.

Agree, the rooster is very beautiful bird? Roosters with colorful long tail feathers are in no way inferior in beauty even to the peacock. And what an important and proud look the rooster has... True, draw a rooster live if you live in the city is quite problematic. But on the Internet you can find many pictures depicting this bird. And if you need a drawing of a rooster, you can simply copy it from a photograph.
As always, we will draw a rooster step by step with a pencil. At the last step, you can color the drawing with colored pencils or paints.
1. Draw simple outlines of the rooster

First, it is important to select three areas in which you need to draw the neck, torso and tail. Contour lines can be free form, the main thing is to try to accurately draw their sizes, since the proportions of the future drawing of the rooster will depend on this.
2. How to draw a rooster, second stage

The cockerel has a comb on its head and “earrings” below its beak. I don’t know why he needs them, but he needs to draw them. Draw an oval for the head, and just below the outline for the “earrings”. After this, I think it won’t be difficult for you to draw two contours for the paws.
3. General outline of the shape of the body and tail

Take a closer look at my drawing and try to outline the general outline of the rooster in the same way. Immediately after this, you can remove the extra lines from the drawing. In addition, at this step, you also need to start drawing two bird legs.
4. Drawing of a rooster in detail

This step is simple, but the most time-consuming. Start drawing what you find easier. It seems to me that the paws draw a rooster easiest way. Then you can separate the tail from the body of the rooster with a zigzag and draw the outline of the longest and outermost feather. The next element of the drawing is the wing; you can draw it freely. And now you can start drawing the head of the rooster. Draw the beak and correct the outline of the “earrings”. Select the area in which you will later draw the eye. And finally, draw the initial outline of the rooster's comb.
5. How to draw plumage

At this stage, the drawing of the rooster will be completely completed. Outline the tail feathers with curved lines, add another zigzag line on the neck and draw an eye. See what other details I left out and add them as you see fit. For example, I forgot to draw spurs on the paws. But every rooster is sure to have them. If you paint a drawing of a rooster, make barely noticeable outlines for the different colors.
6. How to draw a rooster. Final step

Black and white drawing of a rooster It doesn't "look" at all. It is advisable, of course, to color it. Just keep in mind that if you don’t know how to use paints, it’s easy to ruin the picture. It’s better to take colored pencils or felt-tip pens and color the picture with them. If you need to draw with a simple pencil, then make shadows based on my drawing. As always, I recommend drawing at least a simple landscape in the background, such as a wooden village fence.
In this lesson you will be able to draw a beautiful Macaw parrot step by step.
It may seem that drawing a sparrow is not difficult, because we see this bird all the time in the yard. In fact, drawing a sparrow is difficult; it is much easier to draw a large bird, such as a rooster.
If the rooster is a very beautiful bird with bright and colorful plumage, then the swan is perhaps the most elegant bird. That is why you need to draw a swan very carefully so that it does not turn into a goose.
The stork and the rooster have become unique and rare birds for city residents. But if a rooster can sometimes be found in the city, then a stork can only live outside the city, away from the city noise.
The eagle is so powerful and predatory bird, which poses a threat even to adult hens and roosters, not to mention chickens. However, the proud and beautiful appearance of this bird makes us forget that it is the largest and most dangerous flying predator.
If you managed to draw a rooster correctly, then drawing a crow will not be difficult for you, especially since a crow can be drawn from life, just look out the window.


Consequences of tubal ligation during caesarean section
The benefits of sunflower seeds for the heart, hair and nerves
Why do my legs give way at the knees?
Name energy: how the patronymic influences fate and the birth program Name patronymic meaning character
First Chinese Emperor