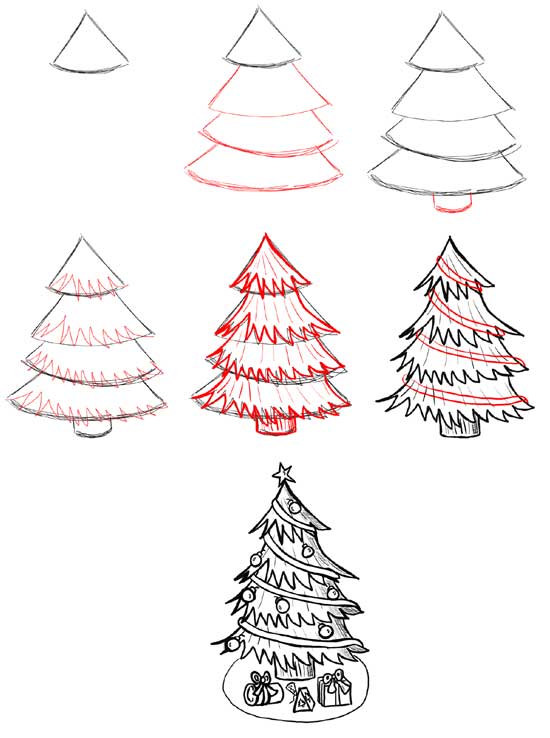
For it, an outline in the form of a triangle is created on paper, the shape of which will result in a Christmas tree with symmetrical sides and the desired size. To do this, you can use a ruler or a regular triangle, with which it is even easier to draw neat lines.
The top of the triangle will become the crown of the tree, the branches of which can have either clear lines or imitate needles if the lines of the design are not straight, but in the form of jagged cutouts. As the sides of the triangle expand, the branches of the tree also become more massive. The lower part of the picture can end with the image of a tree trunk or simply snow in which the spreading branches of the New Year's beauty are buried.
If there are doubts that it will be possible to make the branches the same size, then inside the triangle itself you can draw thin horizontal lines that will serve as the border between the branches of the tree, allowing them to be symmetrical. According to this scheme, difficulties with how to draw a Christmas tree step by step with a pencil, easily and beautifully and in a matter of minutes, will not arise at any level of professionalism and artistic skills.
Interesting! In this technique, a pencil may not be the only possible tool. With the same success, the base part of the tree can be outlined with felt-tip pens and painted over with paints. They will help you make your Christmas tree original and voluminous applications, when toys and garlands are not drawn on top of a ready-made drawing, but are glued from other materials. You already know, ?
The second way to draw a Christmas tree is easy and beautiful
In order to use it and figure out how to draw a Christmas tree step by step with a pencil, easily and beautifully, a slightly different template is used than the one described above. The triangle is replaced by a vertical line indicating the height of the future tree. It is very easy to adjust the size using this method: the higher the line, the larger the spruce itself.
The drawing will begin with an image of a star crowning the top of the head and at the same time acting as the top of a tree. The tree will have three levels in total, the top of them in the shape of a triangle is drawn directly under the star. The jagged ends of the bottom line of the triangle imitate branches. It is advisable to make them not completely straight, but with a slight bend in the shape of a crescent, the protruding part of which will be directed downward.

The second triangle is drawn larger and wider than the first, as the tree expands from the crown down to the bottom of the trunk. The largest triangle is the last one. The teeth on it must be present just like on all the others, otherwise the pattern will be in to a greater extent sketchy and not reminiscent of a real fluffy beauty. We also tell you about Dogs according to zodiac signs.


The last step is to draw the tree trunk, the same vertical line helps to make it even and not make a mistake with the center. You can decorate the tree according to your taste and imagination.
There is less than a week left until the most important holiday of the year, so more and more people are getting creative and creating a New Year's mood for themselves. And it is for such people that below are several master classes on how novice artists can draw a Christmas tree with a pencil step by step.
Before you get started, you should have the following things in advance:
- white sheet A4 or even larger;
- simple soft pencil;
- eraser;
- sharpener (just in case);
- colored pencils or paints if desired.
And here are the main stages of work:
A large triangle is drawn on the sheet - its size determines what the future Christmas tree will look like at the very end. If necessary, you can use a ruler to make the lines as straight as possible.

Afterwards, the top of the future tree is drawn in the form of wavy lines, as shown in the figure below.

Now it’s worth drawing the branches below in exactly the same way. They should not be a single whole, but seem to be scattered.

At the next stage, the most magnificent part of the tree is completed and the auxiliary triangle is erased. This must be done as carefully as possible so as not to erase too many necessary details. Of course, after that they will need to be completed again.

Straight lines draw a short but reliable tree trunk. Since the Christmas tree is not on the street, it is transplanted into a pot that appears on paper at the same stage.

Now comes the interesting part. The tree needs to be decorated with garlands, as shown in the example below. But you can also use your imagination and decorate the Christmas tree at your own discretion.

At the last stage they finish drawing New Year's toys, snowflakes and any other New Year's attributes at the discretion of the artist.

All that remains is to decorate the resulting drawing so that it becomes “alive” and looks more interesting in a frame on the wall.
Now you know how to draw a Christmas tree with a pencil step by step, but this is not the only lesson for beginners in our article today.
Little Christmas tree
The next option is a little lighter than the previous one, and the festive tree looks very cute and attractive. Even children can handle this drawing.
So, in order to show all your drawing capabilities, it is enough to go through the following steps:
The A4 sheet is placed vertically and a straight vertical line is drawn in the middle of it. Its size will correspond to the height of the future Christmas tree, so this point should be thought through in advance. In the same way, you can draw several small Christmas trees on one sheet.

At the very top, just where the depicted line ends, a Christmas star is drawn. It will become the main decoration and should be quite large. Also, for fun, you can add eyes or a funny face on it.
If I may say so, the tree will have three tiers that complement each other. At this stage, the upper level begins to be drawn on paper in the form of a mountain with jagged ends.

Then the next part of the New Year tree is drawn. Everything is done exactly the same as in the previous step, only this time the “mountain” should be a little larger.

The penultimate stage is a detailed drawing of the lower part of the tree. Of course, it will be larger and more magnificent than all the previous ones. Now you need to finish drawing the visible trunk and horizon line below so that the tree does not “hang in the air.”

At the very end, all kinds of New Year's decorations and garlands are drawn, which will sparkle with multi-colored lights.
Most often, for beginning artists, it is important not only how to draw a Christmas tree with a pencil step by step, but also in what color scheme it will be presented. So it's time to pick up pencils and trust your inner voice.
Christmas tree from the cartoon
IN Soviet time Many holiday cartoons dedicated to the New Year were produced. And we all probably liked the festive spruce, whose branches were crushed with snow and decorated to such an extent that sometimes it dazzled our eyes.
It’s very easy to draw a similar Christmas tree yourself. And you can do this in just 4 steps:
According to a familiar pattern, a triangle is drawn on a sheet of paper. An auxiliary horizontal line is carefully drawn from its very top. With its help, you will be able to harmoniously draw a tree trunk, stars and a stand for a spruce tree.

It's time to start drawing the left side. To do this, smooth lines with pointed tips are drawn on paper. Sometimes they bifurcate, sometimes they remain united. This way the branches will look more harmonious. At the same stage, a pointed star is drawn on the top of the tree and its lower branches.

Using the same pattern, the right side of the New Year tree appears on the paper and both sides are connected to each other by wavy lines. All that remains is to finish drawing the trunk and stand, as well as New Year's toys or a small amount of snow.

After the step-by-step principle of drawing a Christmas tree with a pencil for beginners has become clear, all that remains is to erase the additional lines and paint the resulting masterpiece with paints or pencils.

Such a drawing can be a good basis for homemade New Year's cards or as a gift for parents. You can also hang it in a frame on the wall or send it to creative competition young talents.
The latest holiday version of the drawing
Whatever it may seem at the very beginning, there is nothing difficult about drawing a Christmas tree yourself with a pencil. How to do this step by step will be shown below for beginning artists.
To do this, you only need a pencil, paper, an eraser, a little time and self-confidence. And even if it doesn’t work out the first time, this is not a reason to quit creative activities.

So, let's start with the simplest:
- A straight horizontal line is drawn in the middle of the A4 or A1 sheet. To do this, you can use a ruler.
- Based on the example below, a star is carefully drawn, which will become the main decoration on the festive Christmas tree. It can be supplemented with interesting elements.
- Now two arc-shaped lines are drawn from the star - they should smoothly diverge to the sides and be connected to each other by a zigzag stripe. There is no need to rush at this stage.
- A similar element is drawn below, which should start from the second zigzag on the right, and then on the left side.
- The third part of the tree is drawn using the same principle, but is larger in size. Then the trunk visible from under the branches is drawn.
- All that remains is to decorate the New Year's beauty with green paint and the drawing will be complete. For harmony and " interesting image“It is recommended to decorate the top part of the tree with light shades, and the rest with dark tones.
- As soon as the paint dries, you can finish painting holiday toys on the tree branches with multi-colored paint, as well as depict beautiful background with snow.
Now everyone can draw Christmas tree and even use different variations for this. But don’t stop there – use your imagination and don’t be afraid to be original.
There is a little less than a month left until the New Year, we are preparing gifts and drawing cards. And you? If yes, then two Christmas trees are waiting for you in this lesson. Lovers of handicrafts feel especially inspired before the holidays, because their creative impulses can be channeled into making gifts and cards. Handmade cards, even the simplest ones, evoke very warm feelings among loved ones. And how grandmothers admire the creations of their grandchildren!
I won’t tell you how to make the card itself, but I will show you how to draw a Christmas tree for a card. More precisely, even 2 New Year trees. They are both quite simple, they can be drawn by both adults and children.
In the first case, the design of the Christmas tree is simpler and more understandable for children, and the decorations can be more complicated. You can decorate the Christmas trees in a newfangled style, as I did, or in your own way.
Herringbone silver
It is silver because I drew on the card with silver markers and an outline. But more on that later.
I didn't use a pencil for drawing. Look at the diagram to understand how to draw a Christmas tree step by step. Before drawing on a postcard, you can practice drawing with a pencil or marker. In my case, the blue training herringbone was made with a regular thin marker.
In the diagram, each new step is marked in red.

- For four tiers, you need to mark 5 dividing points vertically in the middle of the future Christmas tree. Don't forget to leave some free space at the top and bottom. If you plan to draw a high tip on the top of the head, then leave more space.
- Imagine how the lines expand from the top point down, forming a triangle. By the way, if it is more convenient for you to make a preliminary border for the Christmas tree, then mark the triangle with a pencil. We draw the upper tier, but not as a triangle, but as a bell, slightly bending the corners of the base upward and lowering the lower border in the center in an arc.
- — 5. We draw the remaining tiers like skirts, also raising the corners and lowering the lower border in an arc. 6. All that remains is to draw the tip and the leg (optional).
So our form is ready, which can now be filled out different patterns. My Christmas trees are filled with different doodles - circles, curls, flowers, free form, asymmetrical. And around it I drew curls and snowballs to make it more elegant.

Christmas tree in doodle art style made with thin markers of two colors
How to draw a Christmas tree in simple version you know now.
Children also enjoy drawing such a Christmas tree. They can be asked to draw a Christmas tree with colored markers or pencils. Of course, in this case you need to draw all the “skirts” with a simple pencil, and only then start coloring. In the Zenart and graphics section there are ready-made coloring pages of Christmas trees for children of different ages, as well as coloring templates for Christmas trees in the doodling style. And here's what we got.

children's drawing for this lesson
Postcard with a silver Christmas tree in doodart style
Now I’ll tell you about the postcard. I took dark thick paper with a beautiful texture from the album. I marked the size of the card and cut it out. Dark paper is a little fussy. Therefore, before drawing, I washed and dried my hands, so as not to leave fingerprints, and placed a sheet of paper under my hand. I marked the points with a pencil and then with a white marker. I did not draw the borders of the Christmas tree, because erasing the pencil with an eraser leaves marks on the paper that spoil the whole look.

Next, I drew the skirts with a white marker (here from ZIG). I filled them with silver patterns made with a gel pen. And I added a few more special effects, which, unfortunately, are not very visible in the photo: I decorated some details with finely dispersed holographic sparkles, and also added dots with a silver volumetric outline.
The card turned out stylish and elegant. Inside, I decorated the corner with a pattern in the same style using a silver gel pen. I pasted a square of thick light paper - this is a place to write congratulations.

And now the promised second lesson - how to draw a Christmas tree step by step, but in a different version.
Christmas tree green
This Christmas tree may seem a little more complicated, so I also advise you to first sketch out the sketch with a pencil in a smaller version several times, so that you can easily draw it on a postcard. After all, as you understand, it is better to make as few erasures and markings as possible on a postcard, then the paper does not deteriorate and the drawing looks neater. But in this version it is more difficult to do without a pencil. I laid the outlines on the pencil markings with a marker, and before painting the Christmas tree, I erased the visible parts of the pencil sketch.

- Draw a cone with a pencil. Do you like to use a ruler? Please, you can use a ruler - corner.
- We draw stripes with a pencil.
- Before drawing the Christmas tree itself, you can already draw a tip with a marker, it will cover the very top of the head.
- Now we draw the outlines of the tiers of the Christmas tree with a marker, and erase the pencil sketch where it is visible. If you draw with a gel pen, let it dry before you erase the pencil.
- We draw the outlines of Christmas tree decorations, for example, with colored markers or pencils.
- Filling the space between toys green, also with felt-tip pens, markers or pencils.
We do not paint the ribbons, this is a decorative effect. How to draw a New Year tree so that it is festive and elegant? Add some shine! This is how our Christmas tree turned out.

We took yellow single-sided cardboard on which we drew Christmas trees, some contours were outlined with silver and gold gel pens, so the decorations play beautifully in the light. Especially beautiful flickering under artificial light. You can also use glitter gels for children's creativity.
Next, we cut out a rectangle with a Christmas tree and pasted it onto a card made of decorative paper. By the way, you can draw a Christmas tree on self-adhesive paper, so that you can also glue it onto a blank for a postcard.
That's all for today! If you liked it, leave a review in the comments. I remind you that you can send your creations to our club’s VKontakte feed vk.com/zenarts
Take a sheet of paper or album, a pencil and an eraser. Ask your child what he will use to decorate the hedgehog and prepare pencils, markers or paints with a brush.
Tell your child the rules of how to work with paints.
- Prepare and moisten the paints with clean water;
- mix paints on a palette (white paper), not forgetting to wash your brushes;
- evenly cover the surface of the background and characters in the composition;
- at the end of the work, wash the brush, do not leave it in a jar of water, but wipe it with a cloth;
- After finishing the paint, put the pencil in boxes or in a pencil case.
How to draw a New Year tree


Step-by-step instructions "Step by step" on how to draw a Christmas tree.

1. Draw a triangle. Now draw a star on the top of the triangle. Leave enough space to add the rest of the tree.

2. Draw the top of the tree, which consists of three branches, as shown in the picture. Don't try to draw too accurately, not quite straight lines will look better. The ends of the branch lines should join the star.

3. Now add two more rows of spruce branches. Moreover, in each subsequent row of branches one more is added. Thus, row 1 - three branches, row 2 - four branches, row 3 - five branches.

4. Then simply draw a bucket under the tree and attach it to the tree using two lines, which will be the trunk of the spruce. Add two lines down the center of the bucket as a ribbon as shown. Erase all auxiliary lines.

5. Draw a bow on the ribbon and draw a ball on each branch. Give the star at the top of the tree a sparkling effect. Our Christmas tree is ready! Well done!

6. Now you can start decorating.
Whatever your child draws, be sure to praise him and hang the resulting masterpiece on the wall so that the child feels like a real artist.
How to draw a Christmas tree
We offer a Christmas tree option that you can decorate as you wish.
Send us the resulting drawing by e-mail. Please indicate I.F. child, age, city, country where you live and your baby will become a little famous! We wish you success!
If you ask any child which holiday is his favorite, then, without a doubt, any child will answer you: “This is New Year!” New Year is one of the most famous and favorite holidays for both children and adults! We are all waiting for a miracle from New Year's Eve, some kind of magic, we believe that everything will change. What about the expectation of gifts? What could be more exciting than this? The New Year comes to us with snow, cold weather, and the smell of tangerines and Christmas tree needles is everywhere. Today we will learn how to draw an obligatory attribute of this holiday - christmas tree with gifts! Someone in the house puts live Christmas tree, spruce or pine. And some, in order to preserve living trees, prefer artificial Christmas trees, which are currently very similar to natural ones. Drawing a Christmas tree is not at all difficult. Just follow our tips, look carefully at the pictures and get to work.
Stage 1. Using a ruler, we will draw auxiliary lines for our future Christmas tree. One vertical and two horizontal - shorter at the top, where the very top of the tree will be, and longer at the bottom, where its base will be.

Stage 2. Now let's start drawing the outline of our forest beauty. Stepping back a little from the top horizontal line, we begin to mark the branches of the tree on both sides of the vertical. We try to arrange them carefully, symmetrically, so that our Christmas tree will ultimately be beautiful and fluffy. This will be like the back layer of branches.

Stage 3. Now we will draw the front layer of the Christmas tree legs. We place it in front of the previous one. These branches seem to overlap the back layer of branches and make our Christmas tree even more fluffy and spreading. Don't forget to mark the top of the tree by sharpening it along a vertical line.

Stage 4. We place Christmas tree decorations - balls - on the branches of our Christmas tree different sizes. We simply draw circles of different diameters on the branches. These toys must be placed evenly throughout the tree so that there are no empty areas and our tree is beautiful and elegant. Below under the tree you need to draw gifts for the kids. Gifts are packaged boxes with contents in them. different objects that children want to receive for the holiday. They are drawn like this. Using a ruler, mark a vertical line and two oblique lines extending from it at a certain angle at the top. Then connect them together. The result is a cube shape. On the sides of these cubes we draw lines of future bows that will be used to tie the boxes.

Stage 5. Now we draw a star on the top of our Christmas tree. It is five-pointed. In order to draw it straight, you can also use a ruler. The main stages of drawing a star have already been given. Below we will draw the trunk of the Christmas tree and decorate it with a large bow. The bow consists of two identical parts, which we place symmetrically on both sides. We also decorate the upper edges of gift boxes with large tied bows like roses or flowers. We draw everything with smooth lines. The edges of the bows go down onto the boxes.

Stage 6. Now you can shade the boxes a little and give them a certain color. On the bantu around the trunk we will also mark stripes.

Stage 7. Finally, let's start decorating the Christmas tree. Naturally, the Christmas tree only comes in green. different shades. The trunk is brown or gray. We make the balls on it multi-colored. The star can be red, yellow, blue. Gift boxes - according to your taste and desire. Look how beautiful christmas tree We did it! It would be New Year soon!


Meat with eggplants and tomatoes in the oven Ragu with white wine
How to properly and tasty cook pancakes with cottage cheese
Rose petal jam made by me
Buckwheat with pork ribs in a slow cooker Ribs with buckwheat in a slow cooker recipes
Chicken skewers Chicken skewers with bacon