When a photographer begins to develop the composition of a future photograph, he must first take into account the types of objects that will be depicted in his photograph. Very often they include in the frame different kinds lines, including converging lines. This is what our story will be about today.
Lines in photography, and indeed in any image on a plane, carry within themselves a huge emotional potential, a powerful charge that creates interest in the image created in the frame. If the composition of a photograph contains several lines that converge at a point located in it, or are located very close to one another, then this looks very technical and attracts the viewer’s attention to the image.
The simplest, most common example of converging lines in a photographic image is the rails of a railroad track. This is a classic. If you stand between two rails and look along them into the distance (before going out onto the tracks, be sure to make sure of your own safety!), then on the sides of the railway you can always see two paths, two lines, which the further they run away from our eyes, the more closer to each other.
If you photograph this, then when you show the photo to the viewer, it is easy to make sure that his eye will slide along the lines of the rails depicted in your photograph. This is a completely natural reaction, this is how the human brain works. These two lines converging at the horizon are like two funnels, directing a person’s gaze in the direction desired by the photographer or artist.
The same thing happens if the photograph shows two paths in a field, converging fence lines, rows of windows in big building, wires and telegraph poles, stairs... There are a great many such lines in the space surrounding us. And they all converge at one point.
In this article we will give you some tips that we hope will help you in working with such lines.
1. Experiment with positioning
This is the same classic shot of the railway line just described. This plot has huge potential. The lines in such a photograph can either converge at one point or run symmetrically, parallel to one another.
Another type of positioning. When photographing, take a step in one direction or another from the railroad tracks. Make the rail lines run diagonally across the frame, from one bottom corner to the opposite top corner. This will give the composition of the photo noticeable dynamism. Vertical and horizontal lines arranged symmetrically can look very impressive in the frame. But movement is conveyed much more effectively by lines running diagonally across the image plane. The vector of this diagonal can be changed by looking at the lines from a slightly different angle, moving away from the lines a little to the side.


2. Short throw lens
The original image of converging lines is dramatically affected by different types of photographic lenses. If the photographer is at a point located between these two lines, a short throw lens will be especially useful to him. wide angle lens. Such a lens with a small focal length is able to visually enlarge the space between two parallel lines at the place where these lines begin in the frame. This seemingly artificial increase in width will have a noticeable effect on the viewer viewing your photo.
3. Positioning "convergence"
As we said today, converging lines in a photographic image attract the viewer's attention precisely at the point where they meet one another. This point, which coordinates the viewer's attention, thus becomes the most important compositional element of the entire photograph.

But in this case, one should not forget about the “rule of thirds”, which means that on the lines that visually intersect at one point, there are several more imaginary key points that determine the places of greatest interest to the viewer.


If the point at which the lines converging in the space of the frame touch each other turns out to be outside the boundaries of this frame, then the entire image constructed by the photographer will seem unbalanced and will cause the viewer a feeling of psychological and visual discomfort, a certain tension. If this is very important point is inside the frame, then we can already talk about high level photographer's skill. At the same time, the viewer’s attention to the place where these lines converge increases.
4. Adding emphasis at the point where the lines converge
In some cases, the point of convergence of lines in the space of the frame can be strengthened by introducing some additional object or object into the composition of this frame. For example, wait for a train to appear on the horizon. Or just a person walking along the paths. But most often there is no need for such an emphasis. Converging lines in the frame already work great.

Look at the photographs in which such lines play an important role. Get inspired by them. Pick up your camera and go hunting for the same amazing effects.
Creative success to you!
Creating an interesting and eye-catching composition is the key to an attractive illustration.. Paintings with a powerful composition of elements will grab the viewers' attention and hold them until every little detail you worked so hard on is appreciated.
In turn, a compositionally poorly assembled painting can ruin the appearance of even the most beautifully depicted objects, creating the feeling that something is wrong with it. Many will not even understand why, but the picture will be less attractive, and it will be more difficult to understand its meaning. Later in this lesson, I outlined 20 points that, in my opinion, are one of the basic rules of good composition, rules that I always rely on when I take up a brush.
1. Focal point
Every highly compositional painting has a dominant object, or focal point, that is the center of the entire painting. All other elements of the picture should complement or frame this object. The focal point can be anything from a skyscraper in the distance to a paper cup sitting on a windowsill overlooking the entire city. It is very important that the focal point fits into the picture. There are many ways to highlight a focal point - the “One-Third Rule” or the “Golden Ratio Rule” - but I will not go deeper into this issue, because... for me it’s more important to feel the picture, without any rules.

2. Placement of other objects
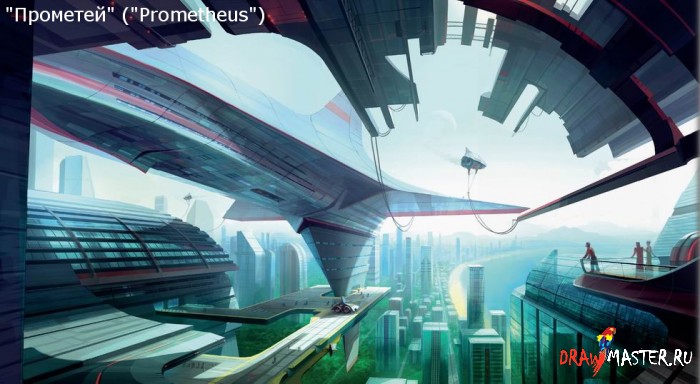
All other objects should be in harmony with the focal point and thereby enhance the effect of the entire composition. Carefully placed elements of the painting will contribute, ultimately adding depth, balance and realism. Pay attention to the painting “Nimbus”, which depicts a landscape that directs the viewer’s gaze into the distance; or on small details, such as the car near the moored ship in the painting "Prometheus".
3. Unity of objects
It is very important that all elements of the picture look appropriate, emphasizing that the shapes and structures of objects located in the distance are dictated by the external conditions between them and the viewer; or that all objects and structures correctly reflect light and cast shadows. With this approach, the composition will benefit. Let's return to the painting "Prometheus" - notice how the ship casts shadows on the pier and the buildings surrounding it, noticeably adding to the realism of this moment.
4. Framing
In paintings with a complex composition, a technique such as framing can be useful, which will help guide the viewer’s eye through the picture and keep him there. This can be achieved by simply adding smooth lines, or clear silhouettes to guide the eye exactly to the place that needs to be highlighted, most often this is the focal point. Pay attention again to the painting “Prometheus” - because. This can be seen very clearly on it - where I framed the center of the picture with a large pier facing forward.
5. Avoid tangent lines
They can have a negative impact on the whole picture and should certainly be avoided. Tangents are lines coming from individual elements of the picture that intersect at the end. For example, power lines that converge right at the corner of a building. Moving these power lines away from the building, placing them a little higher or lower, can avoid the visual perception problem.

Click on the picture to view the image in full size and 100% quality.
6. Color temperature
When you are faced with choosing dominant colors for your painting, always remember that the painting will ultimately evoke either cold or warm sensations; it cannot be both warm and cold at the same time (unless this is an author’s technique). Of course, you can use both warm and cool colors in your painting, but one of them should always be dominant, even if not by much (as, for example, in the painting “Dungeon”).

Click on the picture to view the image in full size and 100% quality.
7. White saturation
Contrast gradient is a very important tool when creating interesting composition. Ideally, you should achieve a balance between light, medium and dark tones, using at least some of them. To achieve a good balance, try using a maximum of one shade, a little of another and just a little of a third, for example, as in my painting “The Room” - I used 60% dark, 25% mid and 15% light. .
8. Depth
Depth and perspective are also very important. Images from a certain angle require a properly organized and realistic depth, using a series of elements that lead the eye deeper into the picture. These elements can be fences, railways, an urban landscape, or even just a line of flowers on a field. The best compositional paintings are drawn as if you are looking at them from the inside.
9. Closing
Unlike tangent lines, this point refers to elements of the picture that meet each other. All elements of the picture should either be located far from each other or be in close proximity. When brought together, the objects create a unified form that draws the viewer's gaze away and causes him to pause while peering into the painting.

Click on the picture to view the image in full size and 100% quality.
10. Light
After giving the object its shape, this is the most important part for me. Before painting a drawing, I pay a lot of attention correct positioning Sveta. I have divided this topic into several logical parts to explain in more detail different features creating light and realistic compositional balance.

Click on the picture to view the image in full size and 100% quality.
11. Let there be light!
Choose a position for the primary (brightest) light source - the sun, a window, or, for example, a street lamp - in which the object will look three-dimensional and will cast an interesting shadow. The primary light can be the main part of the composition and even its focal point; it determines what color everything it falls on will be. Without light we will not see anything: therefore it is very important, and its correct placement is no less important.
12. Shadows
Shadow can be used to highlight the shapes of an object, attach them to a drawing and, when correct use, to add an additional frame to the composition (for example, as in the painting “Prometheus”, where the upper part of the pier casts a shadow on the lower part - the promenade). What is important is that the shadow appears better when positioned under the direct rays of a light source.

Click on the picture to view the image in full size and 100% quality.
13. Additional light sources
Important factors in the finished composition are the secondary and tertiary light sources. Secondary sources can be scattered or direct rays of light reflected from the surface on which the primary light fell, or a weak glow from street lamps and car headlights, and even strong light sources close to the primary one. The added secondary light makes it possible to enhance the detail of the picture and the arrangement of the elements of the picture.

14. Atmosphere
Atmospheric depth and occlusion (light absorption) are important components of a single composition in a painting. This can be a spacious area where the transparent air between the viewer and the horizon takes on color and tonal contrast; or it may be a small area where light passes through dusty air, taking on a subtle color (such as in The Room). A strong beam of light can also add atmosphere to a painting by bouncing and scattering around it.
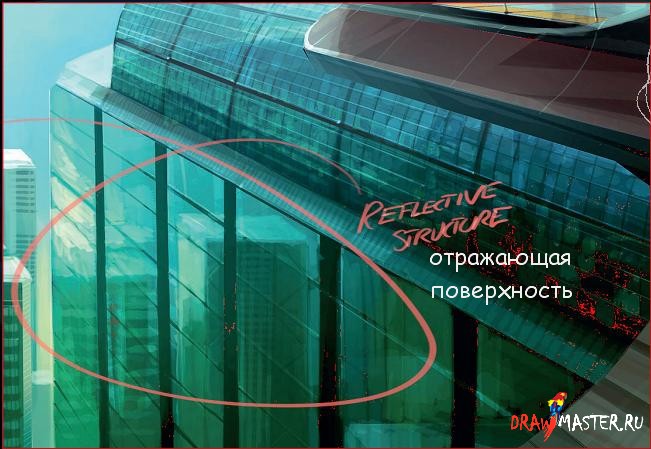
15. Surface structure
For compositional balance, thoughtful and correctly constructed structures of various surfaces are also very important. It must be clearly understood that the use of reflective or shiny surfaces can attract the viewer's attention. In the painting “Prometheus” I used a lot of reflective surfaces that will definitely attract the attention of the audience, but also will not distract too much from the main element of the painting – the ship, but will only enhance its effect. Or, conversely, the use of dull and dirty textures can evoke completely different feelings in viewers (for example, as in the painting “The Room”).
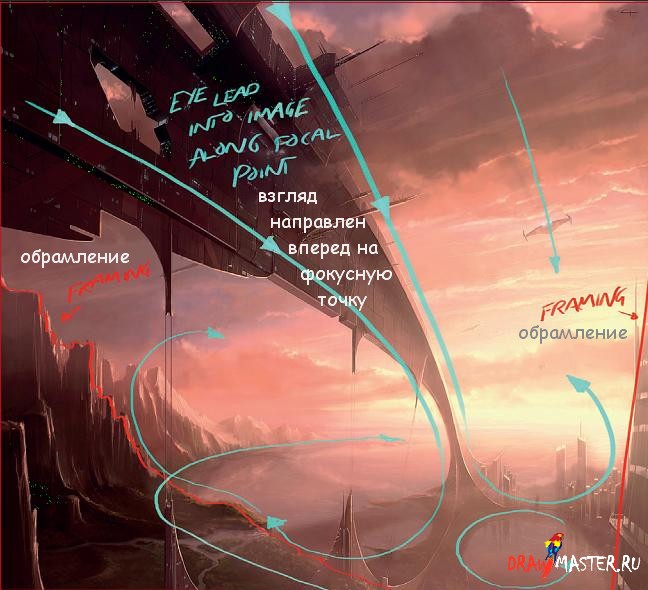
16. Direction of view
You can also draw attention to the picture by using elements that direct the viewer's eye to the center or around the frame. This can be achieved different ways. For example, good old fences or roads going into the distance, or, as in the painting “Nimbus”, a huge structure cutting through the sky and leading glance from the top left corner to the very center. The trick is that the viewer will lead his gaze along the arch until he comes to the end point - the most important part of the drawing.
17. Holding your gaze
If the viewer pays attention to the picture, the important point here is to hold this gaze longer. Let's go back to the good old technique with a fence leading into the distance from left to right. On the right side you will definitely need to add something, for example, a couple of trees or maybe a small house, so that later you can smoothly return the viewer’s gaze to the entire composition. Let us turn again to the painting “Nimbus”. Notice how the eye follows the line down and lingers on the city, looking at the rocks on the left and the city itself on the right.
18. Dramatic
Large-scale and epic images are usually either dramatic or very calm. To add drama to the image, you can play with depth, scale, speed of movement of elements or their calmness. In Nimbus, a large arched structure emerges from behind the viewer, sinks into the clouds, and descends to a point in the distance, showing how enormous it is in relation to the comparatively small skyscrapers at the point where it touches the ground.
19. Balance
Achieving balance in your composition is a matter of practice, especially if your focal point is a large, dramatic detail that will captivate you. most frame. Looking again at the painting "Nimbus" - here I balanced the painting by using some shorter buildings, cliffs sloping into the distance on the left, and adding clouds that soften the perception of the painting. Together, these elements create harmony between the huge focal point and the rest of the surroundings.

20. Relative scale
Complex compositions depicting different shapes and dimensions must be correctly constructed so that the viewer sees and understands the scale of the elements of the picture. In the painting "Prometheus" I painted several people - some closer, some further from the ship, to show the enormous size of this ship and the pier. You can create huge scales as far as your imagination and the boundaries of the canvas allow you. It’s the same with small objects - be it a glass with pencils, or a telephone on the edge of the table - everything should serve to ensure that the viewer understands the size of the table.
Hello, dear amateur photographers!
Today we will talk about lines and their role in photographic composition.
So, when we try to compose a shot in the viewfinder or on the LCD screen of our camera, we need to pay attention to close attention on line. They are the ones who can unite various compositional elements of the frame or separate them, determine the mood, expressiveness and dynamics of the photograph.
Lines can be both a photographer’s assistant, enhancing a particular effect, and a real destroyer of the entire compositional solution.
The photographer's knowledge of the use of lines in the composition of the frame not only helps him create bright, interesting photographic images, but also allows him to understand how the viewer will view the photographs he has taken. Where will his gaze stop, what details of the image will he pay the main attention to, and what will be his general perception of the photograph. Depending on their location, the lines express the dynamics of movement and give the photo a particular mood.
Study for "Madonna in the Grotto" by Leonardo da Vinci
and one of the possible "lines of beauty" of this sketch.
Such a line can act in a composition both as a framing contour of the object being photographed and as a guide line.

Diagonal lines
Diagonal lines in the composition of the frame not only add dynamics to the image and, in fact, symbolize movement, but also simply attract the viewer’s attention.

The starting point of the diagonal line is usually placed in one of the corners of the frame, and then the line is drawn either from the upper left corner to the lower right ("falling" diagonal), or from the lower left corner to the upper right corner ("rising" diagonal). The implementation of both versions of the diagonal line gives the viewer a feeling of tension in the movement.

Diagonals can also be used to direct the viewer’s gaze in such a way that, moving along diagonal lines, he fully perceives all the plot-important details of the photograph.

Diagonal can connect main object shooting with a background image, thereby forcing a person to move his gaze into the frame.
In addition, diagonal lines allow you to add depth and some spatial dimension to the photo. In this regard, a special effect occurs when there are any lines converging in the distance in the frame.

So, we looked at the main types of lines in photographic composition. But we should not forget that the line along which the viewer’s gaze moves can not only be progressive, but also form an oval, triangle, square, etc. The strongest impression is created when there is an odd number of objects attracting attention in the frame, or more precisely, when this number is equal to three (composition triangle).
Now we know that lines in the hands of a skilled photographer become a powerful weapon with which the photographer helps the viewer see exactly the image and the mood that he wanted to convey in his picture.
But when using lines of directed attention, you must adhere to two rules.
First, you should make sure that the lines always point to the most important objects in the image. This also allows you to direct the viewer’s attention.

Secondly, it is necessary to ensure that there are no noticeable “dots” along the lines that can lead the viewer’s gaze away from the main line that the photographer “laid” for him specifically, so that he can feel the entire image as a whole.
Extra lines and dots outside the image scatter attention, the direction of the gaze changes and the necessary concentration for full awareness of the image is lost, a loss of interest occurs, and the entire photograph becomes boring to perceive.
And at the end we will summarize the main results.
Lines are one of the main elements of the composition of any photograph.
Lines, real or imagined, can enhance the effect of an image or give a photograph a particular mood.

Lines in a frame carry a variety of emotional loads: curved and horizontal lines calm, broken lines irritate, vertical lines exalt, diagonal lines add dynamics.
Of course, to learn how to use it correctly and, most importantly, to the right place Various types lines, constant practice is required. The next time you take a walk with your camera, see how you can use the lines in the frame to give the photo more expressiveness and emotional brightness. In addition, try to constantly analyze the shape of objects. Ask yourself the question of how you can photograph this or that object in order to maximize its shape in the picture, make it more interesting for the viewer, and convey the necessary mood in the frame. And you will very quickly develop the skill of analyzing shapes and lines.
Now, having mastered these skills at least in general outline, you can move on to the composition.
Composition - as it is, power lines and balance is a complex and rather subjective question, because the mutual harmonious arrangement of objects in the picture is a matter of taste for each individual person. However, despite the fact that there is no comrade to taste and color, there are some general principles compositions, using which you can make any pile of objects harmonious. At least with enough training.
Composition is how various objects are positioned relative to each other in a drawing or in reality.
How they are located in reality is not particularly important in this case. Unless, of course, you are planning a rock garden. But the mutual relationships between the images of objects in the picture... This is really important. Among other things, also because even if in “real life” objects are arranged anyhow, then, knowing the rules, you can arrange them in a drawing much better than in life.
So, the first rule is drawing should not touch the edges of the sheet, unless specified by the specific purpose and design. For A3 format there should be approximately 2 cm of space left from the edge.
Second rule. And, in fact, the main thing. The picture must include harmony. In other words, equilibrium. Or, on the contrary, there must be a lack of harmony, a lack of balance. It all depends on what you want to show.
What does it mean?
Let's compare the square standing on the surface:
and the same square, only slightly distorted.

Which image is more balanced?
Now let's place a large square on the edge of the sheet. And the small one is in the center.

And vice versa, a large square in the center of the sheet. And the small one is in the corner.

Which one is more harmonious?
Each person has personal preferences. Some consider one thing harmonious and balanced, others another. It is almost impossible to explain the principle of harmony and disequilibrium at a distance, remotely. Everyone develops a system of harmony and disequilibrium for themselves. And then, if this is part of his tasks, he tests the system on other people. Checking her out.
You can develop your own system of harmony only through practice. And testing it on other people.
The rule of harmony and disequilibrium applies both to the shapes in the drawing and to the colors and tones that are used in the drawing. Color is red, blue, etc. Tones - darker, lighter, very dark, very light. One color can have many tones. One color can have many shades - yellow can be more red, less red, more green, etc. All these features are also in relation to each other either in harmony or in disequilibrium.
Harmony and disequilibrium in pure form are achieved by one or another combination of images of objects and color combinations.
Third rule. Power lines. It's a bit like the second rule. Some people achieve harmony or disequilibrium with its help. But lines of force are different.
A little exercise. Take the picture that you liked the most.
For example, "Madonna" by Leonardo da Vinci.

And now watch the Baby’s hand, with which he reaches out to the Madonna’s face. The lines of this hand smoothly flow into Madonna's hair. The contour of the hair smoothly goes around the face, goes down to the cloak and the line continues with the folds of the cloak. The folds of the cloak are lost under the hand of the Madonna with Berries. However, the line of force continues with the folds of clothing above the elbow, flows into the hand with berries, to the lower hand of the Baby.

The line of the baby’s upper arm also passes into the power line of his head, into the power line of the Madonna’s face.
Just like the arms, the Baby’s legs are also united by a line of force. The beginning of the line is set by the fingers of Madonna's hand. This direction continues with the Baby's right leg and goes into the lines of the folds of the cloak. The Baby's left leg continues with a line of force on one side - in the folds of the cloak, and on the other - in his body, passes to the head.
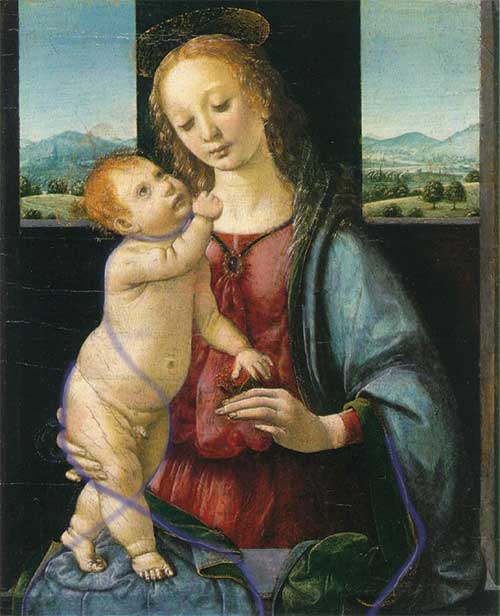
See how the lines of force connect the foreground with the figures and the background in the windows in the background. In the left window, the line of the nearest hill meets the line of the Baby’s chin. The line of the far mountain in the left window goes into the line of force on the outside of the Baby’s face.
The Madonna “enters” the landscape in exactly the same way. The line of the nearest hill continues with the folds of the cloak. The mountain slopes also converge on the lines of the cloak. Notice that the line of the nearest left hill and the line of the nearest right hill continue into the Madonna's necklace and meet each other on the jewelry. By the way, decoration is the visual center of the picture, the point of intersection of most lines of force.
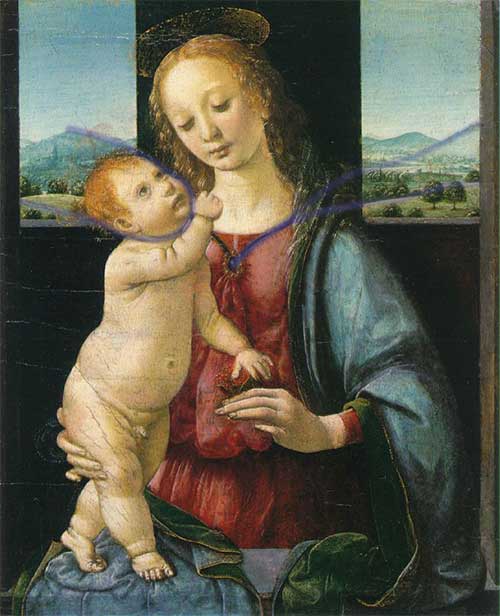
I hope you noticed these features. The lines listed are not all that are in the picture. I don’t know whether Leonardo da Vinci took these lines into account when developing the composition of “Madonna” or not. But these lines are present. And thanks to them, the composition turns out to be not only harmonious and balanced, but also connected. The composition does not fall apart. She is whole.
Thus,
lines that can be clearly traced regardless of the object in each image are lines of force.
They are called power because they carry the whole picture, its integrity. Remove them by arranging objects differently - and the picture will fall apart and become weak. Lines of force are what unite images of objects. These can be either real lines or imaginary ones. They disappear and appear. However, if they can be traced, then the picture is complete.
On the other side, power lines- this is what expresses the character of the object. If their combination changes, then the object changes. Lines of force are what remains when all the unimportant, insignificant and insignificant details of an object are removed. Remove everything that does not unconditionally characterize the subject. Lines of force are the skeleton of the idea of an object. His eidos, ideal image.
Objects interact in the drawing using lines of force. They either communicate or are disconnected from each other. Lines of force show the relationship of objects to each other.
Lines of force have different densities and can form convergence points - epicenters. There may be several of them in the picture or just one. It may not exist at all. Depending on this, the nature of the picture changes.
Learning to use force lines is easy—you just have to watch. Behind the paintings already made, behind what you draw. And at some point, when it accumulates factual material, you will understand how to apply this to your specific tasks. Moreover, almost all living things contain many lines of force.
So, first observe with examples, and then draw yourself.
How do these rules apply? Very simple. If you want to draw movement, then this image cannot be balanced. Because movement is not peace. There is no balance in movement, there is a desire to go somewhere. The lines of force converge towards the goal of the movement. If you want to paint a static picture, then the lack of harmony will definitely not allow you to achieve this. When there is no harmony, the viewer's gaze roams around the picture, creating movement.
There must be balance in a static painting. All parts are linked to each other. United by power lines into a single whole. Lines of force do not have epicenters or have one clearly defined epicenter.
With combinations of these rules you can achieve huge amount possible nuances and moods, when parts of the picture intertwine with each other in the order you planned, and, perhaps, even fit into the interior of your room, the lines of force of which continue the lines of the picture. Well, now, actually, instructions for training the composition:
Practice expressing harmony and disequilibrium, lines of force and placement of the drawing on paper to the point where you feel that you have mastered this step completely.

Based on materials from http://wozmoznosti.narod.ru/drow/yegor/step4.html
Once we see a line, we want to continue it to find out where it leads because we are naturally very curious. This means that lines are a very important part of the composition. Looking at individual lines, it is difficult to determine their direction, but in a photograph we can focus on the edges of the frame. Taking into account the interaction of lines with the frame format allows them to be used very effectively.
Direction
The use of lines in a composition, their position and direction play a huge role in how we perceive an image.
Horizontals
Lines that cross the frame horizontally are usually thought of as passive. We are so used to seeing the horizon line in everyday life that horizontal lines in the frame give us a feeling of stability and peace. Viewing an image from left to right (or right to left) is most natural and familiar, and horizontal lines contribute to this.
Verticals
Lines that cross the image vertically and give it more dynamics than horizontal lines. Because verticals interrupt calm horizontal lines, they can make a photo less easy on the eye and more mysterious. The use of vertical lines forces the viewer to view the composition from the bottom up, which is less comfortable than studying the work along a horizontal axis.


Diagonals
Lines that cross the image diagonally have a more complex effect. They are more dynamic than horizontals and verticals, and therefore impart energy and a sense of depth to the image.


Converging lines
Two or more converging lines give your work a sense of significant depth. This classic way give a two-dimensional image perspective, since we are familiar with the effect of objects shrinking at a distance.


Using Guide Lines
Classic compositional technique involves the use of diagonals or converging lines to draw the viewer's eye into the depths of the image. The most commonly used lines are the result human activity, because compared to elements of the natural environment they are more even. Features such as roads, fences, paths and walls present clear lines in the landscape, while natural features such as rivers and rock formations are less clear-cut alternatives. Leading lines can be used to draw the viewer's eye to a focal point; they can also be used independently to create a more mysterious or graphic composition.


How to get help from your Angel: advice from clairvoyant Arina Evdokimova Horoscope from Arina Evdokimova
Talismans and Family horoscope from Arina Evdokimova
Stewed eggplants with tomatoes and peppers How to stew eggplants with tomatoes
Lavash snacks with fish
Green fish soup made from fresh cabbage with canned fish