And an integral attribute of the holiday. It is installed in every house, in every apartment.
Today we will talk about how to draw a Christmas tree. There are many options, but we will show you the simplest and most affordable ones. In addition, we want to show you how to draw a Christmas tree step by step. Even a small child can use these instructions.
How to draw a Christmas tree?
Option 1
This is probably the easiest way.
First we draw three triangles superimposed on each other.
Then we make the sides of the triangles more curved.
Let's finish drawing the trunk.
We decorate the Christmas tree with garlands and balls.
Option 2
From this line we outline how the tiers of branches will be located.
Carefully draw each tier, depicting needles and branches.
Using an eraser, erase the extra lines.
We decorate the Christmas tree with New Year's balls.

Option 3
Draw a triangle.
At the bottom of the base we draw a small square, below it is a rectangle. This will be a tree trunk and a Christmas tree stand.
To the sides of the triangle we draw lines running at an angle. These are tiers of branches.
We draw the branches, connecting the tiers with a triangle.
Using an eraser, erase the extra lines.
Decorating the Christmas tree New Year's toys, garlands.

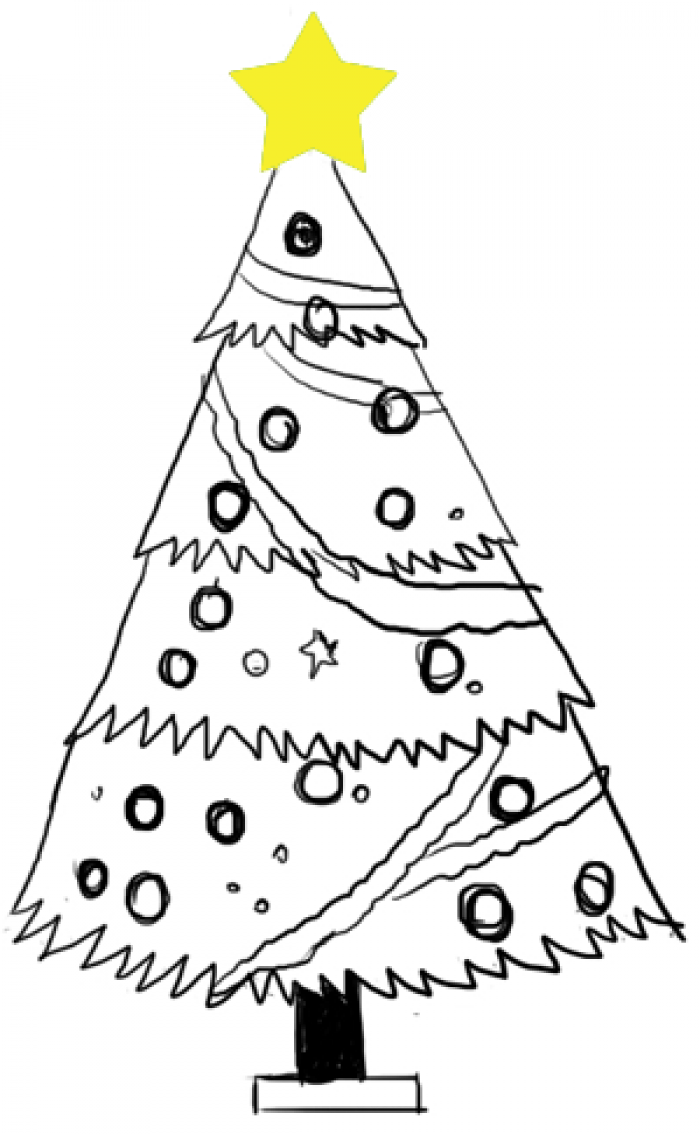
Option 4
Draw an equilateral triangle with a base slightly smaller than the sides.
In the center of the base we denote the trunk.
Using the shape of a triangle, we draw the contours of the Christmas tree.
Use the eraser to remove the auxiliary lines.
We decorate the Christmas tree with garlands, balls, bows, stars, and candies.

Option 5
Draw a vertical line. This is how we denote the axis of symmetry.
We draw several rows of triangles with teeth - this is how we designate the branches.
We draw the branches as shown in the picture, giving the tree splendor.
We decorate the green beauty with toys and draw a stand.

Option 6
Draw a triangle with a rounded base.
To it from below we add three more triangles, a little larger in size, also with a rounded base.
Let's finish drawing the trunk.
Draw branches along the contours of the triangles.
We decorate the Christmas tree with garlands and New Year's toys.

How to draw a Christmas tree step by step?
Option 7
Draw an angle as shown in the picture.
We form a triangle with a base in the form of a curved, wavy line. These will be the branches.
We finish drawing two more rows of such branches.
We depict a trunk.
We decorate the Christmas tree with toys, garlands, balls, and candies.

Option 8
Drawing a Christmas tree this way is also not difficult.
We immediately begin to draw the contours of the tree.
Add a trunk.
We depict a star at the top.
We decorate the Christmas tree with New Year's balls, garlands and other toys.

We told you how to draw a Christmas tree step by step. I think they are simple circuits will help even kids learn how to draw a Christmas tree.
To learn how to make beautiful snowflakes out of paper, watch the video:
How to draw a spruce step by step.
Actually, we have - we seem to have already “been through this”. To this I will tell you - today we are drawing a FIR tree. What kind of difference is that? Well, although these words mean the same tree, a spruce is something that grows, and a Christmas tree is often cut down and on New Year’s Eve they are forcefully invited to join in the fun.
Today we are drawing a whole, living spruce - it grows not far from our house and is getting prettier every year. Thank God, gone are the days when New Year people zealously cut down all the fir trees in the city right in the parks and on the streets. Well, today there is no such thing; my familiar Christmas tree did not survive these times.
True, we will draw from a photograph - a crowded street in winter is not a suitable place for inspired creativity and sketches from nature.
Let me note here that there are no fewer myths about the appearance of fir trees than there are any variants of people. Just as a man is drawn starting from an oval, then from a rectangle, so the spruce, without looking, rhymes either on arcs or triangles. And if you look, the branches are like branches. An ordinary tree: a trunk, branches on it, and more branches on them. When I repeat this for the hundredth time, my students smile, but familiar images, hardened from the cradle, shine in their eyes:

"Classic" images
Well, don't give up.
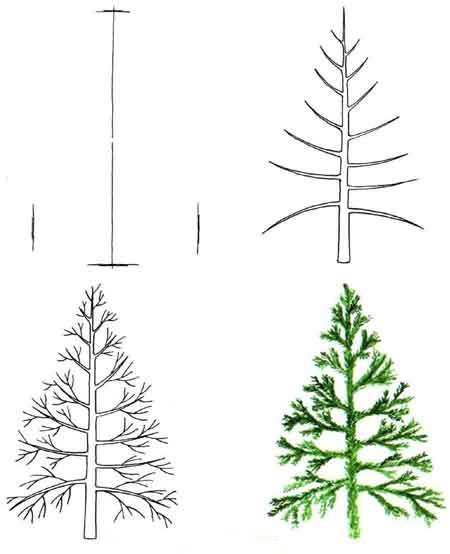
Let's start with a pencil drawing. Let's outline general shape They ate this one specifically. Determine the height of the trunk and the most general outline– the spruce looks like a pyramid because the lower branches are long, and the higher they grow on the trunk, the shorter they are. Let's draw the middle line (trunk) and the boundary lines of the branches:

Now let's outline the branches - exactly where they grow, and observing the angles of their inclination. In general, just like the chosen spruce tree.

Comrades, I beg you very much: do not immediately grab the needles. Everything has its time. Let's first distribute the branches, and let's start with the branches of the first order - that is, those that grow from the trunk.
I will draw pine needles with a felt-tip pen. I'll start from the top of the spruce.

There are few branches, easy to draw. Below, the branches already merge into arrays. Here I'll use a thicker green marker.

The most difficult thing for children is to keep their attention on nature. That is, draw sequentially branch by branch the way they look on the tree. We gain patience and begin to draw small branches. Well, here’s a drawing of a spruce in winter – it looks like its real prototype.

However, let's not limit ourselves to this lesson alone - this is just a training session. Summer is coming - and all the surrounding spruce trees will be happy to pose.
Take a sheet of paper or album, a pencil and an eraser. Ask your child what he will use to decorate the hedgehog and prepare pencils, markers or paints with a brush.
Tell your child the rules of how to work with paints.
- Prepare and moisten the paints with clean water;
- mix paints on a palette (white paper), not forgetting to wash your brushes;
- evenly cover the surface of the background and characters in the composition;
- at the end of the work, wash the brush, do not leave it in a jar of water, but wipe it with a cloth;
- After finishing the paint, put the pencil in boxes or in a pencil case.
How to draw a New Year tree


Step-by-step instructions "Step by step" on how to draw a Christmas tree.

1. Draw a triangle. Now draw a star on the top of the triangle. Leave enough space to add the rest of the tree.

2. Draw the top of the tree, which consists of three branches, as shown in the picture. Don't try to draw too accurately, not quite straight lines will look better. The ends of the branch lines should join the star.

3. Now add two more rows of spruce branches. Moreover, in each subsequent row of branches one more is added. Thus, row 1 - three branches, row 2 - four branches, row 3 - five branches.

4. Then simply draw a bucket under the tree and attach it to the tree using two lines, which will be the trunk of the spruce. Add two lines down the center of the bucket as a ribbon as shown. Erase all auxiliary lines.

5. Draw a bow on the ribbon and draw a ball on each branch. Give the star at the top of the tree a sparkling effect. Our Christmas tree ready! Well done!

6. Now you can start decorating.
Whatever your child draws, be sure to praise him and hang the resulting masterpiece on the wall so that the child feels like a real artist.
How to draw a Christmas tree
We offer a Christmas tree option that you can decorate as you wish.

Send us the resulting drawing by e-mail. Please indicate I.F. child, age, city, country where you live and your baby will become a little famous! We wish you success!
I have chosen carefully several schemes for drawing a Christmas tree various levels of difficulty. Choose the one you like best.
Some of the schemes are in this video!
Method 1
Although the method is the most difficult, but this Christmas tree quite cute. And considering that all kinds of gifts are conveniently nestled under it, it’s absolutely wonderful. This diagram demonstrates how to draw such a Christmas tree step by step.
Method 2
And this is the real one forest beauty, lush, luxurious and so beautiful! I hope the diagram won't be too complicated for you.

Method 3
Here is another New Year tree with big asterisk. You shouldn’t forget about her either. This decoration has already become traditional!


Method 4
This diagram shows in great detail the process of creating a small New Year's masterpiece. First you need to draw a triangle, and on its top a beautiful star.


The Christmas tree needs to hold on somehow. I suggest putting it in a bucket.

All that remains is to add some decorations, toys, bows and, of course, color. Carefully color the Christmas tree. That's all!


Method 5
This tree is based on a large triangle. Attached to it stand, branches, decorations.

Method 6
Another good scheme and again with gifts=)

Method 7
And this one is not bad, slender, curvy, easy to perform. But it's your choice!)

Method 8
The last diagram will help you learn how to draw a Christmas tree in the most naturalistic form.
It seems we have sorted out the Christmas trees. If you don't really love paint, you can make it from paper, cardboard or fabric. Interesting tips regarding how to do this you will find in.


Chicken skewers Chicken skewers with bacon
Mushroom glade salad with honey mushrooms recipe with photos How to prepare mushroom glade salad with honey mushrooms
Very tasty lecho: recipe with carrots
Minced meat for dumplings - preparing hearty meals at home
Honey cake with sour cream