Hello everyone!
The most beautiful time has come, when everything around begins to breathe warmth and the sun warms brighter and more affectionately. And with this comes the first spring holiday, for which we all begin to prepare in advance. Children learn, sign with, create. And we adults are looking online for new and original gift ideas that we can make ourselves and present to our mother, grandmother or, for example, our favorite teacher on March 8th.
Tell me, have you already thought about this question? I think the answer will be yes. Of course, you can go to the store and buy ready-made souvenirs, by the way, I have a blog on this topic.
Or, of course, you can engage in an exciting process and sit at the table and get busy. It turns out that you can create amazing things from hand-made materials that are indistinguishable from store-bought ones. Are you ready for this kind of work? If yes, then let's go.
I suggest that we immediately confess our love to our respected mothers, grandmothers and the female half of humanity in general. And, for example, knit a handmade souvenir in the shape of a heart from beads. It looks both cool and stylish. You can make it in the form of a keychain, or you can package it beautifully in a box. In general, express your feelings.

Take beads or beads with a diameter of 3 mm, and it is advisable to find thin wire or at least fishing line. You can see the entire sequence of work in these pictures.
The craft is simple and you should not have any questions, and if you have, then ask notes below in the comments field.


Or make a candlestick from salt dough, it will come in handy around the house, cool idea).

Gingerbread cookies can be a nice and sweet gift. I have the recipes. Cover them with colored glaze or draw scenes and compositions. Even in my city, master classes on such painting are held in schools and kindergartens.

Here's another paper idea, make a cup with a tea bag.


Or make a tree like this from your palms.

Or here’s another lovely creation in the form of a flower wreath.

On this day you can even decorate the table in a special way, look how great the cups are decorated:

Master class on making a bouquet of tulips from candies
I think you’ve already seen such flowers made from candies, but you’ve probably wondered how and what you can make them from. The most common and easiest option is corrugated paper. In general, in addition to tulips, you can build roses and poppies or other wonderful plants. Well, I have a lot of cool ideas on this topic. Well, now look for step-by-step instructions in pictures on how to create tulips, and then roses, and it will be quite easy to get candy out of them.


The second option is wonderful and bright roses with sweets. Both beautiful and festive at the same time.


What kind of souvenir can you make so that it is useful in the household?
It's no secret that all women are, first and foremost, hostesses, and we love gifts that are useful. Therefore, if you do exactly what we need, we will thank you very much. And here is the first option, this is handmade soap, how do you like this beauty?
We will need:
- baby soap - about 90-100 g
- food coloring - dry
- glycerin or vegetable oil
- aromatic oil -0.5 tsp
- heart or flower shape
Stages:
1. First of all, grate the baby soap on a fine grater and melt it in a water bath or in the microwave until it melts.
Important! The mass should turn out like thick sour cream.

2. Then choose the appropriate color of food coloring and dilute it in glycerin (take 1 tsp per 100 ml of soap) or vegetable oil.

3. Then mix the dye, aroma oil and soap mass.

4. Fill the molds with “dough” and wait 24 hours, and after your souvenir is ready, take out the blanks and give them to your beloved women.

Last year, my sister gave me this pincushion for March 8th, and I was stunned, because it can be made in just a couple of minutes. Use a jar for this, decorate the lid with fabric, and place the padding polyester inside. Isn't it wonderful? And most importantly, it’s simple, beautiful and stylish! And it will definitely come in handy on the farm.


Or you can arrange it in the form of a book.

But my son and his dad made a miracle thing out of their car, I found something similar on the Internet, great! Use foam rubber instead of a pad.

And here’s another idea, a soft pillow in the shape of a cat (the diagram is also shown in the picture). All you have to do is take and sew the product.

How to make the most beautiful gift for mom on March 8th with your own hands
I decided that you would want to give mommy something sweet in any case, it could be something you bake yourself or this bouquet of marmalade candies in a pot.

To work, take gummies and kebab sticks.


And then use transparent film and form a seven-flowered pattern.

This is such a lovely craft.

In addition, you can give a chamomile with wishes (I have a set of 100 petals that can be used for printing, write to anyone who needs it, I will send it).


Or make this magical souvenir that was discussed in the previous article. You can see the entire sequence of actions for assembling it; I send the templates by email.

Using eights, you can easily and quickly recreate such a vase with its contents.

MK folding card for mom made of paper
There are quite a lot of interesting ideas on the Internet, and this one is no exception; such a voluminous card will be an excellent present if you make it yourself and give it as a gift on the day of the holiday. Write inside. In general, watch this video from the YouTube channel and create.
Use the card not only for International Women's Day, but it can also be created for Mother's Day or Birthday.
Step-by-step instructions for creating a topiary for March 8
You can make a topiary in the shape of a figure eight, or you can go the simplest route, buy ready-made roses (or make them yourself) and glue them to a foam ball. A creative work will come out on a jar. I offer a quick version of the craft. If you have time, consider other options, they can be found on the YouTube channel.

We will need:
- baby food jar
- decorative flowers - 2.5 cm in diameter
- stamens
- decorative balls
- foam ball 6 cm
- tile adhesive for ceiling tiles or glue gun

Stages:
1. Pour decorative stones into a Frutoniana jar or other glass container.


3. Take ceiling tile adhesive or a glue gun and go along the marked line. Next, attach it to the jar and secure it.

4. Now the ball needs to be decorated with roses or other flowers, attach them to the glue gun. Start from the middle and so on until you complete the entire craft.

5. As you can see, in just a couple of minutes you will build such beauty.

6. After that, all that remains is to decorate the jar, glue a decorative ribbon and rhinestones around the jar.


The topiary on the jar is ready, it looks cool and very stylish! I wish you good luck in creating it.
Flowers for female colleagues at work on International Women's Day
We continue to surprise our women, and I propose to once again make unforgettable souvenirs from fabric in the form of red tulip flowers, which are shown in this video. It looks like a soft toy, only it’s a bouquet.
Or use another option of biscuit edible roses, it’s very stylish and fashionable. Everyone at work and at home will be jealous of you later. Watch the recipe right now, by the way, your mother will also be delighted with such a wonderful and beautiful gift:
Well, again, since I’m familiar with beadwork, I suggest taking and weaving an orchid.

You will see a master class with step-by-step guidance just below:


Rose made of satin ribbons for March 8th for teachers
We continue to create and this time we are making a modest souvenir for our favorite teachers, these can be teachers or educators, as well as women who are somehow connected with pedagogy. You will need a lot of satin ribbons, I indicated the sizes in the materials, a wooden kebab skewer and be sure to stock up on a lighter and a glue gun.
We will need:

Stages:
1. Start by creating a bud. To do this, take a 5 by 12 cm satin ribbon and use a lighter to go along the uneven sections on each side. Then fold one end into a triangle, and then twist another one from the resulting triangle. You can see this in the photo.

2. Then fix it with tweezers where the line is (see picture). Take scissors and cut.
 Source https://youtu.be/1fqnPn1f8aE
 3. Next, do not release the tweezers, but go over the cut with a lighter. Thus, you will get a figure like the one in the picture below, do the same on the opposite side, that is, do the work by analogy.

4. Thus, you should get 23 pieces, these will be future petals.

5. Next step, make the leaves, fold the satin ribbon in half and cut out the leaf. Then treat all the edges with a lighter, and also make veins; in these places, also go through the flame of a lighter.


6. Now the fun part is assembly, take the petal and apply a glue gun to the center and start twisting it in a spiral. Then take another one and apply glue, I indicated with a black arrow where to do this. Apply to the bud and move again in a circle.

7. This way you should end up with a lush and charming rose.

8. Then turn the workpiece over and drip glue, insert the stick and cover it with green floral adhesive tape. Then finish the flower by decorating it with leaves.

9. The main thing is to take your time so that your creative masterpiece comes out neat and attractive.

10. The result will blow anyone away; it’s impossible to resist such beauty, don’t you agree? And you created such a miracle yourself, success.

How to make a gift from paper for mom in kindergarten
Little hands have already done a lot of such work, remember last time in another note we created and, with which we delighted mothers and grandmothers. Today I’ll show you a few more options for what you can impress.
I suggest you start creating and take these wonderful mimosas as a basis, do them at home or in kindergarten with preschool children. This kind of work can also be done with schoolchildren in primary school. You will need napkins, roll them into balls and fix them with water, let them dry.

Then make leaf blanks from colored paper.


And then bend a sheet of office paper and glue it like this to make a mimosa.


The next work is dandelions. You will need small squares, which you will connect in several layers with a stapler.

Then cut out in a circle and make cuts along the edge.


Cut out leaves from green paper according to the template.

And this is what should happen in the end.

Crocheted gift for March 8th for a friend or sister
Everyone knows that I love to knit, although I don’t have much time right now, as I have a lot of other things to do. In my very creative journey, I started my first creations with napkins. And so I decided this time to show some ideas that I liked many years ago. I hope that you too will be enchanted by this Swan Lake. Catch the description and scheme of work.


 Source http://korizza.net/2011/04/blog-post_8507.html
 To tie a swan you need to use this description.


Here are other interpretations from newspapers and magazines.


Tip of the day! Tie together figure-of-eight potholders, hearts, or coasters.


Craft ideas for moms for elementary school for International Women's Day
Well, now choose what you like best and also create healthy things together with your children. There are quite simple options, like these palms.

Or this plasticine picture, even preschoolers can handle it.


You can also use cotton pads:

Or do appliques with schoolchildren.


Use your favorite technique that all children like - origami - and you’ll end up with a tulip like this on a postcard.

Also use paper napkins with openwork patterns.

Or create a whole flower meadow arrangement.

But look at what an original gift, it’s a paper apron, and inside you can insert leaves with recipes. Decorate with scrapbooking elements.

Or please your mommy with a paper cake, put a surprise or something inside each piece.


Volumetric figure eight made from scrap materials
First of all, I want to show an example that is probably already familiar to everyone without exception; we have already done such a craft in previous ones. Use the kirigami technique, keep the template, I can send it to anyone by email, the image will be more accurate.


To make it easier for you to master the technique of vytynanki, I suggest watching a master class on cutting out a figure eight, which I found on the Internet.
 Source http://www.tutdizain.ru

Here is a masterpiece made from coffee beans.

Well, if you really want to create a huge figure eight, then cut out a number from cardboard and paste it with flowers from napkins just like we did the dandelions above.

Or create a souvenir using the kanzashi technique, if you know this design method.


That's all I have, it seems like the note turned out to be voluminous and I hope it will come in handy more than once. Give gifts to your loved ones not only on holidays, but also at other times. And also say nice words as often as possible and smile. Subscribe to my groups on social networks, set classes and write your opinion.
I wish everyone a sunny day and good mood! Goodbye.
If you just can’t decide how to congratulate girls on International Women’s Day, think about DIY gift ideas for March 8th! Just choose among the many ideas exactly the one you like - they are all fresh, original and will help you pleasantly surprise the fair half of humanity.
DIY gifts for little ones
Little girls, first of all, need congratulations on such bright dates - be sure to tell them about the history of the holiday, about its traditions, to add a touch of learning. The best way for little ones to remember what they heard is, of course, gifts!
Dolls
Since young princesses simply love to play with dolls, give them a toy - not just a simple one, but one made with your own hands! No little girl will refuse such gifts on March 8th - after all, no one else will have an exclusive soft friend like your daughter or younger sister.
For example, you can make a cute Waldorf doll, a toy from nylon tights, popular among Tilda needlewomen with your own hands. All of these toys are quite easy to make—all you need is to have basic sewing and cutting skills by hand.
Braided bracelets
Jewelry is one of the integral attributes of a woman’s image, and for little girls too. This does not mean that you should give your children jewelry - there is a danger of quickly losing expensive items.
Instead of expensive jewelry, try to consider gift ideas in the form of woven baubles with your own hands - they can be easily made from beads, beads, or simply woven from laces using the floss technique. Also, try making bracelets from rubber bands.

On March 8, you can make stylized bracelets - in soft pastel colors and with the number 8 - by the way, turned on its side, it symbolizes infinity, and this sign has recently been very fashionable to use in your wardrobe.
Magic costume
Another gift option for March 8th is a carnival fairy costume! The fact is that all girls love to watch cartoons in which fairies personify goodness, beauty and magic.
That is why every little girl wants to become like her favorite characters for at least one day - March 8th. What is a fairy without wings?
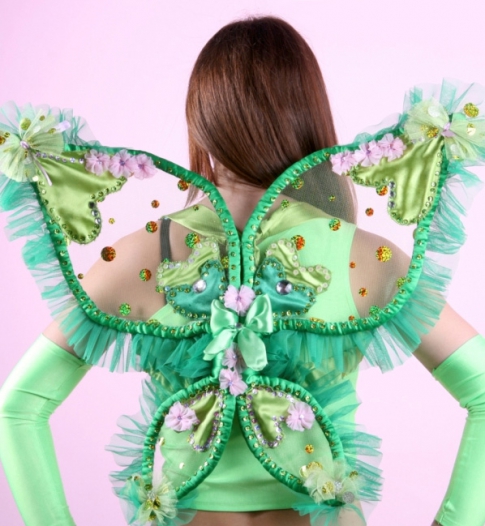
- Take 2 long pieces of thick, flexible wire for the upper wings and 2 for the lower ones. Bend the pieces in half, giving them the shape of wings.
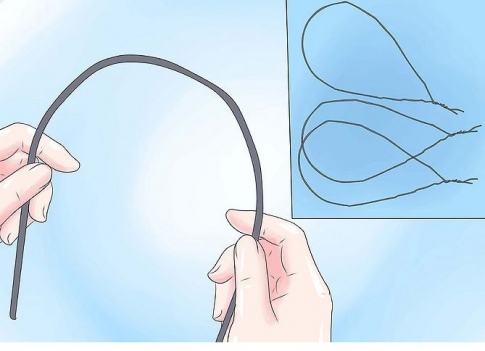
- Cover each wing separately with fabric. Alternatively, take transparent nylon stockings and simply pull them over the frame. Connect the parts with wire. Some needleworkers do not fasten, but sew the parts together.

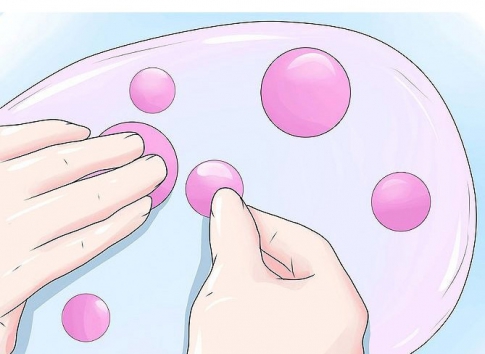
- Use paint, glitter, buttons, beads and feathers to complete your DIY gift.
Don't forget about the magic wand!
Gifts for loved ones
We've sorted out the kids, but what gift ideas can be used for March 8th for adults?
Knitting
Since March 8 is celebrated at the very beginning of spring, the return of frost is still quite possible! Therefore, taking care of the health of your loved ones will be the best gift this time.

show more
The first spring holiday is approaching, and with it the pleasant chores of choosing a gift for March 8th. You don’t have to choose an expensive gift; you can do it on your own and on a modest budget and make an unexpected and pleasant gift with your own hands.
Hand-main is gaining momentum, there are a lot of manufacturing manuals on the Internet, and if you have a natural talent for creativity, then there will be no problems with either the idea or its implementation.

If you don’t have enough ideas of your own, I’ll give you various options - from easy to more advanced:
- Write a poem yourself or with the help of a hired poet (for money), make a beautiful postcard with your own hands and write in your poems

- Bake a cake, decorate it with flowers and a figure eight, brew some fragrant tea and serve on a beautiful tray. If the cake is too complicated, make cupcakes or cookies. It's much simpler, but no worse in taste and appearance

- Knit a warm and unusual mug cover
- Paint the mug with paints or decorate it using decoupage technique
- Tie coasters for mugs so they don’t stain the table
- Weave flowers or trees from beads

- Embroider a picture of voluminous flowers with satin ribbons. That's very beautiful
- Sew a soft toy, for example, a bear or a bunny, and place a tulip or mimosa sprig in your hands
- Surprise your woman with a letter written by you in your own hand. Put it in a box (you can make or decorate it yourself). Can you imagine how surprised your wife or girlfriend will be at such an unusual gift?
- Sew a pillow in the shape of a heart or a regular square shape. Decorate with ribbons and flowers
- Take on all the household chores on this day - prepare breakfast, lunch and dinner, set the table, wash the dishes, take a walk with the children, put them to bed. On this day, do everything that is usually within the scope of your wife’s activities. She will be very grateful to you

- Many girls and even older girls love beautiful notebooks, and if you use scrapbooking when decorating, the gift is guaranteed the highest score
- Make soap. It is not difficult. Soap molds can also be found at home. As a last resort, buy silicone baking molds and use them. Play with color, cover with glitter for manicure
Remember that in addition to the gift, its presentation is important. The beautiful and unusual design will intrigue and delight.
Corporate gifts for March 8 colleagues from newspaper sticks
There are newspapers in every home. With the help of simple manipulations, you can prepare an economical gift option for your colleagues - an organizer for writing instruments.

Prepare:
- Newspapers
- PVA glue
- Corrugated cardboard
- Unfold the newspaper and fold it lengthwise, cut it
- Fold the half lengthwise again and cut with a knife.

- Take a wooden skewer and, starting from the corner, wrap the newspaper onto the skewer. At the very end, glue the corner so that the tube does not unfold
- Let us thus prepare the required number of tubes
- After the glue has dried, take out the skewer and roll the tube into a snail shape.

- We take the next one and apply glue inside, and then push the end of the snail into the cavity of the tube and wrap it further, forming an organizer part
- As you wind it, lubricate the sides with glue. You should get two parts with a diameter of 12 cm and one 9 cm

- We grease them with PVA glue, and until they dry, we form them, bending them in the right direction

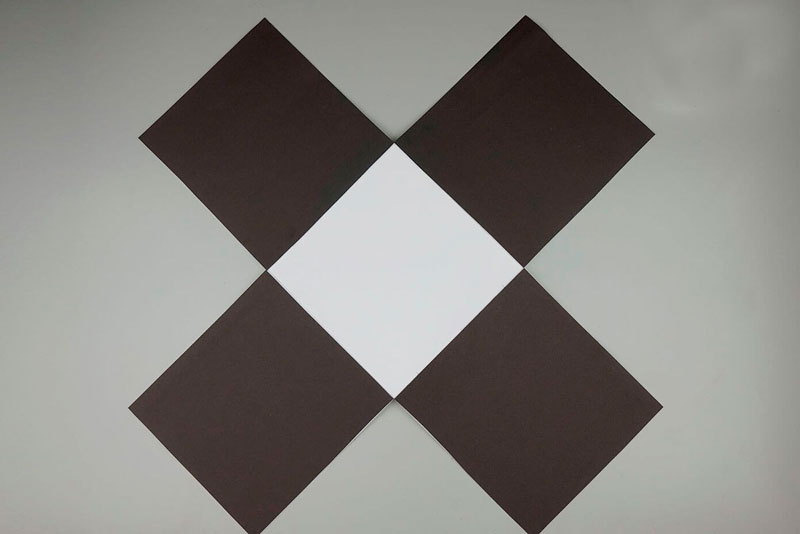
- We cut out parts with sides of 6 and 25 cm from corrugated cardboard, wet the surface with a brush and water and separate the upper part

- We paint the part (9 cm) and corrugated cardboard with brown acrylic paint
- We paint the details in the desired color scheme

- We cover the edges of the finished parts with tape
- We secure the short corrugated cardboard ribs with self-adhesive film

- We assemble the structure - we attach the part to one part with glue, then on the other side, we fix the bottom with glue
- We apply glue to all surfaces, including internal ones. We send it to dry.
How to make paper flowers for mom and grandma in the senior group of kindergarten
In kindergartens, preparations are underway for Mother's Day - children learn poems and songs, prepare dances and skits. And, of course, they don’t forget about gifts for their mothers and grandmothers.
Let's prepare for work:
- Scissors
- Toothpick
- Green paper
- Yellow and white crepe paper
- Ruler
- Narrow tape
- Yellow threads
Let's make daisies. The process is not complicated and entertaining.

- Cut a sheet of green paper in half lengthwise, and then cut one piece in half again. We twist the stem onto the corner of a toothpick for the future chamomile. After twisting the stem, take out the toothpick and glue the thicker end of the stem with tape so that it does not fall apart

- Roll white paper into a roll, measure 10 cm and cut with scissors
You should get pieces made of white with sides 25 cm by 10 cm and yellow 4 cm by 20 cm

- Fold the yellow sheet in half and cut it, then fold it again and cut both edges in 5mm increments

- Fold the white paper in half and cut it. Now we put a yellow strip in the middle and fold it from one edge, then turn it over to the other side and fold it like an accordion. And so, step by step, we make an accordion out of paper

- We tie the middle with a thread and cut off the edges roundly.

- Attach the stem with tape

- We straighten the petals and get a fluffy beautiful chamomile. Make several pieces and arrange them in a bouquet. And if you also make a vase, then the delight will be several times greater.
Video - how to make a bouquet of sweets for International Women's Day for a girl
What girl doesn’t love sweets, and if it’s interesting to arrange them in the form of a bouquet, then it will be two in one - both the bouquet and the sweets.
How to make felt flowers for your sister
Fresh flowers are good, but they don’t last long. But a felt bouquet will delight you for many years. Just blow away the dust.
Let's prepare:
- Green and pink felt
- Basket
- Template for flowers
- Floral wire
- Scissors
- Twine
- Pencils
- Pliers
- Kraft paper
- Plastic mat
Don't worry about looking at the amount of materials needed. Some can be replaced (if you don't have them), some can be simplified along the way. And in general, never be afraid to try something new. You never know what you can do till you try.

- Cut out templates from paper. You can easily draw them yourself in the size you need, and then cut them along the contour

- Using a large template, mark out the details on pink felt and cut them out.

- Cut a strip of lighter shade of felt measuring 1 by 5 cm and make cuts on it at a distance of 3-4 mm

- Apply glue to the middle and connect the two parts. A small detail will serve as a bud for a flower. Roll it into a bud and apply glue to secure it

- We trace the second part on green felt and cut it out. This is a sepal for a rose

- We cut the wire to the required size, string a sepal on it and secure it with glue, and strengthen the rosette on top
- Thus, we will prepare the required number of roses. If you are tired, you can end here. Just combine the flowers into a bouquet, tie it with a ribbon and the gift is ready.

- If you want to continue, then we’ll make a vase. You can buy a basket in stores. Cut a circle from a plastic mat the size of the bottom of a basket. You can also use thick cardboard or other suitable materials.

- We put moss inside, stick roses into it, and shorten the stem to the desired size. Instead of moss, you can cut out polystyrene foam or a thick piece of foam rubber

- Wrap it in craft paper and tie it to a bow with twine. Paper can be replaced with wrapping paper.
We create a beautiful bouquet of tulips from fabric for March 8th for a teacher
The flowers turn out to be very beautiful, almost real, and are wonderfully suitable for a women’s holiday.
Let's prepare:
- Cotton fabrics of different colors for patchwork
- Green cloth
- Cocktail straws
- Threads
- Lighter
- Needle
- Soft filler (holofiber, cotton wool, etc.)
- Scissors
- Paper and pencil
- Ruler
- Double-sided tape
Manufacturing:

- We cut out three blanks from paper with dimensions of 3 * 21 cm, 7 * 12 cm and 7 * 14 cm

- We fold the 7*14 piece in half lengthwise and draw a leaf on it and cut it out. We will cut the leaves using this template

- We mark the details on the fabric according to the templates. For one tulip you will need one 3*21 piece for the stem, 7*12 for the flower and 2 pieces for the leaves.
- If you are going to create a bouquet, then prepare all the details at once, carry out the work in stages

- For the stem, seal one edge using a lighter flame to make the seam look neat

- Place double-sided tape on the opposite edge

- Wrap the tube in fabric. We pin the remaining edges with needles and hem the seam with a needle so that it is not visible

- Let's take care of the leaves. We turn the bottom edge of the part and sew it, then we put the parts together right sides and sew along the edges, turn them inside out, and iron them. It is better to perform this operation on a sewing machine, but if you don’t have one, then manually

- Fold the edge of the fabric for the flower half a centimeter to the wrong side and smooth it with an iron

- We fold the fabric with the right side inward and sew the edge and turn it inside out. The result is a cylinder

- We go along the edge with a needle and collect the fabric, insert the stem inside and tighten the thread. We try to match the seams on the stem and bud and tie the stem and flower together with a thread

- Fill the bud with filler and tie it crosswise with thread. First from one edge to the other, then opposite. Press the corners with your fingers to give shape.

- We apply the leaf to the stem so as to close the seam and hem it with invisible stitches

- We prepare the rest of the flowers in the same way and decorate the bouquet with a ribbon or place it in a vase.
We make a box decorated with famiaran flowers for a gift to a friend
Does your friend like candy? Well, who doesn’t like it, you tell me. What if you present it not in a banal box, but in a box you made with your own hands and decorated with beautiful flowers made of fomiaran? I hope she likes it.

You will need:
- Fomiyaran
- Skewer
- Pastel
We produce:

- On the sheet we measure intervals of 2.5 cm on all sides. Using a wooden skewer, draw all the squares along a ruler.

- Take a pastel of a contrasting color and sketch half of the square, then cut it out

- We round two corners of squares - we get petals

- Curl the petals with a curling iron

- We leave two petals for the bud. We coat it with glue and twist the first petal into the bud, then put it into the other petal and twist it again. Don't forget to lubricate before twisting

- Now we glue the petals in a circle one by one and form a rose. We make several pieces

- For the box we take thick cardboard and colored cardboard. We cut out the bottom, glue the cardboard in a circle - we get the bottom part of the box. For the lid, we trace the top part, cut it out and also paste it in a circle - we get a lid for the box

- Cover the bottom and top of the lid with green cardboard

- We glue a polystyrene foam hemisphere onto the lid, paint it with paint to match the box and stick on the roses. Now we fill it with delicious candies, cover it with a lid, tie it with a ribbon and the gift is ready.
I have given several simple master classes on how to make a gift with your own hands for lovely and beloved women. Such gifts will last a long time and will be useful as an idea not only for a women’s holiday, but also for any other occasion.
It’s better to prepare gifts for March 8th with your own hands in advance, but if you just now remembered about the holiday, choose simple master classes from our selection.
Original ideas and simple handicraft techniques will help you make surprises for friends, mothers, grandmothers, daughters, granddaughters, work colleagues and other women whom you want to please. Don’t be afraid to give handmade crafts to bosses, doctors and teachers. Such things are in price today, and if you think about the packaging, the gift will become even more valuable.
What to do on March 8 for colleagues
Let's start by making simple and small gifts for colleagues on March 8 with our own hands. If the team is large, then you can make small souvenirs for everyone, and come up with something more substantial for close friends and bosses. But here it’s up to you - take into account the relationships in the team and traditions.
A win-win option is cup coasters. The easiest way to make such useful things is from felt. You can make several of these in one evening. You can do the same thing.

For colleagues with whom you have a closer relationship, sew felt keychains. This useful and cute accessory will appeal to women of any age.

Every girl needs a pincushion, even if she doesn't do needlework. The bright one will help keep dangerous needles in order.

A simple and very effective decoupage technique will also come in handy when making beautiful and useful gifts for March 8th with your own hands. If you need something inexpensive and easy to make, we recommend making it from blanks.

For large numbers of employees, try . Ideal for beginners.

You can give it to the team leader and let her hang it at the entrance to her office. Perhaps this accessory will improve the mood of both the boss and the employees called to the carpet.

Amuse your colleagues with delicious food. Wrap it beautifully in cellophane and give it to everyone on March 8th. They look like the real thing, but no one will get better from these!


From adhesive tape sleeves it turns out. The finishing is done with napkins. If there are no bushings, the base can be assembled from cardboard. In principle, this decor is suitable for any box.

Small coffee shops will help out when you have a lot of girlfriends. Sew one for each girl and complete it with a suitable design.

For your most beloved friend, you can spend more time knitting and threading. Delight is guaranteed, just don’t forget to take into account the size of your girlfriend’s gadget.


If your mother has long hair, then please her with a hair clip or hoop. Universal.


Paper is the most popular and environmentally friendly material for crafts. From it you can make almost anything your imagination wants. In this article we will look at how to make paper gifts for March 8th with your own hands.
You will need: colored paper, scissors, needle, ruler, glue stick.
Master Class

Roses made of money
You will need: printed banknotes of any denomination, wire.
Master Class

Box with a surprise
You will need: 3 sheets of A3 format, black paper for pastels measuring 50x65 cm, scrapbooking paper of 2 types (red and with flowers), Moment Crystal glue, pencil, ruler, red satin ribbon, mug, 4 candy bars.
Master Class
- Take an A3 sheet of paper and draw out the diagram of the box.

- Take another A3 sheet and redraw the side edges of the box.

- Take the third A3 sheet and redraw the diagram of the box lid.

- Cut out the parts from 3 sheets.

- Glue the side edges of the box.

- Fold the edge of the lid 2 times inside.

- Secure with glue.

- Cover the sides of the box with black pastel paper.
- Cut out a blank from black paper according to the lid pattern.

- Cover the lid with black pastel paper.

- Cut out 4 rectangles measuring 15x16 cm from black pastel paper.
- Cut 4 rectangles measuring 13 x 14 cm from red scrapbooking paper.

- Cover the inside of the box with black rectangles.
- Place a piece of red ribbon in each direction.

- Glue the red rectangles to the inside of the box on top of the ribbons.
- Cut out a 15x16cm rectangle from floral scrapbooking paper.

- Glue it onto the center base of the box.
- Cut a 13 x 164 cm rectangle from floral scrapbooking paper and glue to the lid.

- Place 4 bars on the sides and tie with ribbons.

- Place the mug in the center, lift the edges and close the lid.

- Decorate the lid with ribbon and tie a bow.
giant flower
You will need: colored thick paper, a sheet of cardboard, scissors, glue.
Master Class
- Create patterns for the petals: 6 large, 6 medium and 6 small.
- Cut out the petals.

- Make cuts at the base of the petals.
- Curl the ends of the petals away from you.
- Flip the petals over and glue the ends close to the cut, forming a natural petal shape.

- Glue 6 large petals together in a circle.
- Glue the middle petals, and then the small ones.

- Glue a piece of cardboard to the bottom of the flower.
- Fold the sheet in half and cut the “brush” from the fold side. Repeat this process with two more sheets.
- Separate and unfold the cut sheets.

- Roll the first leaf, then add the rest to create a core.
- Glue the core to the center of the flower.
Ship made of money
You will need: 7 sheets of A4 format with images of different banknotes (euro, dollars, hryvnia, rubles), white sheets of A4 format, silicate glue, scissors, glue gun, thick cotton threads, skewers 20-30 cm long, polystyrene foam, a flat box of half as wide as the bottom of the ship.
Master Class
- Fold a boat from a sheet of paper as shown in the photo.

- Carefully turn the boat inside out so as not to tear it.
- Fold and iron the boat.
- Trace the outline of the boat on another sheet, then draw a dividing line and cut out 2 parts.

- Coat them well with glue and glue them to the inside of the boat to make two-layer sides.
- Cut the money sheets into 1.5 cm wide strips.

- Cover the boat with money stripes.
- Carefully coat the entire boat with glue for strength and leave for 2 hours to dry completely.
- Place identical bills side by side and glue them together. Make 3 of these - from five, from three, and from four bills. These will be the sails.

- Carefully thread the sails onto skewers and secure the joints with glue so that they do not slip.
- Take the boat and glue 3 pieces of foam inside.
- Insert skewers into the foam for the front and back yard. The front yard should be 1/3 longer than the back. Make sure the lines are level, then secure with a glue gun.
- Insert skewers with sails, placing them at the same distance. It is worth noting that the deck should be smaller than the stern.

- Fold the threads in 2-3 layers along the length of the sail and additional centimeters for the ties.
- Tie the threads to the skewers as shown in the photo.
- Cut 2 bills diagonally and fold the edges 0.4 cm.
- Glue the bills (sails) to the raking threads.

- Make sails on the stern in this way: do not twist the bill into a tube too much, bend the edge, then glue it.
- Fold 3 bills in half, shape them into flags, then glue them.
- Cover the deck with bills.

- Make a stand for the ship from a flat box.
- Glue the desired background onto the box.
- Glue the ship.
Corrugated paper tulips
You will need: corrugated paper of favorite colors for buds, green corrugated paper for leaves, Raffaello candies, double-sided thin tape, green tape, satin ribbon, packaging material for a bouquet, scissors, wire, pliers, a wooden stick, optionally, transparent beads to create dew , glue gun, tweezers.
Master Class
- Prepare the wire by making the required number of stems of equal length.

- Cut long strips of corrugated paper, cut the long strip of corrugated paper into 2 pieces, then cut into 4 pieces. You should get 8 strips, 6 of them will be needed for the tulip bud.
- Turn each strip over the center, folding it so that the right sides of the strip are pointing in the same direction.

- Make 6 blanks in the same way.
- Attach double-sided tape to the tip of the wire.

- Attach the candy to the tip of the wire.
- Assemble a tulip bud in this way: take the first petal and attach it to tape. Place the second and third petals near the candy and, holding them with your fingers, secure with tape.

- Attach the remaining petals in the same way, forming a tulip bud and securing with tape.
- Trim the excess ends of the crepe paper at an angle at the base of the bud.
- Wrap the stem with tape.

- Cut a strip of green crepe paper.
- Cut into two almost equal parts.
- Fold each part 4 times and cut out the leaves.
- Pull each leaf out in a spiral using a wooden stick.

- Place a short leaf and a longer one below. Secure each leaf with tape. The tulip is ready! Make the required number of tulips of different colors.
- Assemble tulips into a bouquet in this way: connect 2 tulips and tie them with tape, then add one tulip at a time, placing the colors in a checkerboard pattern.
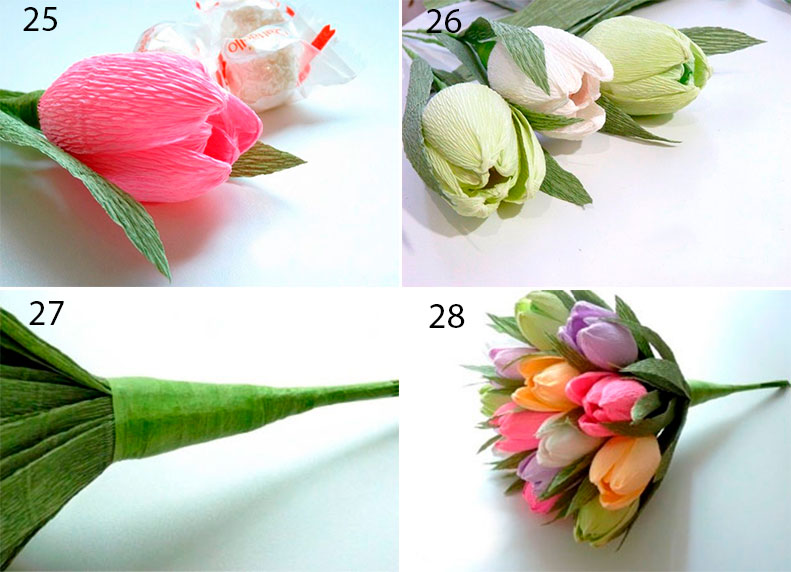
- Cut 20 leaves and place them around the perimeter of the bouquet, securing with tape.
- Wrap the bouquet in wrapping paper and tie with ribbon.

- Create dew drops on tulip buds by gluing clear beads using tweezers and hot glue.
Plate made using papier-mâché technique


Kir Bulychev summary of stories
Rhizomes are underground modifications of shoots
Education of the USSR: prerequisites, stages, significance
Presentation template "ancient Rus'" Presentation on the topic: Kievan Rus
Water bodies Water consumption and wastewater disposal