Drawing on the theme "Space" is an endless field for creative experiments. Depicting the Universe “on canvas”, a small or adult artist makes individual decisions: what paper to use, what colors to give preference to, how to arrange a composition and how to supplement it. Depending on the choice of materials and execution technique, the drawing can be brighter or less pronounced, rich in details or concise and abstract. Space with planets, stars and a satellite, drawn in pencil or gouache, cannot be compared with watercolor in terms of realism. And a small galaxy created with an acrylic paint sponge will be the greatest pride of a novice artist or a talented child. And if you have never had to engage in such creativity before, do not worry. We will tell and show how to draw space in step-by-step master classes with photos and videos.
Drawings with colored pencils or paints on the theme "Space" - a step-by-step master class for children

Children's drawings with paints or pencils on the theme "Space" are a great way of self-realization for the little ones. Depicting the cosmic abyss, colorful planets and fiery comets, children show their imagination, discover new talents in themselves, and show their individuality. And if several different techniques are used in the illustration master class, the process immediately becomes much more interesting, entertaining and informative.
Necessary materials for a children's drawing with a pencil and paints on the theme "Space"
- thick white paper
- black drawing paper
- compasses (or round objects of different diameters - lids, saucers, glasses)
- pencil
- gouache paints (including white)
- brushes of different thicknesses
- stationery scissors
- PVA glue
A step-by-step master class for children on creating a bright drawing on the theme "Space"
- Place a thick white sheet on your work surface. Using round objects of different diameters and an ordinary pencil, draw nine circles on paper.

- Depending on the diameter, the circle will be one or another planet. For example, the largest figure is Jupiter, and the smallest is Mercury.

- Using gouache paints, apply characteristic colors to the circles. You can peep in the children's encyclopedia the real color of the planets, or you can create unusual fantasy planets to your taste.

- When the paint is completely dry, cut out the resulting shapes with sharp scissors along the contour.

- On a black drawing paper (you can use a half), leave splashes of white gouache paint. To do this, take some gouache on the brush and wave it several times over the paper.

- Plan the location of your planets "in space". Lay them out neatly on paper and take a closer look. If you like the compositions, proceed to the next step.

- Using clerical glue or PVA, secure all the elements in place.

- Press each planet firmly with the palm of your hand or a thick textbook to ensure the pieces stick firmly. Do not overdo it with glue so that excess mass does not flow out to the sides. On a black background, the spots will be especially noticeable.

- After the glue has completely dried, remove the textbook and evaluate the result. Drawing with colored pencils or paints on the theme "Space" according to a step-by-step master class for children is completely ready! Photo11
How to draw space in watercolor - an unusual idea for beginners

Using watercolor paints in creating a space drawing is much easier than it seems at first glance. On a wet basis, the colors self-blend into whimsical galactic patterns, realistically displaying wondrous nebulae and fine stardust. Even a child can cope with such a simple fine art technique. And for adults, we offer a complicated option for beginner artists - an unusual idea to paint the cosmos in watercolor in a geometric figure.
Necessary materials for drawing "Space" in watercolor for beginners
- sheet of thick white paper
- water and brushes of different sizes
- watercolor paints
- acrylic paints (black and white)
- salt
- ruler
- protractor
- sharpened pencil
- masking fluid for watercolor (Art Masking fluid)

How unusual to draw space in watercolor - step by step instructions
- Take the “Pacific” as the basis for the image - a sign of peace and love. Using a template from the Internet, transfer the outline to thick white paper. You can also draw a picture yourself using a ruler and a compass.

- To prevent watercolor stains from getting into forbidden areas, use a special masking agent. At the last stage of preparing the drawing, it is easy to remove it from the white area.

- Fill in the sign with masking for watercolor, without going beyond the outlines. Wait for complete drying.

- Thoroughly soak the areas between the axes of the sign with clean water. So the paint will form more realistic "space" stains.

- On one of the wet areas, apply a drop of blue watercolor. Do not make too sharp strokes, let the paint spread on its own.

- Add black watercolor or ink to the blue tones for a natural galaxy effect.

- Thus, fill in all the free areas with colorful stains. When the watercolor dries a little, add a yellow glow and purple reflections.

- Don't be afraid to speak on the white areas of the sign. At the end of the work, you can clean them up.

- Sprinkle the still wet picture with coarse salt. Sprinkle the resulting space with small specks of white acrylic paint.

- When the image is completely dry, outline the outlines of a marvelous space city with a pencil. Using a thin brush and white paint, draw all the lines.

- In the final step, remove the thin watercolor masking film from the white areas of the sign. The contours will become smooth and clear, and the fields will become snow-white.

- Now you know how to draw space in watercolor - an unusual idea for beginners will allow you to create a beautiful panel for your home or a bright postcard for a dear person with your own hands.Photo25
How to draw an ideal space with stars, satellites and planets with a sponge on homemade ceramics

Most often, space is painted with watercolors - quickly, conveniently, and practically. But what if you want to cover a household item that is completely unsuitable for watercolor with a fashionable galactic image? After all, ceramics, wood and other popular materials absorb watery paint, leaving only faded shades on the surface. In this case, it is better to use pigment ink or acrylic paints in a duet with a soft sponge or foam rubber sponge. So the image is successfully fixed and retains its brightness and clarity for a long time.
For information on how to quickly draw space with planets and stars with an acrylic sponge on ceramics, see our next master class with a photo.
Necessary materials for drawing "Space with stars and planets" on home ceramics
- old plain ceramic dishes
- acrylic paints
- spray with water
- sponges or sponges of different sizes
- synthetic brush
- Matt lacquer

How to draw space with stars on ceramics with a sponge and acrylic paints

Another interesting and original option is how to draw space with paints.

Watercolor images of space are good in their own right. They seem to be saturated with a special atmosphere of depth and mystery. But even such seemingly unusual drawings can be made even more entertaining. For example, by combining the space background with the city panorama. You will learn how to paint space for such an original and unusual option in our next step-by-step master class.
Necessary materials for the original drawing "Space" with paints
- thick landscape sheet or watercolor paper
- watercolor paints
- masking liquid for watercolor
- white acrylic paint
- medical alcohol
- salt
- pencil and ruler
- brushes of different thicknesses
- art adhesive tape
- black gel pen

How interesting and original to draw space with paints - step by step instructions
- Draw a horizontal line across the bottom half of the sheet with a pencil. So you limit the area of \u200b\u200bthe picture. From the line up, draw a few slender houses by hand. Don't worry about their symmetry. The more chaotic the structure, the more original the drawing will look.

- Glue artistic adhesive tape under the line. It will serve as a color limiter.

- Paint over the houses with white masking for watercolor. Wait for the liquid to dry.

- Moisten the empty spots on the sheet with clean water. On the wet surface of the paper, dilute various shades of blue: from deep ink to sky blue.

- Add additional colors to different tones of blue watercolor - lilac, pink, green, etc. The galaxy should turn out bright and more or less natural.

- Sprinkle the wet pattern with table salt. As soon as the "space" dries, shake off the grains.

- Using white acrylic paint and an art brush (you can use a toothbrush), leave small white drops on the picture - stars.

- Place drops of alcohol in several places. The substance will slightly wash out the paint and give the image a more complete look.

- Pry off the masking layer with an eraser and remove a thin film. Now the places for the houses are in perfect order.

- With a black pen, draw windows and doors on the houses. Remove the art tape.

- Such an interesting and original version of how to draw space with paints will appeal not only to children. Even adults will enjoy spending time in such an exciting creative process.

How to quickly draw and successfully use the drawing "Space" with gouache

In order to beautifully draw space with gouache and apply it in an original way in a home interior or as a souvenir, you need to make a blank yourself. To do this, you need thick paper and an ordinary wooden hoop. Gently holding a wet white sheet between the circles of the hoop, and then drying it with hair dryers, you will create an ideal field for "cosmic" creativity.
Necessary materials for drawing "Space" with gouache paints
- blank - hoop with paper
- gouache paints
- white cardboard cutouts (feather, polar bear, diamond, etc.)
- good photo
- white acrylic paint
- tinted or printed paper

Master class on the creation and original use of the gouache drawing "Cosmos"

After watching our step-by-step master classes with photos and videos, you learned how to draw space with a pencil, gouache, watercolor or a sponge with acrylic paints. Give the process a little more time, and your drawing on the theme of "Space" with planets, stars and a satellite will be ideal not only for children, but also for budding artists.
Cosmonautics Day and the anniversary of the first manned space flight is an excellent occasion to draw a bright and colorful thematic drawing with pencils or paints together with the children. Alluring ink-blue distance, fiery comets, multi-colored planets and scatterings of brilliant stars ... All this can usually be depicted with a watercolor brush. And then, decorate a school exhibition or a children's corner in the house with fantastic illustrations. For more information on how to draw a simple or complex drawing for Cosmonautics Day for children in grades 3, 4, 5, 6, 7, see our step-by-step master classes.
A simple pencil drawing for Cosmonautics Day in stages - a master class for the little ones

The first orbital flight of a spacecraft with a man (Yuri Gagarin) on board was made half a century ago. Since then, the triumphant march of cosmonautics and aviation began, a series of successful launches of lunar rovers, satellites, rockets, stations and apparatuses. Don't forget to tell the little ones about it by collectively drawing a simple pencil drawing for Cosmonautics Day using our master class.
Necessary materials for creating a children's drawing with a pencil for Cosmonautics Day
- landscape sheet
- soft pencil
- eraser
- colored pencils or markers
Step-by-step instructions for the youngest children on creating a drawing for Cosmonautics Day

Step-by-step drawing "Cosmonaut" for children (grades 3, 4, 5, 6, 7) for Cosmonautics Day

Celebrating Cosmonautics Day, mankind not only admires the acceleration of technological progress, but also honors the memory of all those who have worked and are working on complex theory and “transcendental” practice. The phased drawing "Cosmonaut" for Cosmonautics Day will help children in grades 3, 4, 5, 6, 7 to more clearly understand what they are - heroes conquering space.
Necessary materials for a phased drawing "Cosmonaut" for children in grades 3, 4, 5, 6, 7
- sheet of white landscape paper
- soft tip pencil
- leaf
Step-by-step instructions for creating a drawing "Cosmonaut" for children on Cosmonautics Day

Beautiful drawing for Cosmonautics Day with a brush and paints

Space has always attracted the attention of children. Its blue depth, thousands of bright glows, myriads of stars and dangerous comets with fiery tails seem to boys and girls something magical, fabulous, incredible. Take this opportunity to teach schoolchildren to draw space with a brush with paints for Cosmonautics Day. Surely they will enjoy this activity.
Necessary materials for a bright drawing for Cosmonautics Day with a brush and paints
- half of drawing paper
- pencil
- eraser
- thin and thick brushes
- watercolor paints
- glass of water
- Toothbrush
- white gouache
Master class on creating a beautiful drawing with paints and a brush for Cosmonautics Day

The theme of space is extremely entertaining for children. Even from preschool age, children try to draw bright rockets, comets, planets and so on with a pencil and paints. Sometimes they are happy with the result, but more often they are upset by the failure. Don't stay away. Teach children (3rd, 4th, 5th, 6th, 7th grade) how to draw a drawing for Cosmonautics Day step by step using our step by step instructions.
Every year in early April, schoolchildren are introduced to such a Russian holiday as Cosmonautics Day. This date is famous for the first manned flight into space. To make it more interesting for children to study this topic, competitions are usually held for the best drawing for Cosmonautics Day. " What to draw by April 12? - this question interests many parents and their children.
I have collected for you a bunch of interesting and modern ideas for drawings that children of different ages can repeat, from elementary grades to seniors. Some ideas come with step by step tutorials. I hope you find for yourself
What can you draw for Cosmonautics Day?
Astronaut
How to draw an astronaut in four different versions you will find in.

Space
There are a lot of lessons on drawing space on the Internet, there are both step-by-step photo tutorials and videos. Most often, when drawing space, watercolor is used, because. it is translucent and blends easily.
I like the videos on the channel TILLITH. She has a whole playlist of how to draw space.
Here is one of her videos:
There is also a step by step on my site.


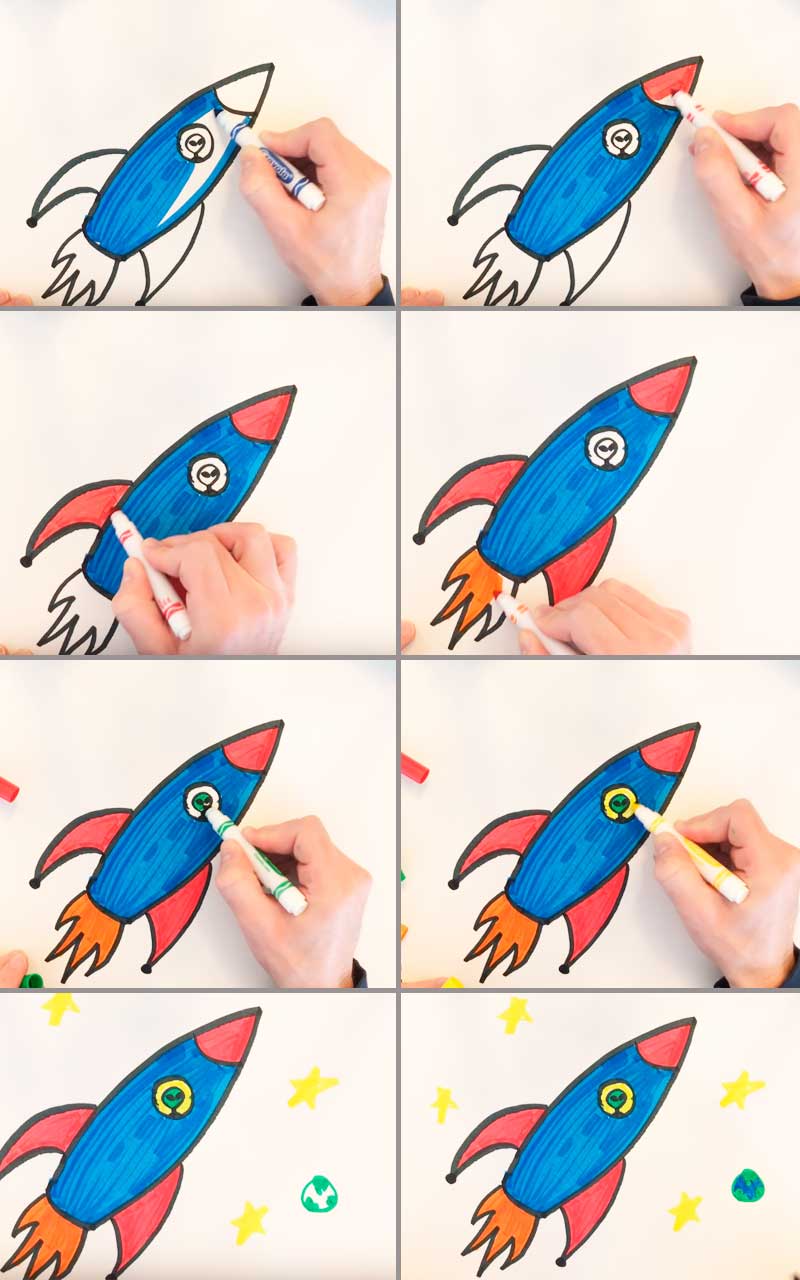
Rocket
In a recent tutorial, I showed:

Satellite

I found how to draw an artificial satellite with colored pencils on the site prodelkino.ru.
planets
The planet is easy to draw, but it always looks epic, especially if it is beautifully painted.

Below is a step by step tutorial how to draw a planet like saturn.
Step 1
First draw a nice and big circle to illustrate the volume of the planet. Leave some space on each side to draw the rings later.

Step 2
Now for the rings: draw a long and thin oval shape in the center of the circle. You can tilt this shape (nearly a 45 degree angle) to make the planet look more inviting. 
Step 3
Now transform the oval shape into a beautiful and sharp ring. Gently erase the extra lines.

Step 4
Then add some lines on the planet to create different stripes of gas. You can also add a couple more rings. 
Step 5
Use several colors of orange and yellow. The combination of these colors will make the planet more realistic. 
Step 6
The last step is to add shadows: one on the right side, one under the ring, and one behind the planet on the right side of the rings.

A beautiful, colorful and voluminous planet, drawn in just six simple steps, is ready!
Orbital station

You will find a lesson on drawing a station.
Galaxy
space doodles
This direction in drawing arose not so long ago and now it is mega popular. Verbatim doodle- these are dashes, scribbles, meaningless drawings that are created mechanically, thinking about something else. Drawing space objects in the doodle style looks very welcome. Here are a few examples that you can easily repeat with a black helium pen. And if you then color the drawing, then you have every chance to take first place in the competition for the best drawing for Cosmonautics Day!


Images taken from pinterest.com.
comet
moon with starry sky
I hope that you have found an interesting idea for drawing for Cosmonautics Day. Connect your imagination and you will succeed!
We meet any event prepared! But it seems to me that for many children Cosmonautics Day is not “any” holiday, but the most beloved one. Some of the kids dream of becoming an astronaut, others think that when they grow up, everything will be like in science fiction films, where the Cosmos is conquered and any interstellar travel will be real. And still others just love the stars, love to look at them.
So, it's time to start preparing for the most unusual day for the little ones. And on the agenda. I will show the options, and you and the baby yourself choose what to draw. And go to posts with, there are a lot of simple and interesting crafts.
It is impossible to imagine traveling to other Galaxies without Ships! Our kids will become designers of the interstellar flotilla! Will it be difficult for the baby to complete the rocket? It's not difficult at all if we show you how to do it. Then our child will even be able to independently complete the task and draw a rocket with a felt-tip pen or pencil in kindergarten.

But the baby will be able to paint the finished picture without our help.
And if you add a little context: stars, the Sun, planets, then everything will become very, very realistic!
I like this picture in my notebook:
Astronaut
In order for the Astronaut to turn out “like a real one”, we must tell our kids about his equipment, in which he goes into outer space and travels to unknown planets. Why do you need a pressure suit? How and with what does an astronaut breathe in his huge overalls? This is very interesting information. In addition, she is able to make the picture very believable.
With a drop in pressure, it becomes more and more difficult for the human body to absorb oxygen; an ordinary person can be at an altitude of no more than 4-5 km without any problems. At high altitudes, it is necessary to add oxygen to the inhaled air, and from 7–8 km a person should generally breathe pure oxygen. Above 12 km, the lungs completely lose the ability to absorb oxygen - pressure compensation is required to rise to a greater height.

Suits will help with this. The space suit, in fact, is a sealed bag in which excess pressure is created. It consists of two shells. It is difficult to come up with a better analogy than a soccer ball: a leather outer cover protects the inner rubber chamber from football boots and ensures that the geometric dimensions of the ball remain unchanged.

So our astronaut is ready, it remains to color him. You can draw a rocket next to it and color it.
Of course, it would be nice to draw a background.

Toddler Option:
Alien
Here is the easiest tutorial. It will completely master a 5-6 year old.

And an understandable video lesson for children from 5 years old:
Stars, planets
And here you can not do without the color scheme. By mixing red, blue, cyan, we get unique space landscapes! If you use a sponge, you can make real clusters of stars, galaxies and other space bodies. Comets look perfect against this background.
Another wonderful master class - watercolor planets:
There is an amazing assistant in this genre for all young artists - wet watercolor painting.
Then you get amazing divorces, multi-colored paints simply mix like a galaxy, creating the very patterns that (most likely))) see astronauts in outer space *. And if you sprinkle salt on top of a wet watercolor, you get a really interesting option.
BY THE WAY!!! Such background sketches are ideal not only as a view of the stars / planets, but also as a view from the PLANET.
Just imagine our kids/astronauts exploring a newly discovered system; descended to the planet, and this is the picture they see in front of them!

The picture at the top left is the red space from here.
We are constantly collaborating with our little ones in creating interesting and informative works. Join us, subscribe to articles, and you can fruitfully spend time with your children! And if you liked the article, tell your friends about it!
Wonderful ideas from the Internet of drawings on the theme of Space for inspiration.
In fact, there is absolute darkness in the vacuum of space. And all the pictures that we see are additionally decorated with spectral colors.
You can approach the task creatively and draw a space cat that plays with a ball - the earth.
Showing publications 1-10 of 235 .
All sections | Space. Drawing classes, space drawings
Target: Development of the ability to differentiate the blue color and its shades - blue and purple. Tasks: 1. Development of auditory and visual perception 2. Development of the ability to navigate on a sheet of paper;. 3. Development of creative activity and imagination; 4. Development of color perception ....
Abstract of GCD on drawing in the preparatory group for children with TNR "Flying saucers and aliens from space" Synopsis of the GCD on artistic and aesthetic development in the preparatory group of compensatory orientation for children with TNR Topic: "Flying Saucers and Aliens from space» Age: preschool group (6-7 years old) Target: creating conditions for the development of imagination and ...
Space. Drawing classes, space drawings - Summary of non-traditional drawing classes in the preparatory group "Colorful world of space"
Publication "Summary of a lesson on non-traditional drawing in the preparatory ...""Colorful world of space". Topic: Multi-colored world of space Form of occupation: game. Purpose: to introduce children to non-traditional drawing techniques using stencils, templates, forks. Tasks: - to consolidate the skills and abilities of working with paints; - develop...
 MAAM Pictures Library
 It was worth living! We have lived up to this! It was worth living! Wait, hope, think, work, try, So that the first of us Could pave a brave path Through outer space. Into this region of no-star, soundlessness, mysterious darkness He ascended for the first time by the flight of an unheard-of...
Abstract of a lesson in drawing with non-traditional techniques with children of senior preschool age "Cosmos" Purpose: unleashing the creative potential of children through non-traditional drawing techniques. Tasks: Educational: - to improve the technical skills of children in visual activities; - learn to experiment with different art materials. Developing: -...
 I decided to show how to draw space with children. Well, how to draw, spray. Suitable for cosmonautics day. Or just as a drawing lesson in an unusual sense. We need gouache, black cardboard (and they are not often used as usual) water (a few jars, a brush and ...
Space. Drawing classes, space drawings - Photo report of drawings "We vote for peace on the planet" in the senior group
 September 3 is the Day of Solidarity in the Fight Against Terrorism. Events dedicated to this day were held in our kindergarten. Parents and children prepared a wall newspaper and drawings together. We vote against terrorism. The phenomenon of terrorism has accompanied mankind for many centuries....
 Technique: palm typing Purpose: to generalize and expand children's knowledge about friendship. To fix the technique of drawing "printing with a palm." Enrich the vocabulary of preschoolers (friendship, clarity, understanding, affectionate words, introduce children to the secrets of friendship. Develop social feelings (emotions ....


The State Duma. Historical excursion. Third State Duma The only State Duma that has worked for a full term
The biological role of nitrogen
Why is it warm in summer and cold in winter Fixies Why is it cold in winter and hot in summer
Science and experiments for children: what are chemical reactions
The collapse of the Roman Empire into eastern and western Why did Rome fall